Going German, High Planes 1/72 Me 262 V3

Started by Magnus Fridsell · 33 · 8 years ago · High Planes, Messerschmitt 262
  • Profile Photo
    Magnus Fridsell said 8 years, 12 months ago:

    Time for a new challenge! I've had the High Planes 262 prototype kits (there are two of them, the V1 and the V2/V3) in my stash for at least a decade so this feels like a golden opportunity to get one of them done! Consensus seems to be that the V1 was mostly natural metal finished - I'll go for the V2/V3 then :)!


    High Planes two prototype boxings...


    ...of which I plan on doing this one in its V3-guise (lots of photos of that one!)...


    ...and here are the contents: blue plastic (I absolutely LOVE it!), white metal landing gear and one vacformed canopy (no margins for slipping here...). Finish it off with a tiny but complete decal sheet and we're set to go!


    Cockpit...


    ...fuselage...


    ...and the rest of the bits and pieces!

    Regards

    Magnus

  • Profile Photo
    Magnus Fridsell said 8 years, 12 months ago:

    I've spent the last week doing some very typical High Planes-modelling-handiwork: making stuff fit! The engine nacelles needed the removal of quite a lot of plastic and the complex fit to the wing contour is far from perfect. I do however have an ample supply of Milliput that will come in very hand in this situation!

    While on the subject of the nacelles, here is some further work:

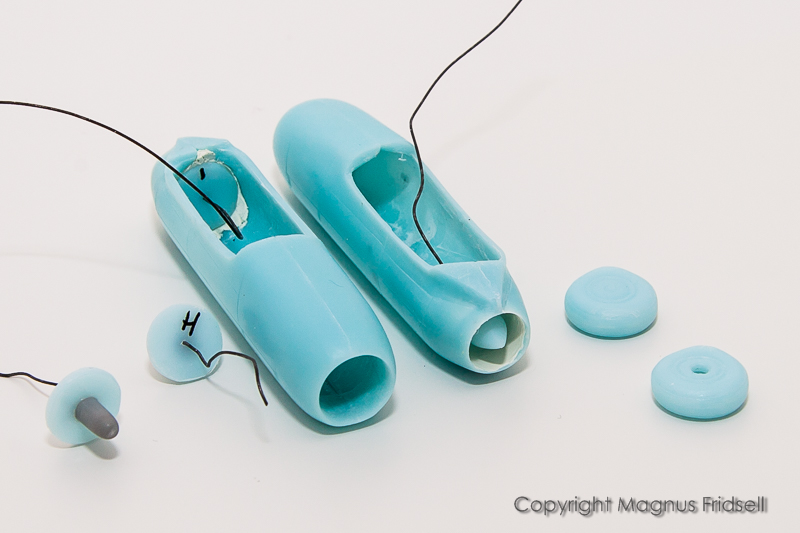
    The early prototypes doesn't seem to have had the same petrol starter motor in the inlet cone as the later aircraft but the cone is still there. Due to mismatching mould halves, these were easiest to do from a piece of sprue. The efflux cones are a bit more complex in shape and could be saved by careful filling and sanding.

    The inlet cones and their blanking plates fitted quite well while the outlet channels were both uneven and far to short, making the efflux cones protruding too far out. I used Milliput to build up the channels, manipulating it using a very handy rubber-tipped sculpting tool, recommended by my friend Johan the Figurepainter and bought at a local art-supply shop!

    The black threads going in all directions in the photo are florist's wire that I use for centering, holding parts together, and when all is glued they make a nifty handle as well!

    The wheels have also been cleaned up and glued, more detailing to be added later in the project!

    Regards

    Magnus

  • Profile Photo
    Magnus Fridsell said 8 years, 12 months ago:

    I've spent my time lately doing some rather sensitive panel-line restoration, the result of which doesn't lend itself that well to photography...

    However, yesterday I finally turned my attention to the cockpit! The kit-supplied tub, combined with some fake detail painting, is probably OK under a closed canopy but I had all kinds of bits and pieces from some old Eduard etch sets (bought for next to nothing at a closing sale more than a decade ago, you never know when those things might come in handy!) that I could use to dress it up a bit further!


    Stick is again from florist's wire (I have still not run out of my supply of it πŸ™‚ ) with a handle shaped from a blob of super glue. Etch from a 1990's vintage 262 two-seater set by Eduard. I haven't found any photos of the 262 prototype cockpit (even when checking my copy of "German aircraft interiors 1939-1945", the one volume my wife usually pulls out from the bookshelf with an amused smile just to demonstrate my level of madness πŸ™‚ ) but I assume it should look quite like the serial production machines sans gunsight and certainly without the central square part that extends below the panel that I am almost sure was the bomb selector panel. Used only for the bomber versions that at this stage of development were far into the future!

    By the way: the deflected pedals are actually intentional, I'll set the rudder a bit offset to add some interest!

    Regards

    Magnus

  • Profile Photo
    Gregor d said 8 years, 12 months ago:

    You like a challenge Magnus! This looks like a real interesting and different build. I'm returning more to 1/72 kits, although I stick to the mainstream manufacturers like Airfix. Good work so far, and good luck πŸ™‚

  • Profile Photo
    Magnus Fridsell said 8 years, 11 months ago:

    Gregor! Nice to have you along for the ride! And even if you limit yourself to "mainstream-Airfix", you have many nice builds ahead of you πŸ™‚ !

    Spent tonight preparing for a painting session tomorrow!


    Parts on sticks, at least the cockpit!


    I've filled in the parts using pc where the plastic hasn't reached out into the corners of the moulds. I've also restored the panel lines on the lower surfaces, something I seldom bother with!

    Regards

    Magnus

  • Profile Photo
    Simon Whitney said 8 years, 11 months ago:

    Looks a hand full Magnus, but I am sure you can make this another masterpiece.

  • Profile Photo
    Magnus Fridsell said 8 years, 11 months ago:

    Simon! Thanks for your confidence in my abilities πŸ™‚ ! It is not as bad as it looks though!

    Regards

    Magnus

  • Profile Photo
    Magnus Fridsell said 8 years, 11 months ago:

    Simon! Thanks for your confidence in my abilities πŸ™‚ ! It is not as bad as it looks though!

    Regards

    Magnus

  • Profile Photo
    Gregor d said 8 years, 11 months ago:

    Great progress Magnus. I look forward to the next update!

  • Profile Photo
    Magnus Fridsell said 8 years, 11 months ago:

    Gregor! A bit of paint even if it is dark grey...

    Regards

    Magnus

  • Profile Photo
    Magnus Fridsell said 8 years, 11 months ago:

    One major waypoint passed: engines have finally been mounted to the wings!


    After painting the internals of the engine pods black for shadow, I used AK Interactive "True metal" for the intake bullets and the insides of the intakes themselves (I assume they were left in bare metal in order not to risk paint flakes going into the engine). The tubes came in very handy as a temporary support for the photos as well!


    A close-up and also a view of the interior with instrument panel installed...


    ...and finally the rear end of the engine pods showing exhaust cones! A bit metallic-shiny but they'll be toned down using the airbrush later.

    I suspect the "True metal" is the equivalent of "Rub'n Buff" (which I have never tried), it's a wax paste the consistency of thick oil paint that can be applied using a brush and then polished. I'll experiment more with it in the future but for the purpose of applying a metal finish to a small part it was very convenient!

    Now on to filling around the pods...

    Regards

    Magnus

  • Profile Photo
    GΓ‘bor SzabΓ³ said 8 years, 11 months ago:

    Interesting subject and the kits seems on the not-too-easy-side to me πŸ™‚

  • Profile Photo
    Magnus Fridsell said 8 years, 11 months ago:

    GΓ‘bor! It's not as bad as it looks and a quite fun build!

    Filling and sanding...


    Using tape to limit...


    ...damage to the surrounding surfaces! I'm back to Milliput for this work, it fills both gaps and holes and containing no solvents it can be applied as thick as you need without shrinking or melting the plastic!


    Not bad after an hour of sanding... I'll check final result under a coat of primer!

    Regards

    Magnus

  • Profile Photo
    Gregor d said 8 years, 11 months ago:

    Good work Magnus, this one is progressing quickly.

  • Profile Photo
    Simon Whitney said 8 years, 11 months ago:

    Great going Magnus, the old coat of primer shows up the ills as to speak.