GWH 1/48 Devastator – FINISHED

Started by Eric Berg · 173 · 3 years ago · devastator, dive bomber, Douglas, Great Wall Hobby, GWH TBD-1 devastator, Lt. John C. Waldron, Midway, T-16, TBD-1, TBD-1 Devastator, torpedo, torpedo bomber, VT-8
  • Profile Photo
    John vd Biggelaar said 3 years, 3 months ago:

    You must have spent quite some time on masking the canopy, Eric.
    At the end it will make it look great.

  • Profile Photo
    Spiros Pendedekas said 3 years, 3 months ago:

    The masking looks really nice, Eric @eb801.
    Now the ultra-delicate job of separating the vacanopy pieces is coming.
    Looking forward to this!

  • Profile Photo
    Eric Berg said 3 years, 3 months ago:

    PAINT SHOP TIME
    I'm almost done cutting apart and sanding clean that vacanopy. Yes, it is tedious and one slip of the blade and -uh oh - but so far so good. I did manage to botch the windscreen so I will just use the clear plastic piece which actually looks better. In between the cutting and masking I have started painting this beast.

    The other night I finally watched, the 1941 movie "Dive Bomber" that actually has a decent and enjoyable storyline. More important it's a wealth of visual painting info for the final months of the yellow wing era. Never expected the stars of the movie to be a SBU Vindicator with the Absent Minded, Professor Fred MacMurray as the pilot. Plenty of Devastator action as well.

    Using acrylics as usual, I going with Vallejo faded UK P.R.U. Blue for the topside and USN Lt. Grey for the undersides, mixed from Tamiya Sky Grey and flat white. I already preshaded outer wings and then sprayed them with an initial thin coat of blue. I'll hit them again later. The fuselage and center wing is now primed using Model Master grey primer for the first time. Hope it doesn't pull up. Tires and landing gear already painted ready for installation.
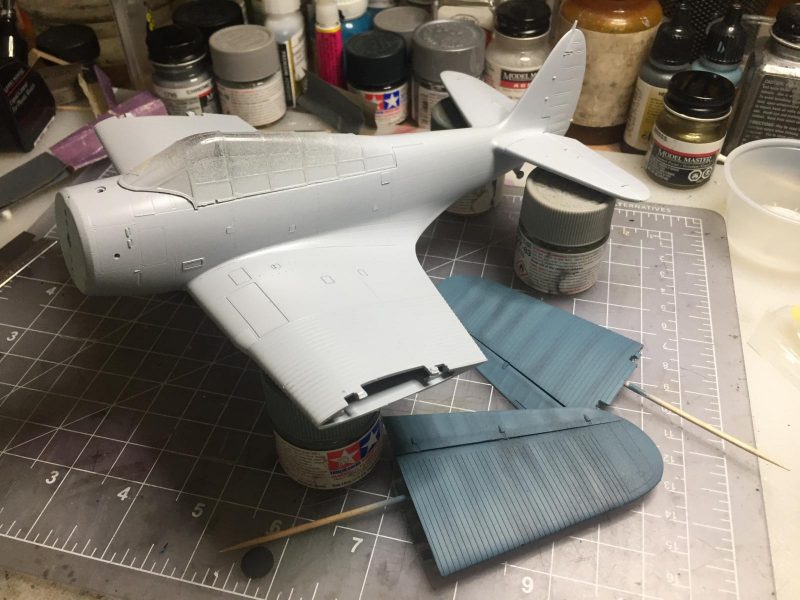

    Onwards!

  • Profile Photo
    Tom Cleaver said 3 years, 3 months ago:

    And, rounding the final turn, he thunders toward the finish line with a Great Result.

  • Profile Photo
    John vd Biggelaar said 3 years, 3 months ago:

    Great progress, Eric.

  • Profile Photo
    Spiros Pendedekas said 3 years, 3 months ago:

    Looking great, Eric!

  • Profile Photo
    Eric Berg said 3 years, 3 months ago:

    PAINT SHOP UPDATE
    Everything is down in the paint shop where the Devastator is now masked off, primed, preshaded and ready for the final spray job.

    Thanks to John vB. for suggesting those plastic sanding needles and Spiros for the folded wet sandpaper idea. Both worked very well. Between those two tools, I think i succeeded for the most part in getting rid of those awful seams on the leading edges of the wings, or at least toned them down. Managed to separate the vacuum canopies without trashing them except for the windscreen, darn it. I will use the kit part instead.

    Next post will be the completed paint job. Here's where I am now:


  • Profile Photo
    John vd Biggelaar said 3 years, 3 months ago:

    Great paint result already, Eric.
    Can not wait to see the entire plane being painted.
    On the pictures the seams look entirely gone. Very nice.

  • Profile Photo
    Spiros Pendedekas said 3 years, 3 months ago:

    Very nice results so far, Eric @eb801! The seams have disappeared and the paint looks great, as well as your transparencies.

  • Profile Photo
    Erik Gjørup said 3 years, 3 months ago:

    Those leading edges turned out very nice Eric (@eb801). Looking forward to the painted vac-canopies.

  • Profile Photo
    Eric Berg said 3 years, 3 months ago:

    Moving along, round one of the basic painting top and bottom has been completed along with the wings and canopy pieces. I like how this acrylic Vallejo Model Air PRU Blue lays down. Nice and smooth with a couple drops of their thinner mixed in.

  • Profile Photo
    Spiros Pendedekas said 3 years, 3 months ago:

    Looking great, Eric @eb801!
    I love how your Devastator is coming along.

  • Profile Photo
    John vd Biggelaar said 3 years, 3 months ago:

    Really great, Eric. @eb801
    Even after round one it looks nice.
    Those Vallejo acrylics are indeed very nice.
    What mixture rate did you use? Personally I use a 2:1 ratio in most cases.
    Looking forward to the next round.

  • Profile Photo
    Eric Berg said 3 years, 3 months ago:

    John: I followed the thinner instructions more or less. 10 drops of paint to 2-3 drops of thinner. I think I like this stuff better than Tamiya paints.

  • Profile Photo
    Eric Berg said 3 years, 3 months ago:

    DECAL WARS:

    I am using decals by Techmod because I read so so many negative comments about the GWH kit decals. Overall I am not too impressed these either, although they lay down great once you get them in place. My main complaint is the decals take forever to loosen up from the thick carrier backing and the bigger pieces tend to crack apart like the wing walkways. The tiny stencils often fold up and one has to wrestle them into place. Almost not worth using most of them. However Techmod has designed these to fit much better than the kit decals so that's a real positive, but overall, I can't recommend them. There are better decals out there.

    Next up: more detailing, touch up and off to the finish line.