Messerschmitt Bf 109 F-4, Spanish AF, Zvezda 1/48

Started by Erik Gjørup · 101 · 2 years ago · 1/48, airbum, Bf109, Friedrich, halfworks, Messerschmitt, Morón, quarterscale, Spain, Spanish AF, WWII
  • Profile Photo
    Erik Gjørup said 3 years, 6 months ago:

    Moving on!

    Having left the “Kindergarden” almost two months ago, it is high time to let you know where it is headed!

    Well – Spain. It will become 6O135 with the Spanish Air Force at the Fighter School at Morón in 1943. That is one of the camouflaged examples in the SBS sheet for some Spanish Friedrichs. You may have seen it in the “Messerschmitt Bf 109 Werke” topic in this Group, and so I shall let those who want to know the progress so far check it over there.


    This is one of the last pictures I posted back then, and that was the status quo till today, except it had its windscreens added.

    Two of the choices in the SBS decals


    And the last one will have to wait for the appropriate kit being started.

    Now, I have been ordering some parts for this one.
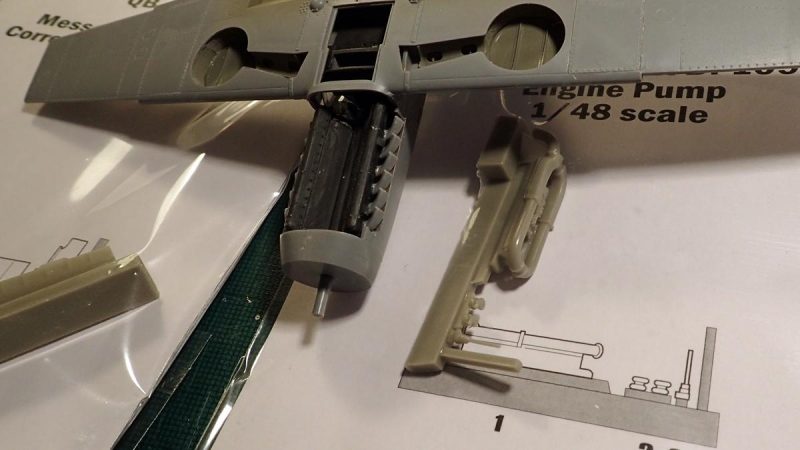


    There are some nice ailerons and an air-intake, I will decide later if they are for this build. The seat and wall are too late for this build, but with more Zvezda Friedrich’s in the stash it will be useful later on as the Zvezda is not all that correct for this version. The Engine Pump set will come in handy as the oilcooler is intended to be left open on this build.

    and that gets yet another HalfWorks 109 on track. Stay tuned for the journey, and feel free to leave a comment

  • Profile Photo
    Tom Cleaver said 3 years, 6 months ago:

    Gonna be very interesting in Spanish markings.

  • Profile Photo
    Spiros Pendedekas said 3 years, 6 months ago:

    I love Spanish markings a lot, my friend @airbum (I think I had voted for them at Der Kindergarten).
    This is a good progress and I like all those goodies you 've accumulated!

    There are some nice ailerons and an air-intake, I will decide later if they are for this build

    ...not to worry, they will be used for sure at Halfworks!

  • Profile Photo
    John vd Biggelaar said 3 years, 6 months ago:

    Good choice, Erik.
    This will become another good looking 109.
    I'm interested in where you bought those add-ons.

  • Profile Photo
    Erik Gjørup said 3 years, 6 months ago:

    Thank you gents - I like this camo color a lot as opposed to the more usual single (dual) color ones. Will indeed be interesting with the camo and those bright markings on the wings.

    Spiros (@fiveten), most certainly will be used later on.
    John (@JohnB) these are Quickboost and most major shops have them - like Modellbau Koenig in Germany or Hannants in England. I do think they are available direct from the manufacturer too. (uncle google will bring you there) As it happens mine were from Hannants and I often buy extras whenever I place an order for something (an new release to add to the ever growing stash?) to bring my order up to the free-shipping line 🙂

  • Profile Photo
    George R Blair Jr said 3 years, 6 months ago:

    Spanish red and yellow markings really stand out on almost any paint scheme, Erik (@airbum), and SBS Decals are really good. I have the same decals and plan to do one at some point in the future after the lengthy queue of models already in line to build goes down some.

  • Profile Photo
    Erik Gjørup said 3 years, 6 months ago:

    George (@gblair), I think you mentioned the decals and your thought to make the sand one - that will surely be a great one too. Very nice colors I think.

    Anyway, another update about to show up on this topic - stay tuned.

  • Profile Photo
    Erik Gjørup said 3 years, 6 months ago:

    Hot air!

    The highly detailed engine on the Zvezda kits lack a major detail!

    Quickboost to the rescue;


    Their part is a drop-in replacement, fitting rather nicely.

    I made the big mistake of not installing it before adding the nose, and it got a bit tricky to get it installed.


    Turned out OK though. The “snail” on the side of the engine is to let out “oilsteam”. It all got a round of Humbrol 85 (I had to load the airbrush for the fourth blade on my mustang)

    And whatsnextthen? – tune in and check later on as I do not know it right now

  • Profile Photo
    Spiros Pendedekas said 3 years, 6 months ago:

    I see you made good use of your "magic hands" mode to perform this delicate installation, my friend @airbum!
    Looking great!

  • Profile Photo
    John vd Biggelaar said 3 years, 6 months ago:

    Compliments on getting it done this nicely, Erik.
    It fits perfectly.

  • Profile Photo
    Erik Gjørup said 3 years, 6 months ago:

    Thank you for the kind words John and Spiros. It really was not all that complicated, but if I had installed it before assembling the nose-section, it would have been a real no-sweat affair; just saw the excess from the pour, and cut off the ends to open up these, and pop it in. Any trouble here was self-inflicted 🙂

    Thanks @JohnB and @fiveten for the comments.

  • Profile Photo
    George R Blair Jr said 3 years, 6 months ago:

    I agree with John and Spiros, Erik (@airbum). If I had found something missing during the build, it would have been a major project trying to get it fixed. Nicely done.

  • Profile Photo
    Erik Gjørup said 3 years, 6 months ago:

    Thanks George (@gblair), it was rather easy this time though as the resin part fitted right in place after being sawn off the casting block. Update comin' right up.

  • Profile Photo
    Erik Gjørup said 3 years, 6 months ago:

    Fitting and filling

    This morning saw another panel and some Liquified Styrene added to the Friedrich

    I had cooked a brew of Liquified Styrene (LqS for future references here) some time ago by pouring some thin glue (old Humbrol pot I got from @klavs1972) and added some cuttings from the sawn off pieces from the Spittschmitt.

    First off, the lower hatch got a testfit – It did not want to fit at all


    but a few runs with a fine sandingstick did the trick

    Then there was some sinkmarks to attend to – a cocktail stick was dipped in the jar with LqS


    Some of it was just added as a blob, some drawn along the longer sinkmarks, and the stick was rolled over to even it a bit. I may have made my brew a bit thin, but that can easily be solved by adding sprue to the jar.

    I have bought a pair of radiatorflaps to make the slot in the upper one as it was on the Friedrich’s


    But they were rather loose fitting, and a tiny bit off angle, so a pair of evergreen shims were glued in place.

    The glue/LqS have to fully cure, then some sanding and we can get flappin’

  • Profile Photo
    Spiros Pendedekas said 3 years, 6 months ago:

    Nice progress, my friend @airbum!
    Congratulations on your first LS application! Looks very sporty! (Upon curing, you may wish to firstly cut/scrape it with your hobby knife to make it somehow even and then proceed with your sanding papers, or use the sanding papers directly. If some roughness remains, I usually use some putty, or some thick cyano).
    The one piece resin part is indeed wonderful.