Tamiya F-14B (Conversion) 1/48, The Fighting 103.

Started by Harvey R. · 141 · 2 years ago · 1/48, Cold War, F-14, Jolly Roger, Tamiya, tomcat, Top Gun, VF-103
  • Profile Photo
    Harvey R. said 2 years, 11 months ago:

    I highly recommend MRP if you have a good setup for extraction, but sadly I don't. I wear a mask for my own health and with a window open that's more than enough for Tamiya, but MRP stinks like nothing else and will make the entire upstairs of the house smell like some kind of factory. It is a really great paint to work with though other than that, so if I can get some it'll be worth trying to make a temporary spray booth near the window to help deal with it. Annoyingly I can't find a long enough extraction tube for my spray booth so I can vent it out of the window from where my desk is on the other side otherwise I'd use them a lot more. I think I've tried MIG or AK (I'll be honest they're so similar with so many of their products I forget who is who) and they were pretty nice to use though quite a paint to clean out of the airbrush from what I remember.

  • Profile Photo
    Spiros Pendedekas said 2 years, 11 months ago:

    That's an amazing interior, my friend @scalerambush!
    I lov it when my workshop smells like I have been airbrushing in there the day before! (no, no, I didn' say that, proper ventilation, please 🙂 )

  • Profile Photo
    George R Blair Jr said 2 years, 11 months ago:

    Paints in the house can be a problem, especially with my wife. I sprayed in the garage when I used lacquers and enamels, but acrylics have allowed me to move back into the house. The smartest thing I have done was a few years ago when we were enclosing our patio to add another room to our house. I had the contractor add an exhaust fan in the wall, which provided an outlet for my paint booth. No smell at all now. Yeah!

  • Profile Photo
    Harvey R. said 2 years, 11 months ago:

    Evening folks, a couple updates over the last few days. Firstly I started to collect the MRP paints required, I chose MRP because the results are great from previous experience but I'll have to find a way to deal with the smell, luckily weather is starting to get better so fully open windows are a possibility. I'm still missing FS35237, I'm trying to find it in MRP but I may have to get it from another brand, but the other two greys required for this bird are on their way plus a nice gloss coat for all the stencil work.


    The Forward Fuselage

    A little bit of work was done since last time, firstly the whole thing got glued together and is no longer held together by tape. Some work on the seamlines is needed, but the only one that is particularly bad is the radome but that would need filling and sanding anyways to make it look like a nice smooth single piece. I also added the... Framework? Not really sure of the word to be completely honest, but that got painted black and put on. I started work on the ejection seats too, but not much worth showing there.


    Currently the Tamiya instructions indicate that it's time to put the nose section down and start on the body, and so I'll do just that.

    The Body and Ordinance


    With the nose put down for now, next up is to drill holes for the ordinance, pylons, and pallets, Tamiya provides very clear indication of 3 possible load outs (6 on the F-14D kit, more on that later) and where to drill for the load out you choose. Or you could do what I'm doing, drill every hole with a 7mm bit and put a magnet in it. Currently I've built one Phoenix pallet with a magnet, as well as one Sparrow, I also put together a Phoenix itself but haven't put a magnet into it just yet. Overall the results are promising, hopefully the magnets won't be too noticeable on the finished product. Does paint even adhere to a smooth magnetic surface and does it have any impact on the strength of two magnets? I have no idea but we will find out.


    The F-14A comes with two sprues with your air-to-air weaponry, this is the same as their F-14D and let's you build either earlier or later variants of the weapons. I really should have just gone with the F-14D and backdated it rather than upgrade their F-14A, live and learn.

    Next up is drilling out the rest of the holes for magnets, then it'll be mating the upper and lower body halves together.

    2 additional images. Click to enlarge.

  • Profile Photo
    Spiros Pendedekas said 2 years, 11 months ago:

    Cockpit looks great, Harvey @scalerambush!
    Love those magnets idea, looking also great so far!

  • Profile Photo
    George R Blair Jr said 2 years, 11 months ago:

    Cockpit came together nicely, Harvey (@scalerambush). Assembling and cleaning all of the ordnance on the F-14 can be tiring, because there is so much of it. Looks like you are well on your way to getting through the task.

  • Profile Photo
    John vd Biggelaar said 2 years, 11 months ago:

    Solid progress, Harvey.
    Magnets are mounted nicely, they won't be visible in the end.

  • Profile Photo
    Harvey R. said 2 years, 11 months ago:

    Evening folks, it's time for more Tomcat.

    Starting To Take Shape


    Firstly and most noticeably, the upper and lower halves of the body have been put together. I haven't checked if anything needs filling yet, but nothing jumps out, it was unsurpsingly a very perfect join. One thing is that the upper half of the fuselage is two seperate parts, which join together on that 'V' shaped step/line. It was a bit of an awkward fit, and I do wonder why it wasn't just a large single part considering the size of the lower fuselage part, but I think Tamiya handled it as best as they could with two seperate parts. Naturally the two fuselage halves were joined once all the magnets were in place.

    The forward fuselage also received its resin chin pod for the F-14B, then I realised I need to smooth down the join seam on the radome and flicked off the resin part and covered the seam in Tamiya putty diluted down slightly with Tamiya Extra-Thin. Speaking of Extra-thin, it's really annoying how it becomes unusable once it gets about half full as the brush in the cap isn't long enough, I'll probably need to buy a new one after this build. The forward fuselage also had the weapon rack test fitted on, it actually stays put by the magnets if using the long Phoenix pallets, but regardless magnets were added for a possible Sparrow use.


    On the subject of aftermarket, I added something else. The kit allows you to build the early and later Sparrows, Sidewinders and Phoenix presumably as the sprue is identical across the A and D kits (I really should have just got the F-14D and backdated it, oops!), but naturally the kit doesn't come with the decals for the unused later models. I'll be building the later versions so had to buy some decals, the only ones I could find are by HGW which I didn't enjoy using before. In the case of some missiles I'll likely make a split of some early and some later, so 4 AIM-54Cs and 2 AIM-54As, maybe 4 or 6 AIM-7Fs and 2 or 4 AIM-7Es, etc.


    Finally I began work on the engines, its going to be fun fixing the nozzles (oh boy I really should have got the F-14D kit, let this be a lesson to anyone impulse buying a kit without thinking of the project long enough to realise the simple solution), but for now it began with the intakes. The interior should be white, but with a bit of the underside grey at the opening of the intakes. The current plan is to glue these in place, paint the plane, and then remove the masking tape with some tweezers. I may just not glue in the intakes as they fit decently enough without glue, and it's not like this plane has a difficult camo scheme requiring accurate placements of parts.


    Next up, working out how to get the resin F-14B nozzles on the F-14A airframe as they are a slight different size by probably a circumference of only a millimetre or so.

  • Profile Photo
    Spiros Pendedekas said 2 years, 11 months ago:

    Looking amazing, my friend @scslerambush!
    Nice to see this big bird taking shape.
    Yes, it's interesting that the top fuselage part is a 2-piece affair.

  • Profile Photo
    John vd Biggelaar said 2 years, 11 months ago:

    You made some great steps, Harvey.
    Your approach is very decent and well described, this will surely help for future builds.

  • Profile Photo
    George R Blair Jr said 2 years, 11 months ago:

    This is a spectacular kit and you are bringing out the best in it, Harvey (@scalerambush). It is cool that these newer kits allow you to get the fuselage done without adding the wings.

  • Profile Photo
    Harvey R. said 2 years, 11 months ago:

    Evening folks, another quick update.


    The First Steps with MRP Painting

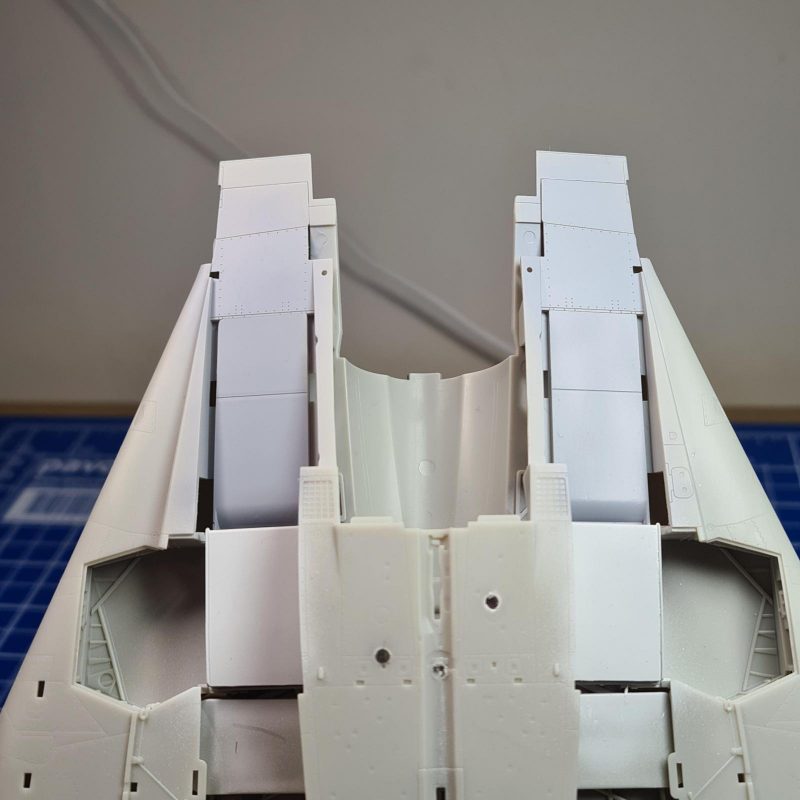
    Last time I said I'd glue the intakes in place, paint, then remove the masking tape. Then I realised that I had overlooked the simple solution of painting them now, clogging them up with sponge later. As such I cracked open a fresh bottle of MRP FS 36375, which is the colour of the entrance of the intakes as well as the underside of this F-14.


    Simply put, as much as the smell and fumes are an issue, the results with MRP do blow me away every time. I haven't painted that much on this build yet, but it's almost like I just used bare plastic of the right colour rather than paint, there is 0 noticeable layer, bumps, or other minor things that show its painted. For small tasks like this my filter/extractor plus a mask are plenty good enough, but I'll need to find a better solution later on when it comes to painting the entire bird. Furthermore, I really need to find that FS 35327 (which is number I can recite off the top of my head due to searching for the MRP paint so often this last week).

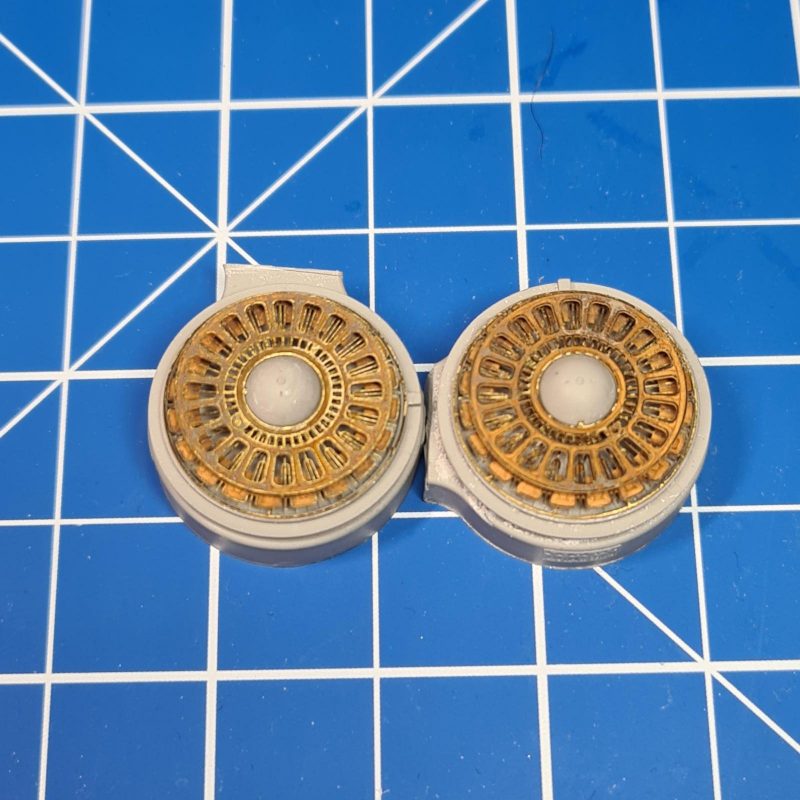
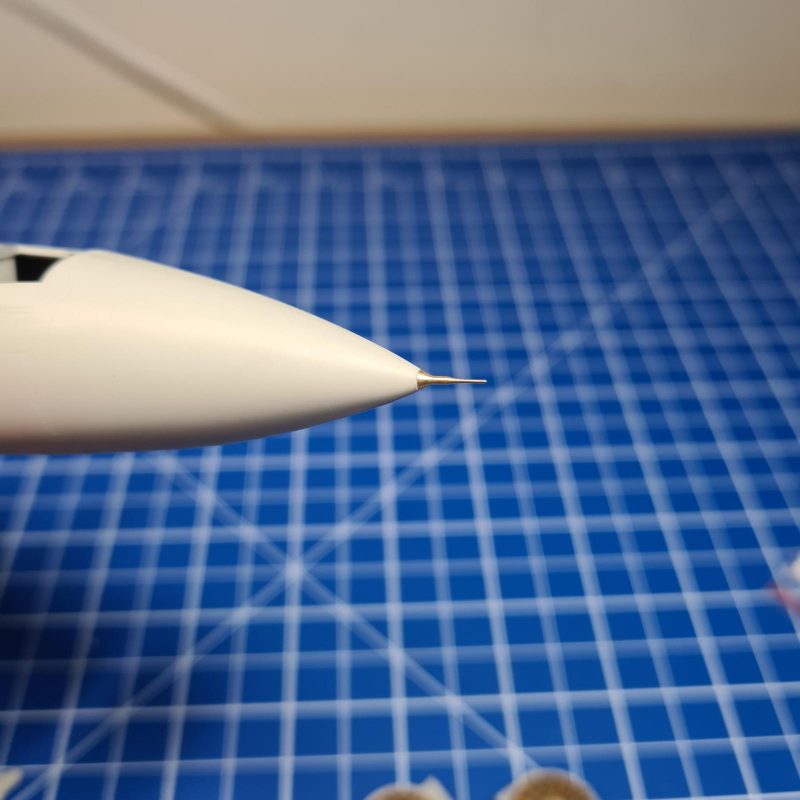
    I've also started work on the engine, I 'primed' it in black (not actual primer, Tamiya XF-2 is good enough for me in these areas) and tomorrow I'll apply a few metallic paints, I especially need to paint the intake fans so I can glue the intakes on properly. I also started work on the brassin exhaust set with the photoetch that comes with it, definitely looks interesting to my eyes. On the subject of aftermarket, I also sanded down and filled the radome and added the Alfa probe, I do have an AoA probe in brass to add but the Tamiya moulded plastic is fine and seems strong, hasn't broke off yet!


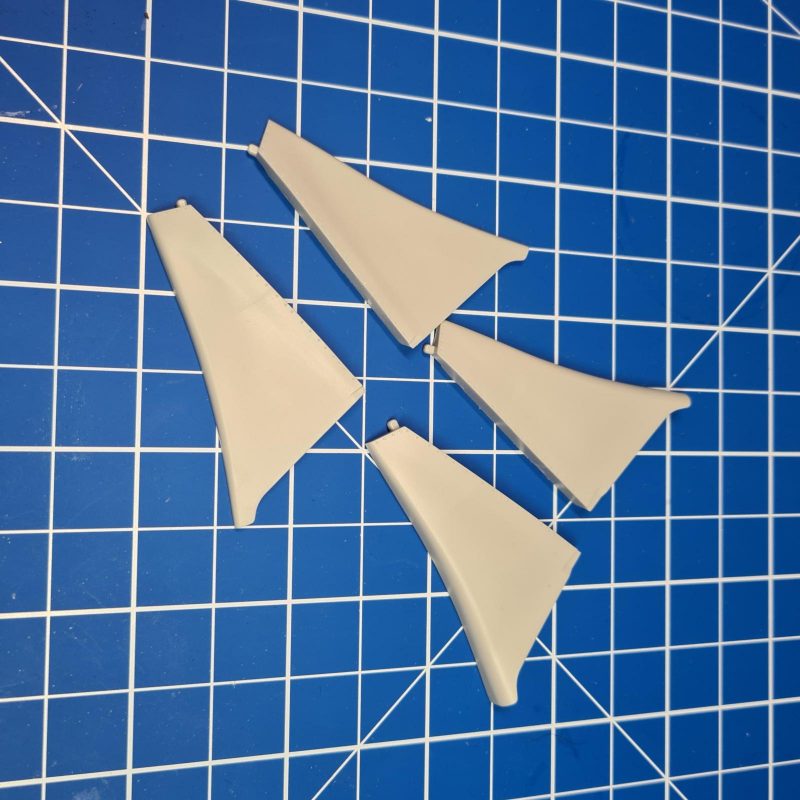
    Speaking of how handy the removable wings are during building, I'd thought I'd just show how Tamiya handle the F-14s wing. The Tomcat had an air bladder behind the wings that would inflate/deflate depending on the wing sweep in order to fill the gap under the wing no matter what angle it was at, naturally plastic doesn't move so Tamiya provides two separate parts for the bladder. Tamiya recommends not gluing these in place and they certainly fit well, allowing you to switch them off when you like. Personally I'll probably keep the swept back one on 99% of the time, the difference isn't all that noticeable and I think the Tamiya F-14 has bigger concerns before it can be airworthy than a gap under the wing, but I'll paint them both up and use them during the end of build photography spree. One issue is that I happened to sand too much off of the part of the wing that keeps the bladder in place (which is meant to be removable), as such there's a slight gap on the left which is pretty annoying and naturally can't be filled in. Hopefully it's not too noticeable.

    Also, I shoved the F-14 in the lightbox and took some quick snaps, too over-exposed if you ask me. The other half asked 'why get a big lightbox when you don't need it?', but that slightly too unwieldy lightbox is coming in useful as it actually fits the Tomcat with its 40cm wingspan.

    On a side note, whilst I'm enjoying this build, I'm glad it's a Tamiya kit. I'm not quite as motivated to build this as I normally am with kits but thankfully it's a relatively care-free build even with my modifications, I do really want to get this done and move back to the propeller fighters though!

  • Profile Photo
    Spiros Pendedekas said 2 years, 11 months ago:

    That MRP gray looks really good on the plastic, my friend @scalerambush! Love the exhaust PE, as well.
    The Tomcat looks amazing so far; having built the Hasegawa one, this one look much better engineered.

  • Profile Photo
    John vd Biggelaar said 2 years, 11 months ago:

    Great progress, Harvey.
    Those exhausts do indeed look great.

  • Profile Photo
    George R Blair Jr said 2 years, 11 months ago:

    The plane looks great, Harvey (@scalerambush). The detail you are getting with the photoetch is amazing. I have a lightbox, but found I get just as good results from using white poster board as a background, along with a light that has a daylight bulb in it.