Tamiya P-47D Thunderbolt, 1/48. Razorback and Bubbletop, Europe and Asia.

Started by Harvey R. · 84 · 2 years ago
  • Profile Photo
    Harvey R. said 2 years, 9 months ago:

    Afternoon folks, time to start up another build thread I think!

    After going off and building some quick kits that weren't worth a thread for, I've decided to get back in with another double build which this time will be an aircraft absent from my collection, the Republic P-47 Thunderbolt.


    For this I'll largely be going for an out of box build, but some different markings will be used. For the P-47D-11-RE Razorback I have a montex mask set for 42-75429 'Eileen', a Thunderbolt from the 84th Fighter Squadron from my beloved Duxford and gives me an excuse to do both D-Day stripes and a checkerboard design.

    Having just finished a bare-metal P-51 I wasn't feeling doing another bare-metal aircraft, but I also wasn't feeling another green P-47. So for this we turn to an oft overlooked subject I've been wanting to do for a while which is the Burma theatre, and decals from Xtradecal provide a lot of options but KL139 'Jungle Queen' is looking to be the winner. Interestingly the instructions state it being from December 1945, perhaps they mean 1944 otherwise I feel the 'Jappy Xmas' is a little late, either way 134 Squadron operated P-47s from June 1944. Regardless it should be an interesting scheme.


    I also have this set of happy chaps, from the incredible Elan13 Miniatures. I found these on ebay and they're from 1995 if the instruction sheet's date is correct. In particular note is the pilot with the glorious moustache who I planned to either put in a desert P-40 or Arma Hobby's upcoming Hurricane Mk.IIc, but I think he'll look good in a Thunderbolt.

    For now the first step has been to begin initial paint and construction on the engine and cockpits, with many pieces off of the sprue and ready to be stuck on a stick. From plastic you can tell this kit is more akin to Tamiya's recent releases than the older ones, there's a slight but recognisable improvement over kits like their Mustang and Corsair which are a bit older.

    Anyways, this should be a nice chill build. I'm not sure how I'm going to finish the models, I'm thinking I'll do 'Jungle Queen' in flight to justify our resin pilot, and then 'Eileen' will be on the ground. Maybe I'll do both in the air, we shall see.

  • Profile Photo
    Spiros Pendedekas said 2 years, 9 months ago:

    You never stop amazing us with your fantastic choices, my friend @scalerambush!
    Looking forward to this superb build!

  • Profile Photo
    Erik Gjørup said 2 years, 9 months ago:

    Strapped in. What a moustache!

  • Profile Photo
    John vd Biggelaar said 2 years, 9 months ago:

    You keep on surprising us, Harvey @scalerambush
    I'm looking forward to those upcoming P47's.

  • Profile Photo
    Harvey R. said 2 years, 9 months ago:

    Truly a glorious moustache worthy of only the most dignified and successful RAF officers!

  • Profile Photo
    Stephen W Towle said 2 years, 9 months ago:

    A small observation from looking at the photo, most P-47's didn't have their flaps down while on the ground. So Tamiya's P-47s are suspect . . . unless your doing " Jungle Queen ". 😉

    Looks like a fun build with some good girlie art and the cartoon wasp should make for a interesting builds.

  • Profile Photo
    Harvey R. said 2 years, 9 months ago:

    Pratt & Whitney R-2800s


    As with most builds we start in the cockpit, after basing everything black to act as shadow if any hard to reach areas don't get the final colour with the airbrush I got to work on the engine instead. As always, I first start with the black based engine and paint it in a metallic colour (MRP Titanium this time), the push rods are painted black, then case is painted in a colour. I then give it all a black wash and slightly drybrush aluminium paint over it.

    On the subject of the nose case, I don't think there is a single shade to use. Tamiya recommends a Neutral Grey, but I've seen in current day photographs and in original photographs shades from light blue, dark blue, light grey, dark grey and anything in between, even black & white photos show a lot of different tones. For these I went with intermediate blue with a touch of neutral grey.

    Of note is the difference between the 1996 Corsair and the 2002 P-47, the Thunderbolt has a slightly bigger engine and a much bigger nose case, with much finer detail. Interestingly the finer detail means that the older engine takes a wash a bit better.

    Wheels Up


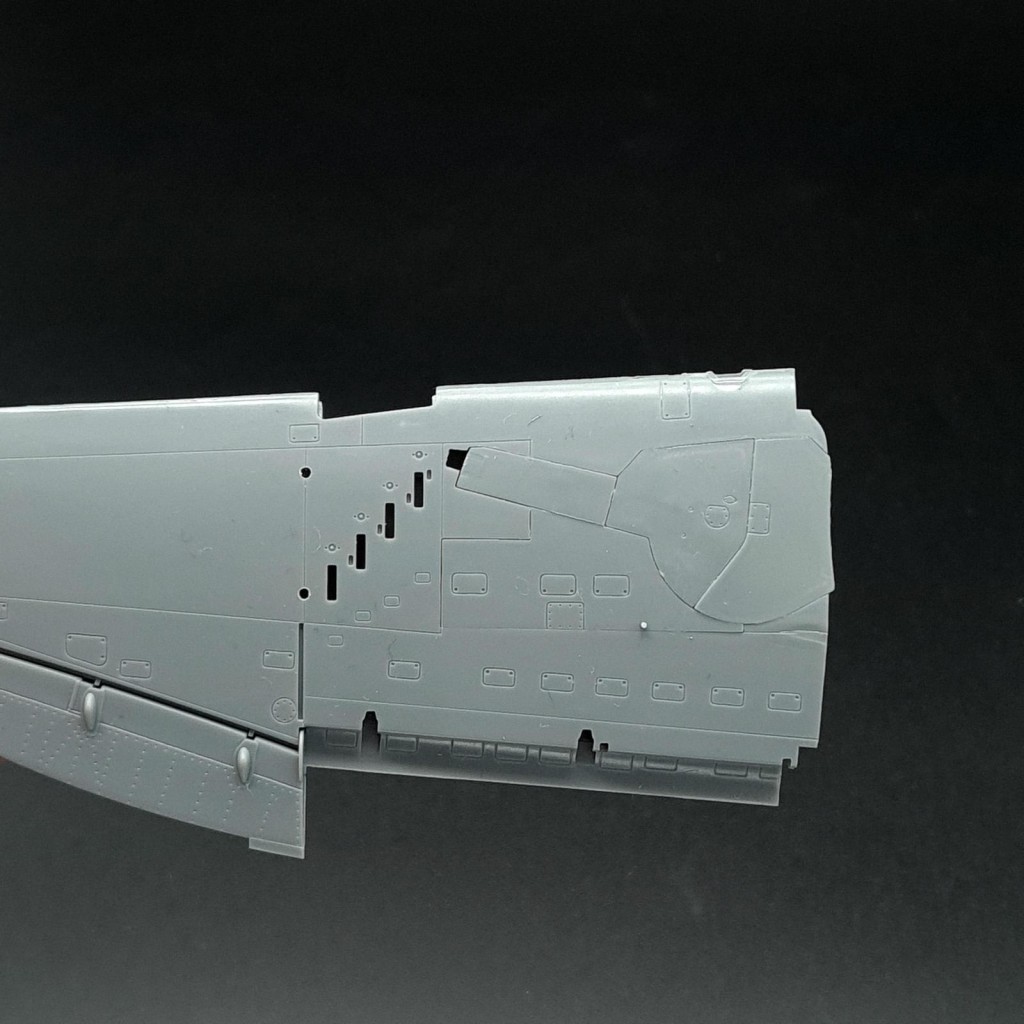
    I took one wing of the bubbletop and assembled it, interestingly there are several panels that are dropped in depending on the variant you're doing, I imagine these are more for the P-47M with it's airbrakes. Fitting the undercarriage was pretty simple here thankfully with minimal modifications required. Firstly the small door seen in the below photograph is sanded off, as this isn't a separate part we will have to make something to fill the gap but this won't be difficult. The rest of the doors fit in quite nicely though the inner door closest to the fuselage sits quite high, this should be solved with some sanding though especially as there isn't any raised detail nearby to worry about getting in the crossfire.

    Finally, here's the state of the cockpit so far. It was painted in a dark green colour different to that of the interior green we know and love, as the P-47 didn't have this. I've seen dome Bronze Green or Dark Dull Green used, I tried to get closer to the Dark Dull Green but it's not exact.
    None of this particularly matters as a wash will change the end colour regardless.

    Regarding the flaps, thank you for the information Stephen. I may still go ahead with the flaps down on the grounded P-47 just to provide some eye-candy/detail, but I'm not 100% sure on that yet. Thankfully the Tamiya kit does give you the option of flaps up or down with the use of separate parts which is always appreciated, if only manufacturers gave that option with the undercarriage!

  • Profile Photo
    John vd Biggelaar said 2 years, 9 months ago:

    Fantastic work on those engines, Harvey @scalerambush
    Looking forward to the completion of the cockpit.

  • Profile Photo
    Spiros Pendedekas said 2 years, 9 months ago:

    Amazing job indeed, my friend @scalerambush!

  • Profile Photo
    Brian Scott said 2 years, 9 months ago:

    Harvey off to a fantastic start . Those R-2800's look fantastic . Look forward to the cockpits being build up. Those pilots will sweet painted up 🙂
    Brian

  • Profile Photo
    Harvey R. said 2 years, 9 months ago:

    Building The Cowling


    A big part of the Thunderbolt giving it the name of 'Jug' is that cowling, unlike the nice and round Corsair's nose this thing needs a big intake for the turbo-supercharger. Tamiya lists using Zinc Chromite for the inside of the cowling with the intake itself being a neutral grey matching the underside colour.

    Looking at photos which I managed to forget to save, the internals of the cowling should definitely be aluminium. I gave it a dark aluminium as this was anodised. The intake itself seems to vary between a grey or aluminium, I ended up with aluminium but some masking tape later can turn this to grey should I decide.

    Also, I added some copper wire to the engine before gluing it all together, I wonder how long this will last as its already started to fall off in some places.

    Bubbletop's Cockpit


    Most notably though is the cockpit work underway on the bubbletop. Fundementally the two cockpits are different but the placement of the back panel and the instrument panel are the two differences. This was sprayed in XF-5 flat green, then the black and aluminium were blocked in. It was then drybrushed with aluminium before the wires were painted grey and some switches given red or yellow. Finally a brown wash was given.

    Instrument decals on this kit have a clear backing, as always its best to cut them up into more manageable pieces but we shall see how it ends up. Honestly I'm thinking the lumps and bumps of the panel are providing a big challenge for the decals, I'll keep applying solution and seeing how it ends up.

    Finally although not pictured I've painted some of the fuselage in Zinc Chromite where the wheel bays are, a tiny part of the fuselage can be seen in the fuelage which has also been painted. Gunsights, which appear to be something needed to be added early into construction have also been painted. Sadly no 'NO HAND HOLD' decals to make it an authentic U.S Gunsight.

  • Profile Photo
    John vd Biggelaar said 2 years, 9 months ago:

    Impressive progress, Harvey @scalerambush
    The interior looks superb.

  • Profile Photo
    Harvey R. said 2 years, 9 months ago:

    Thought I'd just share this, I was looking up for photos of the headrest and whether to paint it brown or black and came across an imgur album with these beauties, I'm sure someone might find them useful.

    I'm sure this'll come handy later when weathering comes relevant.

    14 additional images. Click to enlarge.

  • Profile Photo
    John vd Biggelaar said 2 years, 9 months ago:

    Great pictures, Harvey @scalerambush
    Thanks for sharing.
    The P47 is really a large aircraft, clearly shown on picture 27.

  • Profile Photo
    Spiros Pendedekas said 2 years, 9 months ago:

    Amazing progress and amazing pics my friend @scalerambush!