Ducati 916 - Tamiya 1/12 - work in progress

Started by George Williams · 36 · 9 years ago · 916, Ducati, Tamiya
  • Profile Photo
    George Williams said 9 years, 9 months ago:

    Thanks to Al for starting this group, here's my first posting in it. It's the iconic Ducati 916, one of many in Tamiya's range of 1/12 scale motorcycle kits. The 916 virtually defined the way sports bikes should look in the 1990s. First shown to the public in 1993 it drew instant acclaim. Designed by Massimo Tamburini, the bike won Motorcycle of the Year Award in 1995 for its looks. The President of Ducati, Claudio Domenicali, was quoted as saying that everyone on the planet loved the 916, something of an exaggeration perhaps, but we get his drift. Anyway, onto the kit. I comes in Tamiya's usual packaging:

    and contains sprues in red, grey and chrome plated, together with solid rubber tyres, a metal spring for the rear shock absorber, some plastic tubing and various screws, plus a decal sheet produced by Tamiya.

    Construction starts with the swing arm assembly, and I've attached two pictures of this.

    I'll post more shortly.

    Thanks for looking, George.

  • Profile Photo
    Gregor d said 9 years, 9 months ago:

    George..."Say, that's a nice bike"...! Watching this one build up is gonna make me want to get a motorbike kit! Any suggestions for a good starter bike model for a rookie?

  • Profile Photo
    George Williams said 9 years, 9 months ago:

    Thanks for looking, Gregor. I'm no expert on what might make a good starter bike, but, you're an experienced modeller, so I don't think any of them would give you too much of a problem. I've mainly built the Tamiya 1/12 series, and really haven't had any problems with any of them except due to my own mistakes. Some of the older kits can be had for reasonable prices, but look out for problems with the decals, especially if they are Tamiya's own, rather than Cartograf ones. I prefer the racing bikes (this Ducati is my first 'road' bike), but that's just because I like racing machines, especially if they're red and from Italy! I've tried a couple of Hasegawa kits, but found them a little bit more difficult to put together. So, if you're inclined, pick one that you like the look of, I'm sure you won't go wrong.

  • Profile Photo
    AL HOFFMAN said 9 years, 9 months ago:

    Thanks for jumping in here George. I look forward to following your build. I have 2 or 3 Revell of Germany bikes in the stash. A Vincent Black Shadow comes to mind. Do you know anything about these kits?

  • Profile Photo
    George Williams said 9 years, 9 months ago:

    Hi Al, unfortunately I know nothing about these kits, except that possibly the Revell kit might be the old Matchbox kit, but a Vincent Black Shadow is a real classic, the fastest bike on the road for a long time. I'd love to see your build of that. If you are able to view the BBC series Top Gear, they did a London to Edinburgh race of a new steam locomotive vs a Jaguar XK 120 vs a Vincent Black Shadow, I won't tell you which was the fastest, but it wasn't the Black Shadow!

  • Profile Photo
    George Williams said 9 years, 9 months ago:

    OK, here's the second stage of the construction, namely the engine.

    The real thing has a 916 c.c. 114 bhp liquid cooled L-twin cylinder engine with Ducati's traditional Desmodromic valve operating system. This valve system uses cams for both opening and closing the valves, negating the use of valve springs. The construction of the model is straightforward so long as you follow the instructions. There are a couple of unusal colour calls, e.g. one part green to five parts metallic grey, but it all seems to work OK.

    I forgot to mention that the first part, the construction of the swing arm, I drilled out the ventilation holes in the rear brake disc.

    Thanks for looking again, George.

  • Profile Photo
    AL HOFFMAN said 9 years, 9 months ago:

    Extra effort like opening cooling & lightening holes are what can make or break a model that shows off a lot of it's mechanical features.

  • Profile Photo
    George Williams said 9 years, 9 months ago:

    OK, onto stage 3, this involves constructing the frame, not too difficult, just two parts, and it's painted aluminium at the rear, and a mix of one part silver and 5 parts gold for the front half:

    The rear mudguard (sorry, fender), sprayed matt black: Then joining the previously constructed engine and swingarm (a bit of a tight fit), and then installing this assembly in the frame by means of four small screws. So far, so good, next is the exhaust system...

  • Profile Photo
    Johannes Gerl said 9 years, 9 months ago:

    Dear George,
    that promises to end up as a fantastic model.

    I drove this bike from 97 to 98 and worked for Ducati during these years. Later I felt she was too sporty for me in terms of seat position and I replaced her by more comfortable bikes.
    The design was done by a Massimo Tamburini (by the way: the TA in his name represents the TA in BIMOTA) and to some extent by South African Pierre Terreblanche who later became chief designer of Ducati S.P.A. and was responsible for the beautiful but disliked 999. The design of the 916 had become too iconic to allow the successor to look differently and Pierre was too proud to just make an update to the 916 design. The two bikes that followed after Piere's dismissal (1098 and 1198) picked up the basic 916 design elements and also continued her success on the market.

    Your model perfectly suggests the different materials and paints of the engine. I just don't trust my eyes how much it does.

    The red varnish of the bike was very well done these days and by the way an extremely expensive part of the production. That's the reason why Ducati started to produce the "dark" models having a fairly simple flat black look.
    So add two or three more layers of clear coat than usual to the tank and the cowling and you're there!

    All the best.

  • Profile Photo
    AL HOFFMAN said 9 years, 9 months ago:

    Keep those pictures coming George. BTW, I looked at one of my Revell of Germany bikes, a 1/9th scale Norton, & I have a strong suspicion that these are Protar molds.

  • Profile Photo
    Simon Whitney said 9 years, 9 months ago:

    I see another masterpiece coming along here George.
    Will keep watching.
    Simon

  • Profile Photo
    Gregor d said 9 years, 9 months ago:

    George this is the mutts nuts! Being a self proclaimed technophobe I can only marvel at the "gubbins" that goes into these bikes, but I like it!

  • Profile Photo
    George Williams said 9 years, 9 months ago:

    Thanks for looking, Halvar, and especially thanks for your valuable insight. I've watched a great video called 'Twist the throttle - Ducati', I think it's one of a series made by an American Motorcycle Magaziine, which confirms what you've said. The issue of a glossy finish is an interesting one for me. My own feelings are that we are trying to make scale models, and to some extent the finish has to be scaled down as well as everything else. Anyway, we'll see how it looks after the red paint has been applied.

  • Profile Photo
    George Williams said 9 years, 9 months ago:

    Stage 4 of the build involves fitting the exhaust system.

    Basically, there are two parts to the exhausts, the pipes and the mufflers, silencers, cans (please use whatever term is familiar to you!). The pipes are moulded in one piece in grey plastic, they just need the seams to be sanded off and they are ready for painting. Tamiya call for a mix one part X11 silver and one part X6 orange, but, this didn't look 'metallic' enough to me. So, I sprayed the pipes silver, and then gave them a thin coat of gold, this started to look better to me, and I followed with some thin mixes of blue to give the effect of heat discolouration. 
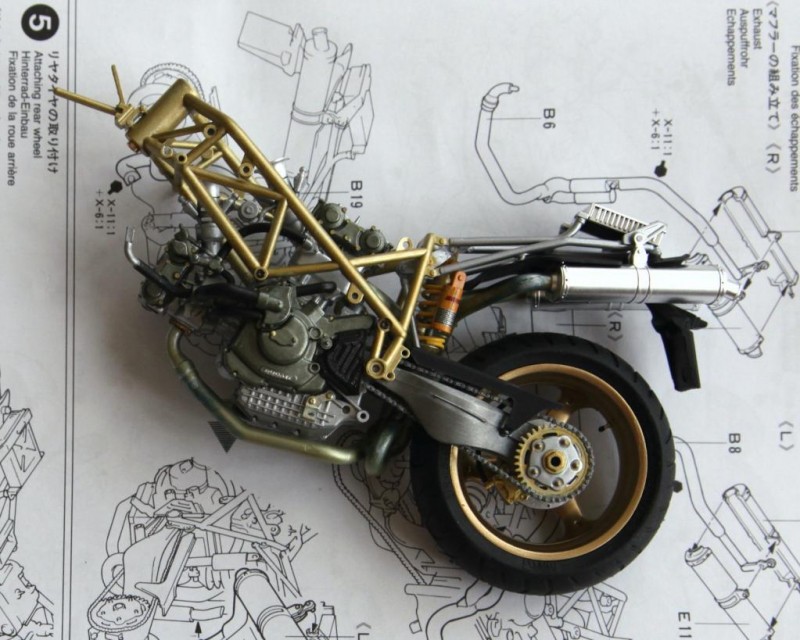
The pipes fit very securely into the silencers. However, these gave me a problem. Tamiya have moulded the silencers in a very nice plated finished, but, they are in two halves. When joined, there is the inevitable seam which should really be filled and sanded, which would spoil the plated finish...What to do? I decided to have a trial fit to see just how much would be visible on the finished model. True to form they fitted so well that no cement would be needed, and, in fact, they fitted so well that I didn't want to risk damaging the rest of the model by trying to remove them. In fact, the seams are only visible from certain angles, so I painted a line of silver into the seams to hide them as best I could.

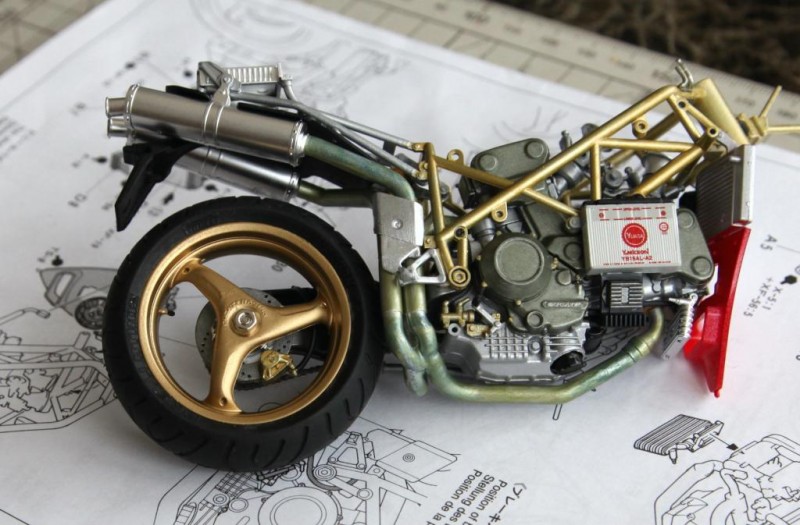
    Having fitted the exhausts, stage 5 just involves fitting the rear wheel. I had previously sprayed the wheels gold, lightly sanded the tyres to get rid of the centre seam The tyres are moulded in rubber and are an accurate replica of the Pirelli road tyres fitted to the real thing. You do have to make sure you fit the tyres the right way round!. So far so good.

  • Profile Photo
    AL HOFFMAN said 9 years, 9 months ago:

    I know Tamiya enjoys the reputation that their kits fall together but these motorcycle kits either have the construction steps in sequence in the instructions or you need to develop a strategy for your approach or maybe both. It's going to be a shame to hide the guts with the body panels.