Gypsy 203

Started by David Hansen · 69 · 5 years ago
  • Profile Photo
    Louis Gardner said 6 years, 4 months ago:

    WOW !

    If I didn't know better, I would think that you had a shrinking ray... and used it on a real Tomcat vertical fin...

    Outstanding Sir.

    Looking forward to some updates in a few weeks. Meanwhile, stay safe my friend.

  • Profile Photo
    David Hansen said 6 years, 4 months ago:

    While i've been away from home working, Fellow model builder, F-15 Expert and Un-Indicted Co-Conspirator Todd Enlund has been hard at work on names for the canopy rails. This critical detail has been the subject of hours of rigourous testing and evaluation, using the time-honoured "Goldilocks and the Three Bears" testing protocol.

    I'll be able to get back to it when i get home Wednesday.

  • Profile Photo
    Louis Gardner said 6 years, 4 months ago:

    The canopy turned out great ... I have tried to letter things in the past using dry transfers. Most often I end up with the letters not properly aligned.

    Looks great ! Merry Christmas my friend.

  • Profile Photo
    David Hansen said 6 years, 4 months ago:

    Actually, what you are looking at is one of Todd's Tamiya F-14 canopies, serving as a dummy for test fitting. He's working on several of the customized markings across town from me.
    As for me, closing in on getting MOST of the decals on the left side...

    -d-

  • Profile Photo
    David Hansen said 6 years, 4 months ago:

    Happy Christmas Everyone!

    And Now, an update of sorts.

    One of the trickier aspects of decaling this bad boy, is the issue of accommodating the opened boarding ladder. The Tamiya decals for VF-2 and VF-84 allow for this option (nicely i might add), but no such luck for the Furball decals. You might say, "just go ahead and stick the boarding steps in the closed position, decal over them, easy peasy, etc..." but cutting off the locating tabs on the steps i thought was a bit extreme, so...

    I carefully measured the dimensions of the boarding step cutout, and transferred these to a piece of Tamiya tape. After double checking the measurements and making some adjustments, i carefully laid this on the Furball decal sheet and cut around the template with a sharp X-Acto blade and a steel straight edge. After soaking the decal in water, just a little tug and the unwanted portion broke free. I was then able to get this modified decal onto the model...

    Unlike past experiences, the Tamiya Stencil decals have been working well, though they seem a little vulnerable in places to being eaten up by Mirco Sol. They have laid down onto the Mr Color gloss gull gray pretty well. The Furball decals have been performing well too, though they are a little bit gluey and i'm still casting about to determine what works best for removing the excess adhesive. Right now i'm using a wet paper towel soaked in Dawn dishwashing liquid and warm water.

    The Tamiya Turbine Warning stripe is perfectly tailored to fit the model. Also, by splicing two decals from the Furball sheet, i was able to come up with Gypsy 203's BuAer number.

    Finally, i know a lot of you want to see how the tail looks, so here's a throwaway shot of the back end with the verticals stood in place. Still doing some tweaking on those...

    I should mention i've gone back to using my new SONY camera to take these shots. I need to get used to its functionality and setup, but its better suited to the broader spectrum of camera requirements i have compared to the (still remarkably good) iPhone 6s.

    So, in conclusion it's just an update about decals, and obviously she's not gonna be done in time for Christmas but hey- You Can't Rush Art.

    To Be Continued...

  • Profile Photo
    Louis Gardner said 6 years, 4 months ago:

    Wow David, the Tomcat is looking fantastic. I like the photos, and especially the captions you add describing the details in the picture. It is indeed a work of art... 🙂

    Merry Christmas my friend.

  • Profile Photo
    David Hansen said 6 years, 2 months ago:

    Hi Everyone,

    There has been much Tomcat activity, here at Casa Del Mongoose. Decalling has been finished up and a enamel paint wash has gone on most of the big aeroplane parts. The masking was removed from the hot sections, and the first couple of colours were sprayed on.

    I first sprayed these sections with Model Master Gloss Black. Then i laid down a coat of Model Master Metalizer Dark Anodonic Gray, in lieu of the XF-56 which Tamiya suggested.

    For the back end of the ront part of the burner can (if that makes sense)Tamiya suggested a 3:2 mix of Flat Aluminium to Metallic Gray. I mixed some of this up using Metalizer equivalents, but it looked too bright, and didn't agree with many of the colour photos i had in my Tomcat books. So, i re mixed a shade of 3 parts Dark Anodonic Gray to 2 parts Steel, and got something a lot less contrasty that made more sense to me.

    I also sprayed the trailing edges of the "Boat Tail" with MM Gloss Black and then MM Non Buffing Steel.

    With the biggest part of the hot sections painted, i could then install the vertical fins. These had already been painted, decalled, and clear coated, but the RH fin needed more touchup work than the left so i started with the right fin. The fit was pretty good with the exception of a "step" at the front end where it blended in with the fairing molded into the upper fuselage. After gluing on the fin, i masked off the decalled area as best i could and went about cleaning up the joint and repairing the damage done to the paint.

    You will see i said "Don't Try This At Home!". I had to mask over some pretty large decals, and i had a lot of faith that the clear coat would protect the decals from lifting up. I got lucky this time but it doesn't mean i will be lucky the next time i attempt a stunt like this. If i had my way, i'd provide things like the "AB" and the sword as separate black decals, and leave it to the modeler to paint on the yellow and black pinstripes, but that's just a personal preference. It makes repair work a lot less stressful.

    The left hand fin required much less rework, and i was a lot more circumspect in how i protected the fin from unwanted overspray.

    With the vertical fin re-painted, i could finish off the last of the decalling and we are a big step closer to the end game.

    I am now working on identifying little places here and there which require some cleanup work. I think i'm gonna re visit some bare metal areas on the boat tail next. Watch this space...

    -d-

  • Profile Photo
    Louis Gardner said 6 years, 2 months ago:

    That was some risky business by masking over the decals. I've tried that before and have about a 50 / 50 success rate...

    The end results you achieved were stunning on your Tomcat ! This one is coming together really well...

  • Profile Photo
    David Hansen said 6 years, 2 months ago:

    Thanks Louis. It's not perfect; there are places on it where i wouldn't want people to look too closely but for the most part its proving to be a rewarding and enjoyable build.

  • Profile Photo
    Louis Gardner said 6 years, 2 months ago:

    I'm happy to hear that you are having a good time with this. That's what it's all about.

    Thanks again for sharing your masterpiece with us, (and the journey creating it).

  • Profile Photo
    David Hansen said 6 years, 2 months ago:

    "It's not just a Job; It's a Misadventure."

  • Profile Photo
    Tom Bebout said 6 years, 2 months ago:

    That cat is looking great David. Like Louis I've tried placing tape over decals with little success. You've got more guts than me as I'll never try that again. Look forward to seeing the finished product.

  • Profile Photo
    Greg Kittinger said 6 years, 2 months ago:

    One handsome alley cat!

  • Profile Photo
    David Hansen said 6 years, 1 month ago:

    Well, just because the deadline for the group build passed, it doesn't mean that work on 203 has ceased. In fact, progress has continued more or less steadily at Casa Del Mongoose.
    Since the last photo was posted, i dropped the other wing. Really. Bent up the wingtip like a potato chip, just like the other wing. However, i managed to fix it. I'll spare you the gory details.

    More importantly, my display base from Mario Catana arrived!


    The size of the base was driven mainly by the dimensions of the filing cabinet it will rest on, so the base is a little bit smaller than what i would normally go with, and its a tight fit. I tried posing the model a couple of different ways on the base to see what would look the best...

    Note that i have put bits of Tamiya tape on the nose, wingtips and vertical fins as well as the ventrals (not clearly visible), as part of my "bonk-proofing" protocol.

    The landing gear is not quite done, but i needed the model on its "Feet" in order to take an accurate height measurement for the display case dimensions. As usual, i went to TAP plastics here in NE Portland and they are on the case (literally and figuratively) I will say the fit of the landing gear is very positive- nothing vague, loose or floppy in regards to the fit. It's details like this that make the plane a lot easier to get thru the "end game" cleanly and with a minimum of hassle.

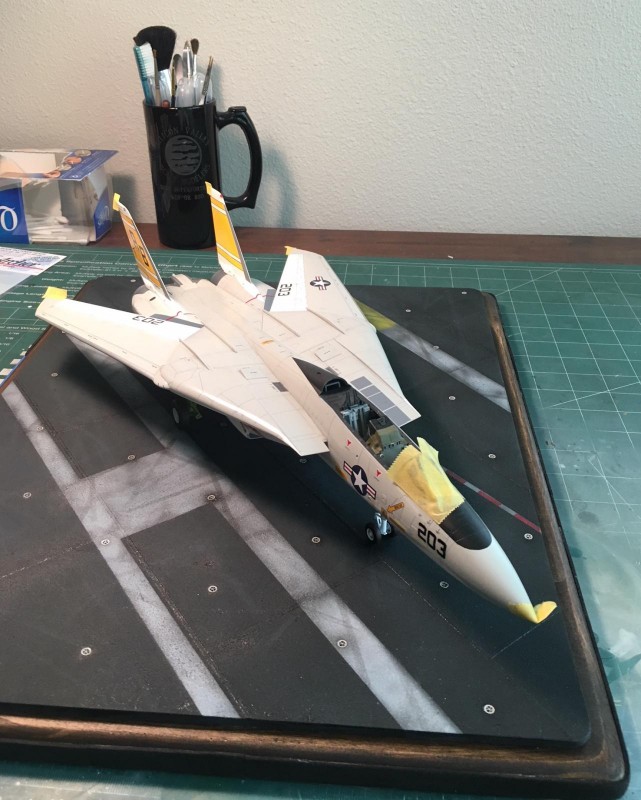
    After comparing the angles and how much "real estate' was available next to the boarding steps, we've decided to go with displaying the model transversely across the landing area. We also looked into adding a towbar, but the base is a little on the small side for that, plus to do it right i would need to break apart the nosewheel torque link and drop the lower part. At this point in the game, more work than i want to do on the model, especially since i think i'd wind up partially destroying the strut in order to re configure-it.

    So, when i get home, back to the "fiddly bits" like the landing gear struts, ejection seats, hook, and miscellaneous detail and re-painting work.

    More to come. Be there, or be rectilinear.

    -d-

  • Profile Photo
    David Hansen said 6 years, 1 month ago:

    Hi everyone.

    Another progress report from Casa Del Mongoose.

    We have entered the "end game" and we are now left with the "Fiddly Bits", and its time to go over the model nose-to-tail, on a search-and-destroy mission to clean up what boo boos, miscues, and bloopers still remain. It seems that for every item i fix, a new glitch comes up to take its place. Mainly, its the accidental removal of little decals here and there suffered while repairing flaws in the paint finish. Nothing disastrous mind you, just kind of tedious to work thru.

    On a positive note though... i (mostly) finished the landing gear!

    For the curious among you, i used Tamiya white surface primer first, followed by Tamiya White, X-2. I then masked off and painted the narrow silver bands on the gear struts by carefully drybrushing with Testor's Chrome Silver. The oleos were painted freehand (don't look too closely).

    There are a few decals that need to go on and for the most part they worked fine. Maneuvering them into position, without floating them away or having them stick to the wet Q-tip were the biggest challenges. Once dry, i added a wash made of 50% Future, 50% water, and a drop of Tamiya NATO black (i used Flat black on the wheel hubs and the contrast might be a wee bit too stark). I then gave the struts a light spray with Gunze Mr Color GX100 Super Clear. The tyres were painted with Testor's Rubber, which is a very dark brown. I used this colour solely because i'm trying to use up my enamel stash and i'm phasing them out.

    The LSO approach light box needs to be added to the nose gear strut.

    The landing gear fits like a dream. The display case arrived a few days back and i've test fit the model on the base with the acrylic display case in position. So far, so good.

    Next, i need to paint and install the arresting hook. There are some spots on the bare metal "beaver tail" that are in need of re-work so that will probably come before i mount the hook.

    Great.

    More masking.

    Ugh...

    To Be Continued...

    -d-