Messerschmitt Bf 109 V-13, 1/48, Tamiya and scratchbuilding

Started by Erik Gjørup · 46 · 1 year ago · 1/48, 109, airbum, Bf 109 V-13, Bf109, Haldværk, me109, Messerschmitt, scratchbuilt, speed record, Tamiya
  • Profile Photo
    Erik Gjørup said 2 years, 10 months ago:

    While this one will not qualify as homebuilt, it does fit into the Air Racing category on the European side of the pond. So to try to bring a bit of life back into this group, here we go!

    Messerschmitt Bf 109 V-13 speedrecord plane

    Having had a few of the Tamiya 109E’s in 109Werke this one emerges as a fast plane

    The story is very interesting and a bit long, and has been told before. This is of course a build-log, so I shall not tire you with a lot of words on the real plane, as it is easy to find online or in a well-stocked library. Some small bits may pop up during the build.

    First, the early planes were most often filled smooth, and so the panellines have to go – here it is in company with tow more of the kits


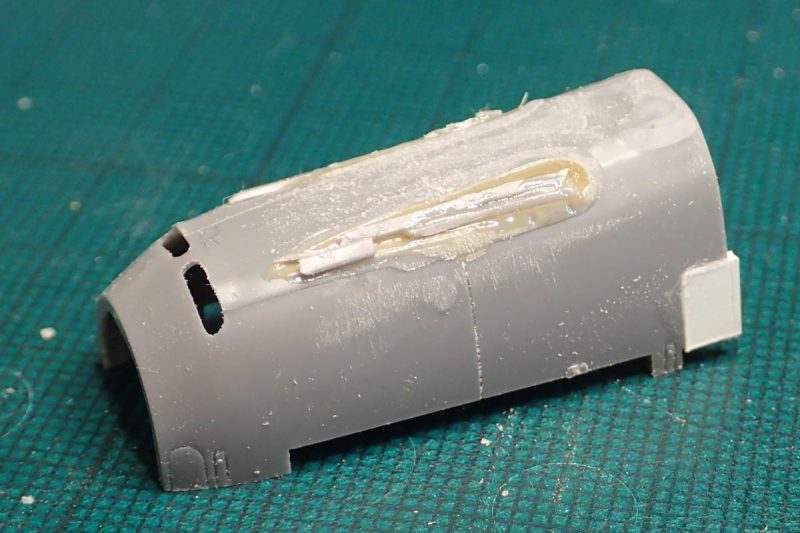
    Some Liquified Styrene (LqS) read how-to here is used as it will ensure a strong non-shrinking bond – what a mess

    First, a lot of filing and sanding took place
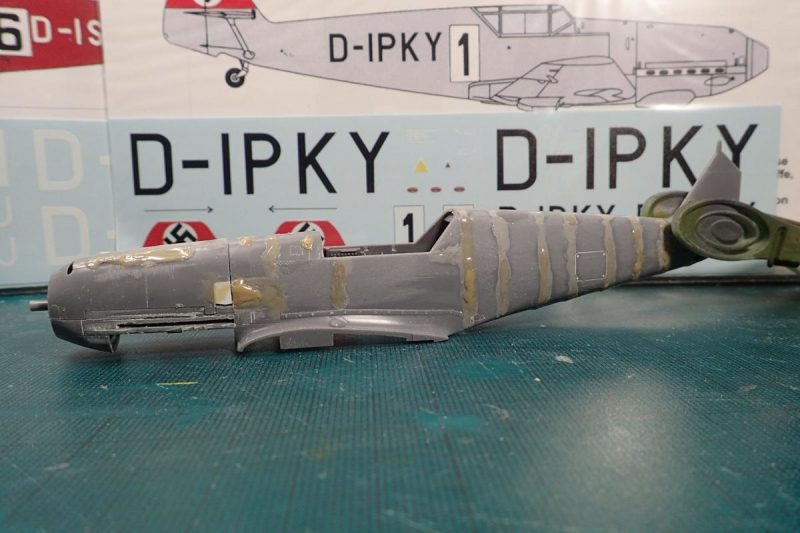


    And some more LqS – then filing, sanding, repeat until satisfied.

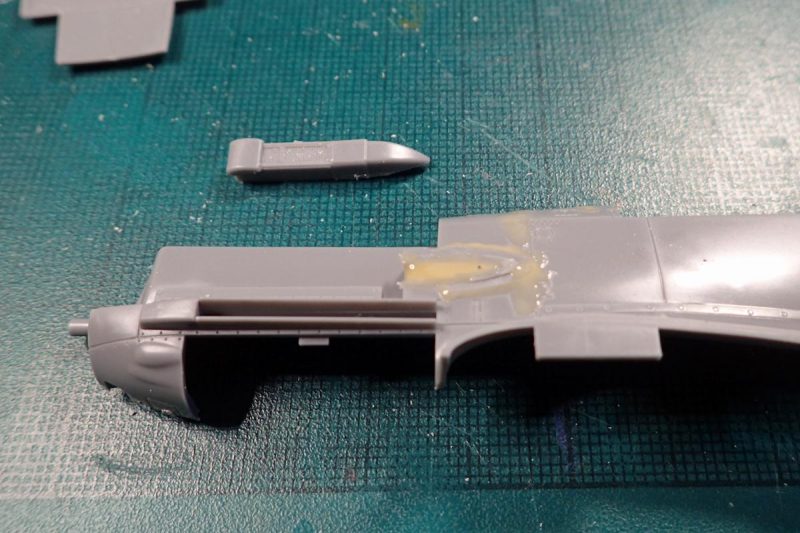
    The intake were quite different from the Emil base-kit, and a lot of LqS and off-cut parts were used to smoothen things (in the light of experience I should just have used a piece of sheet-plastic)


    And the parts so far – the wing bulges were addressed in my “Messerschmitt Bf 109 Werke” here on iModeler!

    next up some more on the intake

  • Profile Photo
    Spiros Pendedekas said 2 years, 10 months ago:

    My friend @airbum, this is a wonderful entry to our friend's Josh @jpatt1000 great GB!

    Of course, since it is YOUR entry, it had to be a 109! Looking great, and I saw you have made good use if liquefied styrene already!

    I have a few kits that fit the bill for entering this amazing GB, so, in the future, I might gradually enter them!

    Looking forward to your progress here!

  • Profile Photo
    Josh Patterson said 2 years, 10 months ago:

    This will be a neat one! Here's what I do when I use glue to fill seams, I put masking tape right up to the gap (or panel line in your case) on both sides, pour in the glue, wipe smooth with my finger and remove the tape. Usually requires little to no sanding, but sometimes more than one attempt to get the gap filled in enough to be flush with the plastic. (Perfect for if you're doing a NMF!) Here's a shot of the wing roots on my Monogram B-17. No sanding.

    1 attached image. Click to enlarge.

  • Profile Photo
    Erik Gjørup said 2 years, 10 months ago:

    Thank you gents. Spiros, well, it HAPPENED to be a 109 🙂 I shall be looking forward to be following some of your builds here @fiveten.
    Josh, thanks for the tip - the seams were a bit deep, and I had a brew stored, so it got the action. I use the styrene-mix in larger gaps, and it is very nice to work with. I have used tapemasks on LqS once or twice, and it gets somewhat messy but it seems to work wonders with thick glue @jpatt1000.

    A short update to follow in a minute

  • Profile Photo
    Erik Gjørup said 2 years, 10 months ago:

    Intake!

    Work on the air-intake commences, and future trouble gets adressed

    I started by marking the location, then chaindrilled the length of the intake to ease filing to final depth.


    I cut a tube in half – not pleased with the result at all!

    Some more filing, and in order to get the slope on the intake another length of cutoff was glued in place, and left to cure. Then it was filed and testfitted and filed and testfitted and. . . .


    The result looked a lot better. The fuselage and cowling so far

    I just dryfitted the lot


    Looking a lot like it should I think

    One thing with the Tamiya 109E kits are the ever lasting problem to get the rear of the wing/fuselage join to line up


    And a piece of sheet solves that.

    now it is once again on to other 109’s before this one gets revisited. Be sure to tune in again later!

  • Profile Photo
    Spiros Pendedekas said 2 years, 10 months ago:

    My friend @airbum, I am amazed by your attention to detail!
    Looking great so far.
    What an inspiration!

  • Profile Photo
    Erik Gjørup said 2 years, 8 months ago:

    Oilcooler and wings

    The wings need a lot of support and the oilcooler trimmed down

    I opened the lid on this one again today, and found the lower wing very warped. Probably due to the LqS treatment. Luckily the top skins were LqS’d while still on the frame, and looked fine.


    So a lot of tape and a pair of supports, and it is off to cure.

    The oil cooler needs to be a lot slimmer on this racer, so out came the saw


    A bit of trimming with saw and file and sandingstick and knife later, it is where I want it. I took the cooler from another Tamiya 109E to keep things aligned while the glue sets.

    And finally some sheet styrene was used to fill the exhausts as I need to drill these (just a small flush stub on these things)


    And with that done, it is off to harden, and another long wait before the next round – hopefully not two months again.

    Thanks for watching – tune in again later

  • Profile Photo
    Spiros Pendedekas said 2 years, 8 months ago:

    Nice steps, my friend @airbum!
    Yep, LqS is a handful of a modeling fellow!

  • Profile Photo
    Erik Gjørup said 2 years, 5 months ago:

    Thank you my friend @fiveten

    Breathe!

    So, it was not two months, but almost 3 before returning to this one

    Well – they say all good things come to those who wait? So just to get back into the loop, I dryfitted the cowling, showing off the new intake


    And the wings got dryfitted too. They need a lot more work – like locked slats and such.

    now, I feel fairly confident to say the next step will be the exhausts – but who knows? – tune in to check up!

  • Profile Photo
    Spiros Pendedekas said 2 years, 5 months ago:

    The new intake looks super, my friend @airbum!

  • Profile Photo
    John vd Biggelaar said 2 years, 5 months ago:

    Good to see progress on this one as well, Erik @airbum
    Dry fitting does look nice.

  • Profile Photo
    Erik Gjørup said 2 years, 5 months ago:

    @fiveten, @johnb, thank you my friends

    Update

    Having searched for my mojo lately, I have found time to sand!

    And with that in progress it was time to make a short update on this one


    Many parts have been through the hands with minor essential work on then performed

    Having gone through the LqS and file process it is time for primerfiller and sandingsticks.


    still a few more sessions needed
    and the preparations for the exhausts will take some more filler

    I will have to come up with a spacer to drill these

    I have been talking about the Tamiya seats before, so just a few pictures here


    I still think the SBS seat look a lot better.

    Thanks for stopping by – tune in again later

  • Profile Photo
    Spiros Pendedekas said 2 years, 5 months ago:

    Really nice progress, my friend @airbum!
    Yes the SBS seat looks way better!

  • Profile Photo
    John vd Biggelaar said 2 years, 5 months ago:

    Good to see the preperations in progress, Erik @airbum
    That seat does indeed look much better.

  • Profile Photo
    Erik Gjørup said 2 years, 3 months ago:

    @jpatt1000, @fiveten and @johnb, minor update on this

    Exhausting?

    I plunged into my AM stash the other day, and lo and behold

    I happened upon a conversion for a hooked 109. It contains some really nice PE exhaust covers.


    According to the instructions it is not needed (well, one might debate that, depending on wich one you decide to make of the 109T testplanes)

    Nice resin hook and arm and nice PE sheet


    I had to see how it would look on the Versuchsmachine13. Not bad at all. Could work – but then I have to open up the hole again – and perhaps make some oval pipes for the exhaust tubes.

    and with that, I have to admit I have been doing some more work on this one – more to follow as soon as I get the pictures taken!