Final Countdown -F14A VF-84 Jolly Rogers, A6m Zero

Started by Chuck A. Villanueva · 141 · 3 years ago
  • Profile Photo
    Chuck A. Villanueva said 4 years, 6 months ago:

    Back after a bit of a hiatus. Working next on the intakes. Hasegawa does provide a full intake trunking which are quite prominent on the Tomcat.

    14 additional images. Click to enlarge.

  • Profile Photo
    Chuck A. Villanueva said 4 years, 4 months ago:

    After a bit of a hiatus. lets get back into final bits to complete the Zero. First removing the masks from the canopy. There was no residue on the clear parts. But they just didn't look so crystal clear for some reason. So I applied some Blue Magic to polish them up a bit. Using a cotton Q-tip to apply the polish and using the other end to polish each panel. What is really nice about this stuff it does not remove the paint from the frame work. It works great for Acrylic, Enamel and Lacquers. Good stuff, I've had this tube for over 20 years.

    Next to work on the landing gear and tail wheel. Being a Mitsubishi built Zero, the gear bays are painted the color of the lower surfaces including inside the doors.

    First the rims have been painted Vallejo Steel. The tires are painted Testors Rubber in the small bottle, using capillary technique.

    The main struts and actuators are black the oleos I use the Molotow Chrome pen. Love this stuff too.

    The decals have been applied on the the main gear doors. The interior of the inner gear doors are the same color as the under surface of the air frame.

    Before assembling the landing gear, I installed the tail hook and tail wheel.

    Now to install the main gear.

    16 additional images. Click to enlarge.

  • Profile Photo
    Chuck A. Villanueva said 4 years, 4 months ago:

    With the intake trunking done, time to work on the intake ramps.

    Rather involving part of the assembly which has several parts involved for each side, which is a bit complicated to represent what is on the real Tom.

    Next to prepare the intake ramps starting with the actuators that adjust the ramps postioning.

    4 actuators and ramps are attached to each side of the intake roof panels.

    Not difficult to assemble, and not really many individual parts. But Academy & Monogram does make this step quite simple. Even the Tamiya kit does not get this involved on the intake ramps.

    16 additional images. Click to enlarge.

  • Profile Photo
    Chuck A. Villanueva said 4 years, 4 months ago:

    The last thing was to decal the prop, push into place and the A6m2 Type 21 is completed.

    1 attached image. Click to enlarge.

  • Profile Photo
    Chuck A. Villanueva said 4 years, 2 months ago:

    Update on the F-14. Working under the nose and forward fuselage section.

    The trouble with this complicated airframe even in model form is quite apparent. It starts at step 1, any thing that is not set in place at the start will through things off as you get to the later stages of the build. In this case with the Sparrow missile well forward insert. The nose to main fuselage is a bit off, which off course throws the alignment of this piece. A good size seam to clean at the back edge, the rear nose gear well not quite centered. Lessons to learn when it's time to build another Hase Tomcat. But will do what is necessary to clean this up.

    Tamiya Black is applied over the top of the nose and behind the cockpit.

    Next the early under nose probe sensor is installed just forward of the nose gear bay.

    While putting the air frame aside. I figured now is a good time to decal the wings.

    The national full color star and bars are applied.

    Then the "no step" stencils. And slime lights on the wing tips.

    Finally the side numbers are applied to the flaps.

    More to follow.

  • Profile Photo
    Chuck A. Villanueva said 4 years, 2 months ago:

    Now moving towards the rear lower section of the fuselage.

    First with the tail hook. Very nice approach by Hase, first with the latch support.

    This hold the hook when retracted up. And mounts between the lower dive brake wells.

    Next the tail hook and pedestal which swivel down from.

    Assembled which allows the hook to retract down to catch the wire when on approach. Then installed in place under the rear fuselage.

    Next the rear strakes.

    i had painted them black. But will be repainted again once we get to the painting process.

    I attach these in place under the rear section of the engine trunking.

    more to follow.

  • Profile Photo
    Chuck A. Villanueva said 4 years, 2 months ago:

    Now to get some work in on the sub-assemblies. Starting with the tails.

    The distinctive twin tails are made up of 2 pieces for each rudder assy.

    Next to build the pylons and missile rails.

    The lower pylon is first assembled and put aside.

    Next the Sparrow/Sidewinder launch rack is assembled. They can also be configured to carry the AIM-9 Phoenix, and later on in life various targeting pods.

    Then the Sidewinder rails are cleaned up and attached to the launch rack pylon.

    Now to assemble the drop tanks. This distinctive feature mount under each intake trunk. Made up of upper and lower halves with a plug in the back end of each tank.

    Then the drop tank pylons are assembled and attached each tank.

    Finally the Phoenix missile launch pallets are next up.

    Starting with the rear set.

    Then the front set are cleaned and attached under the forward section of the main body.

    Next time out some ordnance work.

  • Profile Photo
    david leigh-smith said 4 years, 2 months ago:

    Got to qualify as one of the most detailed works-in-progress on the site’s history, a de facto ‘modeler’s handbook. I’ll be posting tonight on the Group Build, (bringing the curtain down I guess...) but I’ll be with this project TIL the end, Chuck. Look forward to seeing you bring her home.

    @uscusn

  • Profile Photo
    Chuck A. Villanueva said 4 years, 2 months ago:

    Thanks D-L, it is quite an epic of a project. One of the criticism of Hasegawa when these series of 1/48th scale jets were released was the lack of weapons, not so on the WWII kits but on the F-16's, F-15's and the F-14's no weapons are provided in the base kits, some special upgraded versions at time Hasegawa would sometimes provide weapons. A tough pill to swallow paying $40-70.00 for a kit with no weapons. When kits valued from $15-30.00 had full weapons load supplied in the kit. But for the most part just pylons and drop tanks, and buy the weapons set. So the Sidewinders and Sparrow are from one of those Hase weapons set, which I had on hand. The Phoenix missiles are from the Academy F-14A, a build that I did for an Iranian friend of mine that I did building it as an "Ali Cat" I left off the AIM-54's. For the movie I will configure the Tomcat in a standard 2x2x2 mix of Sidewinders, Sparrows and Phoenix missiles.

    AIM 9L Sidewinders short range Hasegawa

    AIM 7 Sparrow, medium range

    Sidewinder and Sparrow

    AIM-54A Phoenix BVR, long range

    All 3 missiles will be painted white.

    For the most part everything on the F-14 has fit well until the gun bay hatch and service door did not fit very well.

    Missiles painted using Tamiya Gloss White

    The nose cones ready to be painted Radome tan.

    While painting the missiles white, I took this opportunity to paint the very nice white metal wheels.
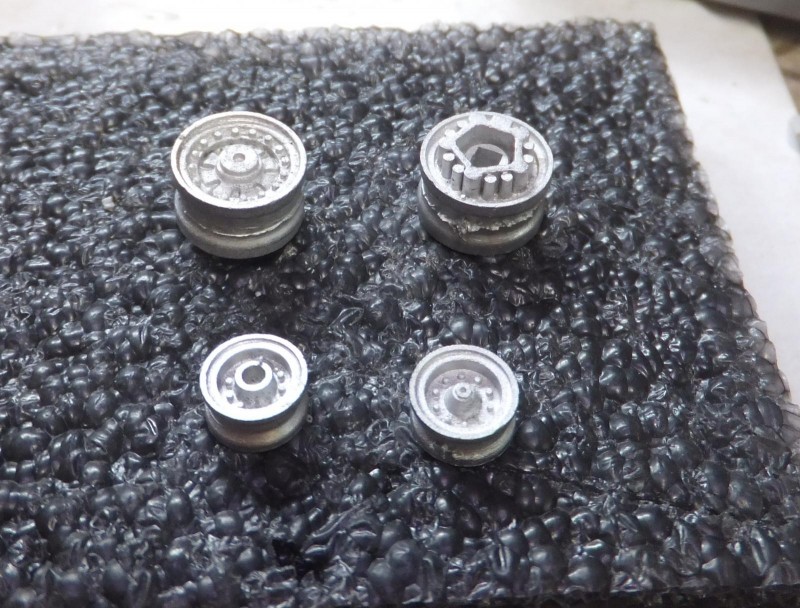
    And the exhaust tail pipe interior.

    With a bit more white still in the air brush. I then painted the horizontal stabs.

    Next the Sidewinders IR nose are masked and painted Gun Metal. The tail fin flight adjusters steel.

    The Sparrow radomes are painted Lt Ghost Grey.

    Finally assembled the tail exhaust pipe and engine exhaust ring.

  • Profile Photo
    James B Robinson said 4 years, 2 months ago:

    Quite the undertaking for sure Chuck and David is right, very impressive coverage of the build process!

  • Profile Photo
    Louis Gardner said 4 years, 2 months ago:

    Wow Chuck ! It’s been a while since I have checked out your progress. I have missed a lot or you have been very busy. It just might be a combination of both things.

    I’ll echo the sentiments mentioned above.

    This has to be the most detailed build journal I have ever seen on Imodeler. I write down my miss adventures in the logs I post and include a lot of the actual building and painting process. But you have taken it to another whole level of detail with your blog.

    A person wouldn’t need an instruction sheet and they could build a model simply by using your build journal in its place. It’s that good !

    I especially like how the A6M turned out. To my eye, the colors look spot on.

    Thanks for taking the time to detail the adventure of building these models for us. Most don’t realize how much time and effort it takes...

  • Profile Photo
    Paul Barber said 4 years, 2 months ago:

    That’s a great way to put it Louis - Chuck your builds are better than the manual!

  • Profile Photo
    Chuck A. Villanueva said 4 years, 2 months ago:

    Wow amen and thanks, it is quite an undertaking just on the Tomcat alone. All the reviews from the prior builders of this kit over the years are true. It is a love hate process. patience, patience patience! Even armed with the knowledge in what to look out for. Still a hand full. But almost done. Still a lot to get done.

  • Profile Photo
    Chuck A. Villanueva said 4 years, 2 months ago:

    Quick update on the Tomcat. Masked and painted the leading edges of the horizontal stabs Vallejo Aluminum.


    Next some decal work on the Sidewinders and Sparrows.

    The Sparrows in the kit show all white, but in the movie the wing lets are Gunmetal and will go back to paint them that color.

    The wing glove pylons. The Sidewinder rails are attached and then painted Gunze Glossy Lt Gull Grey.

    more to follow...

  • Profile Photo
    Chuck A. Villanueva said 4 years, 2 months ago:

    Getting closer to the end. This session I will attach the windscreen and assemble the canopy.


    Next to prep the canopy and install the interior canopy rails

    Normally on any jet I would just mask the canopy with Tamiya tape without any making set. But ran across this set called PMask. An outfit out of Poland. The masks are made to the type of Kabuki tape that is what basically Tamiya masking tape is.

    They fit the windscreen and canopy bubble very well. It took about 30 minutes to the glass. Not bad.

    The design was nice in how the maskings were applied on the canopy. Though the masks for the canopy just outlined the edges of the bubble, using Tamiya tape to complete the task.

    Then using Tamiya flat black to paint the canopy and windshield frames. As well as part of the Anti glare panel on the nose. An noticed an awful gap right in front of the windscreen.

    Using Tamiya grey putty to fill that in and sand.

    Next the process of decaling the AIM-54A Phoenix missiles. I used the decals from the Tamiya kit. They fit the Academy missiles perfectly. Quite a bit of stencils and stripes on the Phoenixes.

    Next paint time.