@lis: Welcome, Bernard. This should be fun if I can pull it off.
Walt (@luftwaffe-birdman), Pedro (@holzhamer), John (@j-healy), and Stephen (@stephen-w-towle): Thanks for the recommendations. I am hoping to avoid removing all of the raised panel lines and replacing them. I have done some limited natural metal areas on some previous models and have had good luck with Vallejo Metals. I really like Tamiya lacquers, so I may pick some up and do some experimenting.
After Stephen (@stephen-w-towle) clued me in on the exhaust system, I did some research to track down the different systems. It seems that the B-25J had a Clayton exhaust system that featured a separate exhaust for each of its 14 cylinders, with a separate fairing on the cowling for each. This kit features this exhaust system. In the early 1950s, the exhaust system was modified to a partial Clayton system where the top cylinders were all collected and vented out a large exhaust pipe on the outboard side of each cowling. The bottom cylinders still had separate exhausts. This is where it gets fun. Not all J Models were converted to the new system. Those that were converted were modified over a period of several years. So, it is possible that you could see both exhaust systems on the aircraft within a given sub-type. For instance, you can find online photos of the CB-25J with both exhaust systems. In addition, the carburetor system was changed on some aircraft from the Holley carb system on the wartime J version to a Bendix-Stromberg system that featured a much taller intake above the engine. Once again, not all the planes received the new carb system. So, on any given post-war B-25J, it is possible to see either exhaust system, as well as either carb system.
I suppose I could have legitimately left the early exhaust system in place, but I wanted to try to depict the combination exhaust. I was hoping that the exhaust stubs on the cowling would be solid, so that all I needed to do was clip them off and sand them down, but they are partially hollow. Of course, I thoughtlessly picked the really stupid way to remove them. On the first cowling, I clipped the stubs off, then filled the holes in the cowling. Dumb. The easy way to do it was to fill the back of the exhausts with putty, let them dry, then clip them off and sand everything down.
I also removed the armor plate that protected the pilots. For the first one, I used sanding sticks to remove the whole thing, which took a long time. For the second one, I carefully removed most of the plate using my Dremel tool and then finished the process with sanding sticks. Much easier. I discovered that it is relatively easy to remove too much plastic from both the fuselage and the cowlings, and that it is relatively difficult to keep all of the round stuff in its round shape. I hope to restore the panel lines around the cockpit and engines using a scriber, and I hope to blend them in to the raised panel lines farther back. Should be a fun experiment.
The interior detail on the fuselage walls was very soft, so I planned to add my own frames and detail using plastic strip. I lightly sanded the interior detail on the fuselage walls. Using the previous detail as a guide, I started adding some frames and boxes using strip plastic.
Thanks for all the suggestions. This has been fun, so far. I have another Revell/Monogram B-25J that I want to use for one of the next conversions, and I have a 1/72 Hasegawa B-25J for another conversion, and I want to use a 1/72 Airfix B-25D for a trainer conversion. I am planning shelf space as we speak. :o)
11 attached images. Click to enlarge.
-
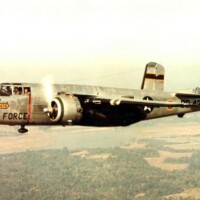
1. CB-25J with modified exhaust system.
2. Original Holley carb.
-
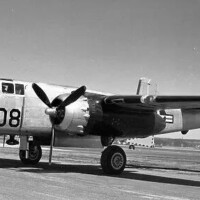
1. TB-25J with original exhaust system.
-
1. This is the Bendix-Stromberg carb.
-
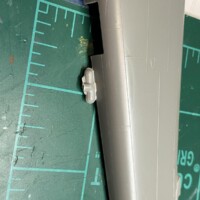
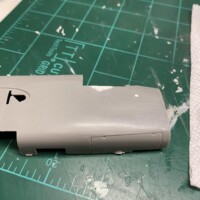
1. Pilot's armor removed. You can see the shadow of the armor in the plastic.
-
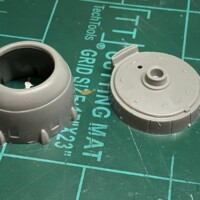
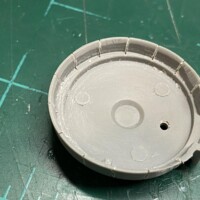
1. Kit cowling and cowl flaps. Half of the exhaust stubs are molded on, the rest are glued on later.
-
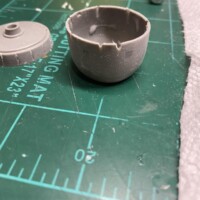
1. This is the dumb way to remove the stubs. I cut the stubs off and then filled the holes.
2. I cut the cowl flaps into separate sections with a razor saw.
-
1. Massive sprue attachments.
-
1. Smart way to do this. Fill first, then cut and sand.
-
1. Rear of cowl flaps thinned with a Dremel tool.
-
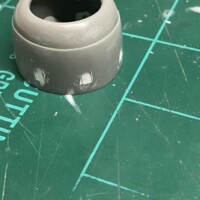
1. If you aren't careful, it is easy to remove too much plastic, leaving a depression that needs to be filled. Ask me how I know.
-
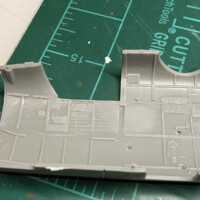
1. Interior lightly sanded and will be replaced with strip plastic and scratchbuilt parts.