Ferrets in the Mediterranean: B-17F Flying Fortress

Started by George R Blair Jr · 157 · 2 years ago · 1/72, Academy, B-17F, ELINT, ferret, Flying Fortress
  • Profile Photo
    George R Blair Jr said 2 years, 6 months ago:

    Thanks, John (@j-healy), John (@johnb), and Erik (@airbum). I keep trying to remember that I wanted to use a resin set to reduce the amount of work, but I am starting to think it may end up being more work than if I had used kit parts and then scratchbuilt the rest.

  • Profile Photo
    George R Blair Jr said 2 years, 6 months ago:

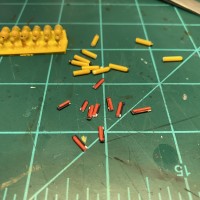
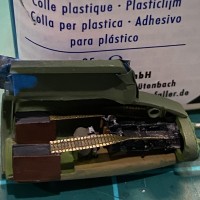
    I got a little additional detailing done in the nose section, then sprayed some primer to bring it all together. I think the pilot's compartment will be next, and then the radio/ferret compartment. I am almost done with the rear gunner's station, so that is a plus. I started scratchbuilding some of the things I will need later, like the oxygen bottles.

    Today is a short modeling day. We go to the kid's house on Sunday and play board games. I know that sounds a little retro, but we have a lot of fun playing the old games like Monopoly, Life, and Clue. More building tomorrow. Cheers.

    3 attached images. Click to enlarge.

  • Profile Photo
    Tom Cleaver said 2 years, 6 months ago:

    @gblair - one minor thing, probably too late to change anything, but painting this stuff before assembly will generally make things easier in the end. Since it's glued with CA glue, there's no chance of the glue harming the paint. (Yeah, another way to slow things down!) Fortunately, since the only parts of a B-17 interior you see (almost) after closing up the fuselage is the nose compartment and the cockpit, what you're doing here won't matter - but if you do another big resin job in the future, it's a good thing to remember.

    That and store your resin sets in a cool dry place. 🙂

  • Profile Photo
    Spiros Pendedekas said 2 years, 6 months ago:

    Love the overal progress, my friend @gblair! This is a superb looking interior!

  • Profile Photo
    George R Blair Jr said 2 years, 6 months ago:

    Thanks, Tom (@tcinla) and Spiros (@fiveten). You are right, Tom. I usually always paint the parts before I assemble them, but I wasn't sure how much I would have to scratch-build due to the missing details in this resin set. So, I decided to try a hybrid method where I would get the basic structure installed and primed, then I could paint and assemble the detail stuff. I made sure I could reach all of the stuff that is already installed so it could be painted in-place. I am currently building a lot of the other parts and subassemblies, like the seats and seatbelts, the oxygen bottles, fire extinguishers, control wheels, ferret equipment, etc. I will paint these items, as well as adding the 3D seatbelts, panel faces, etc before I add them to the structure. Like you said, I may end up regretting this plan. All of the other complete resin cockpits I have done were tubs and seats for fighters that were straight-forward to add, and it made sense to paint these early. I have been really disappointed with the level of detail in this resin set, as well as the many notable missing features. I think I might have been better off using the kit parts and scratch-building the rest. I appreciate you catching that I was doing this backward, but it was entirely part of what may yet be an ill-conceived plan. I may find that I have built myself into a corner, and it will be entirely my fault. To paraphrase the old military saying: No building plan survives the first squeeze of the glue. Cheers.

  • Profile Photo
    Tom Cleaver said 2 years, 6 months ago:

    Fortunately, as I said, you can't see much of a B-17 interior with the fuselage closed up, so whatever you're missing likely won't be obvious.

  • Profile Photo
    John vd Biggelaar said 2 years, 6 months ago:

    Excellent scratch building, George @gblair
    The interior has improved a lot already.

  • Profile Photo
    George R Blair Jr said 2 years, 6 months ago:

    Thanks, John (@johnb). More scratchbuilding today. :o)

  • Profile Photo
    capt. R said 2 years, 6 months ago:

    impressive scratchbuilding!

  • Profile Photo
    George R Blair Jr said 2 years, 6 months ago:

    Thanks, @lis. Nothing too demanding, so far.

  • Profile Photo
    George R Blair Jr said 2 years, 6 months ago:

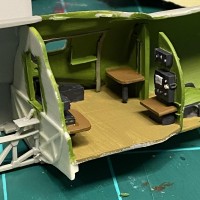
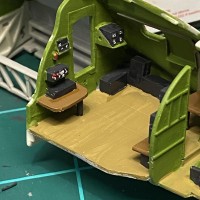
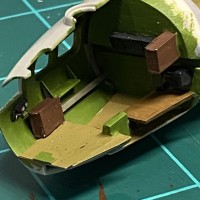
    The interior is starting to come together. I ended up scratchbuilding a lot of the interior parts. Desks and additional equipment were added to the radio compartment. The nose compartment was still pretty bare, even after adding the additional resin, so I added some detail to the back and side walls. I am currently working on the flight deck. In photos, this is a really busy place, so I am trying to make some additional detail to "busy-up" the pilot's compartment. In all of the photos I have examined, the two things you see in every compartment are yellow oxygen bottles and red fire extinguishers. There are two or three different styles of oxygen bottles visible in photographs. There are large oxygen bottles that appear to be attached to the walls behind the pilots that are system oxygen for the aircraft. The other two types are "walk-around" bottles that the crew would use when moving from one area of the plane to another.

    I hand-painted the floor, walls, and black boxes in the compartments. I had planned to spray them, but a lot of creative masking would have been required. I used Vallejo and AK 3rd Generation acrylics to do the painting. I added a drop or two of water into the paint to make it smoother to paint. The interior green in the photos is much lighter and brighter than it is in reality. I guess the camera in my iPhone couldn't accurately translate the paint color in the photograph.

    That's about it for now. I have spent a lot of time looking at reference photos so that I can piece together an interior that looks suitably busy. Trying to replicate everything in the plane, especially in 1/72, would be foolish considering not much will actually be visible. It is weird that once you start adding details it is tough to stop. I really want to close everything and get to the exterior. Anyway, hopefully more tomorrow.

    5 attached images. Click to enlarge.

  • Profile Photo
    Spiros Pendedekas said 2 years, 6 months ago:

    Your interior looks better and better, my friend @gblair! Details for 1/72 are simply amazing, kudos to your scratch building skills!
    Looking forward to your progress!

  • Profile Photo
    George R Blair Jr said 2 years, 6 months ago:

    Thanks, Spiros (@fiveten). Detailing is like an addiction...once you start putting details in the model it is hard to stop. I just wish I was better at doing it.

  • Profile Photo
    John vd Biggelaar said 2 years, 6 months ago:

    Fully agree on the interior looks, George @gblair
    Having a detailed interior, despite you wont see much of it at the end, is also what I like to achieve.
    Your scratchbuilding on this interior is excellent.

  • Profile Photo
    capt. R said 2 years, 6 months ago:

    Great interior! This Ammo feeder on tail gunner seat are PE part?