de Havilland albatross, 1/72

Started by Erik Gjørup · 25 · 1 year ago · 1/72, albatross, de Havilland, DH100GB, dh91, Valom
  • Profile Photo
    Erik Gjørup said 3 years ago:

    Possibly the most beautiful four engine propeller-driven airliner ever built

    - is how BAE Systems describe the type

    I tend to agree – even though it was not the most successful airliner for various reasons, not least world conflict.

    First off, you need stairs to get into an airliner


    And I bought some very heavy ones in thick brass.

    The plastic is from Valom, reputed for being less than precise – first impressions are good


    The fuselage halves are on one tree

    And the wings and almost everything else is on three trees


    There are also a clear tree that I forgot to take a picture off, but so far it looks promising

    The decals look thin and very precisely printed
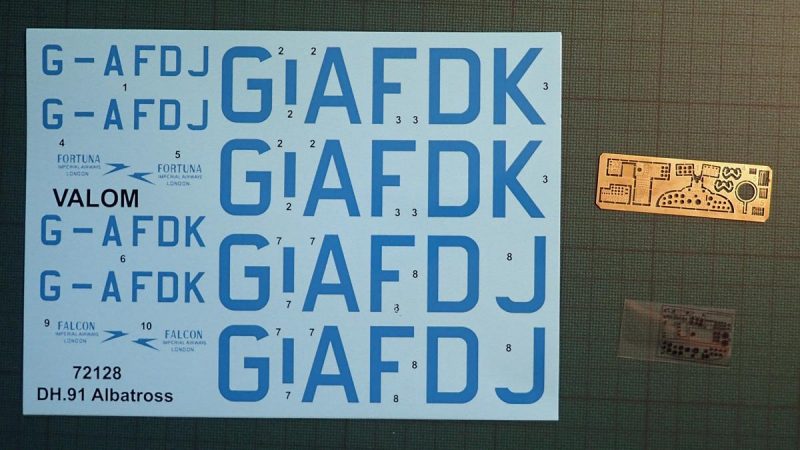


    The throttles are bent but salvageable

    A full plan for the two planes included on the decalsheet is included


    The instructions being a photocopy. A nice touch is that sturdy looking mainspar, and the assembly sequence has you add the upper wingskin last, likely to eliminate any large fillerneeding wingroots.

    As there are plenty of information “out there” on the type I shall not bore you with a lengthy description, suffice it to say that in all 7 were manufactured, all of whom carried names starting with F. Of these none survivrd the war, the last two being scrapped in 1943, one being destroyed by an air attack, the rest damaged in landing accidents! There is a detailed history on Wikipedia, and BAE Systems has a page about it too (where I found the heading text); https://www.baesystems.com/en/heritage/de-havilland-dh91-albatross

    I have quite a lot of builds at the moment, but suffer from lack of airbrushes due to need of maintenance, so this is a gap-filling build as spares are in the mail, but nonetheless one that I shall look forward to

  • Profile Photo
    Erik Gjørup said 3 years ago:

    Build begins

    I started this build with the undercarriagewell and mainspar

    The cockpit needs some paint before assembly, so I headed for the central knot of the plane


    Valom are shortrun kits in every sense of the word. No giudepins, lots of hefty ejectormarks, but some very interesting planes can be build. The major parts here were first primed with ordinary glue (Contacta), and when it had started to “bite” the parts were held together.

    Most assemblies are butt-joints, and some sort of jig is needed to hold the parts as the glue sets


    The rear wall in the main cabin is just helt vertical for now. I will come back and add a few pieces of sheet plastic cut 90 degrees to stabilize it from behind.

    Now I think I will clean a few parts for the next few steps. I just found out that Valom sells some resin benches and tables for this one, but I think it is still going to be the scratchbuilt that may yet win as it will take too long for a parcel to get here – and it will be a bit expensive only ordering one item I guess

  • Profile Photo
    Allan J Withers said 3 years ago:

    Interesting subject Erik, I'm watching !

  • Profile Photo
    Spiros Pendedekas said 3 years ago:

    What a nice entry, my friend @airbum! What an iconic plane, surprising to read only 7 were built!
    Great start putting it together!
    The Valom kit is challenging, as are all Valom kits, but your skills will produce a masterpiece of this beautiful plane!
    Looking forward to your progress!

  • Profile Photo
    Erik Gjørup said 3 years ago:

    Thanks Allan. Hope I can make some progress soon.
    Spiros, indeed - they were started as "the internet of those days" promising speedy maildelivery, then progressed to people, and ended living in the harsh outdoors moving important stuff to and from Iceland wich did them no good. As always I am now thinking deep about the interior. Have to decide before long - probably later today.
    Thanks for watching.

  • Profile Photo
    Erik Gjørup said 3 years ago:

    Preparing

    To ease the future assembly a bit small pieces of evergreen were added

    As this by nature is all-butt joints, I decided to add a number of small pieces of plasticcard along the fuselage halfs


    As you may have noticed they are added along the top on one half and along the bottom on the other. I hope that this way I may be making it all a bit easier, and as it is still a few weeks away that the fuselage gets assembled, the glue will have hardened nicely when I come back and trim the plastic. By nature the pieces will be at an angle (round fuselage) and I will trim a lot off, perhaps using a file to make the parts align easier.

    Still not decided on the interior, but started installing the walls, so it has to be soon – at least not long after the cockpit is installed

  • Profile Photo
    Erik Gjørup said 3 years ago:

    interior

    I found this picture on several web-sites, showing how the interior might have looked (the Valom resin is cast exactly like this)


    At least it is one way of doing it, and the resin available may save a lot of time, but will not be very realistic with all pillows and headrests in the same position.

  • Profile Photo
    Spiros Pendedekas said 3 years ago:

    The Albatross is starting to take shape, my friend @airbum!
    Love your plasticard guides, as well.
    Looking forward to your interior solution.

  • Profile Photo
    Erik Gjørup said 3 years ago:

    This is a rather long fuselage @fiveten, not like @kalamazoo's Fokker in "movies", so I tought it a bit safer to add some guides. I have a few days at work, and I think I have to get some of the other builds going as I expext spareparts for airbrushes to arrive soon 🙂

  • Profile Photo
    John Healy said 3 years ago:

    This is a great subject, Erik. I’ve always wanted to see one of those kits built.

  • Profile Photo
    Erik Gjørup said 3 years ago:

    Thanks John. I shall try to get moving again, but first work will take up most of my days for another week or so. Stay tuned @j-healy!

  • Profile Photo
    Erik Gjørup said 2 years, 12 months ago:

    Tabs trimmed

    and one more divider

    With painfully slow progress on all my builds lately, I did some dryfitting and sanding

    The cardtabs were trimmed short and sanded at an angle


    The opposite sides without tabs were also sanded lightly in order to ensure as flush a fit as possible.

    I then dryfitted the centersection and the floor


    There is going to be a lot of dryfitting and sanding and such on this one – but I really sense the great lines of the albatross in almost every detail.

    next up I have high hopes that spareparts for my airbrush has arrived to enable some painting and then the fuselage is not far from being assembled

  • Profile Photo
    Erik Gjørup said 2 years, 9 months ago:

    Have a seat

    Well, I finally ordered the resin seats to get things moving here

    The cabin dividers were installed some months ago actually


    One of them is just a bit off 90 degrees

    I cut the seats and tables from the casting blocks. No sanding, just a cutter and knife on some wet tissue to avoid dust, then a dryfit


    The walls need a tiny bit of adjustment, then it is on to the cockpit!

    next up – really your guess is as good as mine, so tune in again to check

  • Profile Photo
    John Healy said 2 years, 9 months ago:

    Wow, Erik. Those seats are really well detailed.

  • Profile Photo
    Spiros Pendedekas said 2 years, 9 months ago:

    Nice detailing, my friend @airbum!
    This is one cosy interior!