DH Venom FB-4 -Classic Airframes 1/48

Started by Colin Gomez · 25 · 2 years ago
  • Profile Photo
    Colin Gomez said 3 years, 6 months ago:

    I see that the de Havilland GB is where the action is these days. Lots of great proposals coming up. I have been working away on my Shiden Kai over in the EoJ GB but things are very quiet there. Anyway, I am happy to look over one of my three proposed DH builds - the DH Venom FB.4 in 1/48.

    Hard to believe that I acquired this kit 13 years ago. It is really quite a little gem. I think maybe I was moving towards 1/32nd aircraft when I picked it up and didn't get around to looking it over. It is really tiny but very well molded. As you can see, the parts count is very low. The only significant challenge on first examination will be the resin bits. I hate cutting resin off of blocks -especially when it is very delicate. Anyway this looks pretty straightforward with minimal sawing to do. I will go with the provided kit detail in the cockpit and concentrate on painting carefully. The ejection seat looks very nice. Clearly I will need to dig into my cockpit jet instrument dial sheets for the control panel (no dials on the decal sheet). The fit looks excellent on major components. The booms appear nice and straight and the wings fit very snugly to the fuselage as taped together. I will go for the the 249th squadron option for Operation Musketeer. I really like the stripes used in this operation - very eye catching and nicely harmonious with RAF camo. Oddly enough, the box art is the only painting guide the kit contains. Although there are decals for two other options, there are no profiles for them. That's it. I hope this will be an easy project; I really need one. Speaking of which, I have to get back to riveting my Shiden Kai. If you'd like to check it out, I have been learning a few useful things about that particular labor-intensive activity. Happy modeling.

  • Profile Photo
    Allan J Withers said 3 years, 6 months ago:

    Good looking scheme Colin !

  • Profile Photo
    Spiros Pendedekas said 3 years, 6 months ago:

    Hi Colin!

    This is a wonderful choice! The kit looks very well detailed at key areas, those are some lovely resins! I hope the limited run nature of the kit will not give you significant fit issues.

    I can also see that there's plenty of room at the front to put sufficient weight. As per my Vampire in-progress build here in this DH100GB, quite a bit might be needed: these are tailsitting beauties!

    The "Operation Musketeer" schemes are really eye catching, your excellent skills will deliver spotless yellow/black striping (a process I hate...).

    I love the Classic Airframes instructions. In fact I use their Vampire ones as a reference for extradetailing my Hobbycraft one!

    Quite a few projects are running more or less simultaneously at the moment, but, again, how can you say no at those gorgeous GBs that might emerge, like this DH100 here?

    I just try to concentrate at on or two and proceed them to finish.

    Waiting for your progress!

    Going to check your Shiden-Kai!

  • Profile Photo
    Erik Gjørup said 3 years, 6 months ago:

    Colin (@coling) I shall be strapped in for this build too. It seems like more or less all groups are running at near idle these days, and I am no exception - work and daylight will change that soon I think, at least where I live.

    I usually free resinparts by cutting with pliers if at all possible without harming the item, and cleanup with a sharp blade. That usually works, but flattening with wet-sandpaper may be needed now and then.

  • Profile Photo
    Jeremy Millan said 3 years, 6 months ago:

    Looks like this group is where all the cool kids are now! Very cool plane by the way! I'm gonna have to join in soon

  • Profile Photo
    Colin Gomez said 2 years, 8 months ago:

    Hi and thanks, Allen, Spiros, Erik and Jeremy. Sorry to have gotten side-tracked from this build. I was hacking resin from pour blocks for my Macchi and P-40 in the DAW GB when I remembered this little Venom. It seems we are running out of time for the deHavilland GB, so I better get busy. It will be nice to have a very quick and simple build for a change. The only thing holding me back was dealing with the big chunky resin bits. The sawing I completed today was actually a real chore as Classic Airframes seems to use some rock hard resin but I finally got all major resin components detached and sanded.

    I am happy to find everything fits inside the fuselage like a glove, including the lower nose piece, which doubles as an interior cockpit floor section. The cockpit is all black, so painting will be fairly quick for the pit and IP, except for the ejection seat. I don't really like molded on seat belts but I will manage this time and hopefully paint it up decently. The IP will need some decals for the gauges and drops of future for each one. I think it will look fine with a couple of hours of work. The fit of this kit is very good. I should be ready to paint the camo by next week. I found the painting instructions online for doing the 249 Squadron aircraft on the box art. One problem is that I don't have PRU Blue for the undersides. Does anyone know a Tamiya mix for this? I could order it but paints tend to be slow in coming from eBay.

    That's for looking. More soon.

  • Profile Photo
    Erik Gjørup said 2 years, 8 months ago:

    Great to have this one back online @coling. It is great that the resin so far caused little or no trouble at all, and the painting guide is another great find online.

  • Profile Photo
    Spiros Pendedekas said 2 years, 8 months ago:

    Looking great, my friend @coling! I just love that Venom shape coming together!

    Regarding the PRU Blue Tamiya mix (!) I found a very interesting discussion at Britmodeler:

    https://www.britmodeller.com/forums/index.php?/topic/235088113-anyone-have-a-good-mix-using-tamiya-paints-to-do-pru-blue/

    Hope this discussion will be of some help, in order to proceed to your PRU Blue by mixing Tamiya paints.

  • Profile Photo
    Colin Gomez said 2 years, 8 months ago:

    Thanks, Erik. The resin is good quality and easy to install. The only issue is that it is very hard and difficult to saw through quickly. This can actually be an advantage if you don't want to cut too much by accident. Since almost all of the removal from casting blocks is now finished the build will progress quickly.

  • Profile Photo
    Colin Gomez said 2 years, 8 months ago:

    Thanks for the info on the PRU Blue, Spiros. The Venom does have a nice shape, doesn't it? It looks like a hot rod version of the Vampire and that swept, near delta wing with tip tanks looks pretty cool. I had thought about doing a "Twin Booms" including props and jets GB but the possibilities are probably too limited to bring it to light.

  • Profile Photo
    Colin Gomez said 2 years, 2 months ago:

    I don't know if I can still post this since the de Havilland GB has officially ended.. If it doesn't work, I will repost in WIP. Anyway, I got stalled on my Venom due to the challenge of the resin ejection seat and IP. For the former, I couldn't paint the one piece cast seat and harness so it looked satisfactory to me. It always ended up looking like a goopy mess even after careful brushwork, washes,etc.
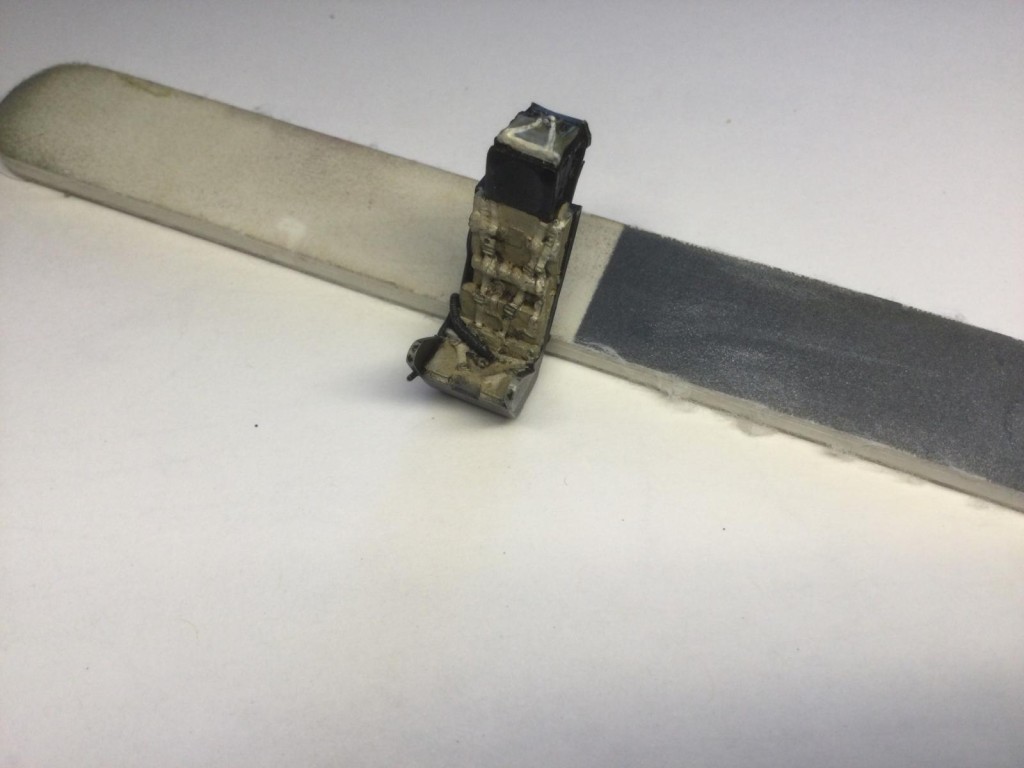
    After leaving it for months, I finally decided to shave off all the details above the lumber support line and redo everything with my paper, tape and spare etch. I consulted numerous photos of the real thing and I think I replicated the way the harness really works and hangs. The effect is much more 3D and authentic looking, IMO.
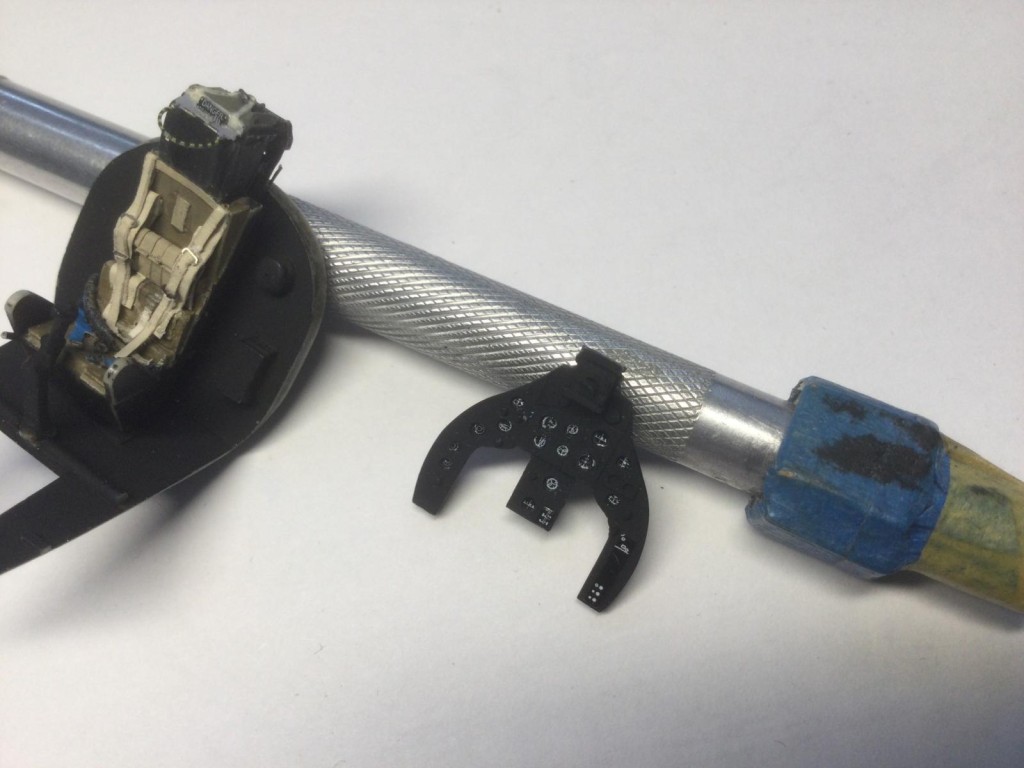
 For the IP, I dreaded doing the deeply sunken dials with decals as I knew they would get mushed up no matter what my technique. I went ahead anyway with pre-cut Airscale instrument dial decals and got an OK result (with problems exactly as expected). But all is well. It turns out that the IP and seat are so close inside the barrel shaped pit that the IP is practically invisible when the fuselage is closed up , so all flaws are quite hidden.

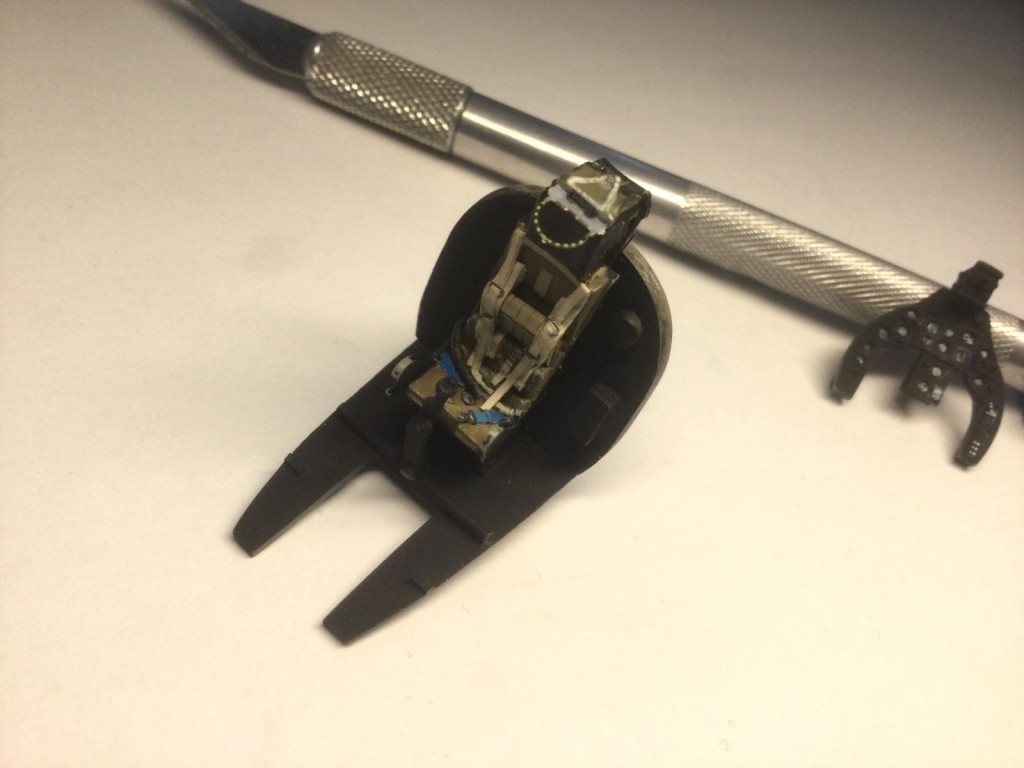
    The real challenge came in closing up the fuselage while aligning the seat and gun sight/IP so everything was centered. It was also necessary to keep shaving the bottom of the seat and lowering it down so that the canopy would fit over the seat (good thing I anticipated this problem as it needed to go a lot lower than expected). Lots of work there but a good result. I added a big fishing weight to the nose, but also left the lower resin nose piece unglued so I can insert more, if needed.

    I have now done the major fuselage and wing assembly and fitted the resin intakes. I will fit the delicate vanes inside the intakes last after major assembly and sanding. I spent this morning filling in various gaps in the wing root and intake fit with stretched sprue. I also created a support rod for each of the tail booms. The booms are just friction fitted until I sand all other filled joints, giving me room to work.
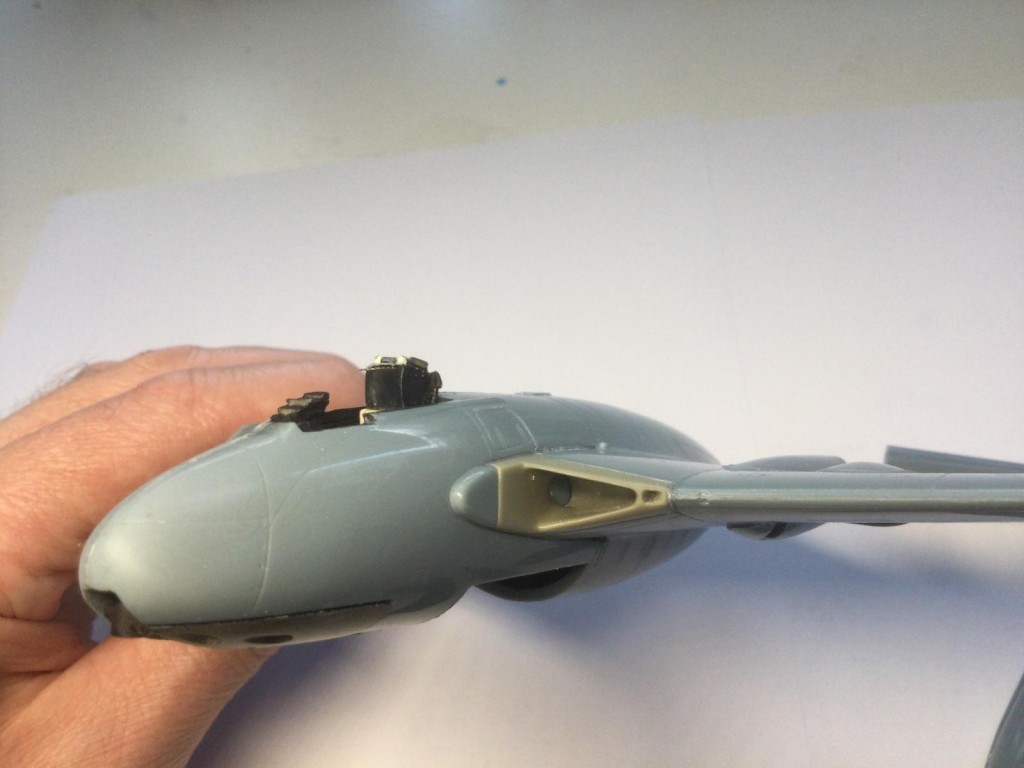
    That's it for now. Pics speak for themselves. I really like the bat-like lines of the Venom, much sleeker than the Vampire, and am looking forward to getting this to the painting stage.

    Comments welcome.

  • Profile Photo
    Spiros Pendedekas said 2 years, 2 months ago:

    Great progress, my friend @coling! Quality, attention to detail and excellent craftsmanship are evident upon seeing your results so far.
    Great "save" with the seat: looks much better now!
    Yes the Venom's charm surpasses the Vampire's.
    Looking forward to your progress!

  • Profile Photo
    John vd Biggelaar said 2 years, 2 months ago:

    The seat is a huge improvement, Colin @coling
    Great idea on the support rods for the tail section.

  • Profile Photo
    Erik Gjørup said 2 years, 2 months ago:

    The "rescue ops" looks very succesful @coling.

    As for continuing the build, please do it here - as I said anything started before the deadline is permitted to keep going. (I have a few of my own to finish too. . .)

  • Profile Photo
    Colin Gomez said 2 years, 1 month ago:

    Thanks, Spiros. It's a simple enough model, parts-count wise but some work to fit, fill and sand.

    Thanks, John. Glad you like it.

    Thanks, Erik. Happy to hear I can still finish it.

    Here is the latest update.

    I had quite a bit of filling to do with stretched sprue for the styrene joints and cyano super glue for the resin/styrene joints.

    All done and sanded now. I was very careful with the boom alignment and filling all gaps. Also lots of work with the intakes. I wanted a perfectly smooth intake ramp, as on pics of the original so I filled this with superglue. Fitting the windscreen and canopy was tricky. I want to have the option of closing the canopy, so I had to add shims of thin styrene to get the joint perfect. Short run kits don't fit like Tamiya kits. The styrene strips I used to clean up the windscreen were meant to fill gaps and make it more resemble the real thing - as in these photos. I much prefer doing this kind of work in 1/32 as the bits of styrene needed are so tiny and fragile in 1/48. Anyway, I think it looks pretty good. Just a bit of final sanding to do when the glue is a bit better set.

    BTW, very fiddly work to do the canopy stripping while avoiding damage to clear parts with liquid glue. Glad its over.

    I am almost ready to paint. I will just need to add the intake vanes and the wing fences. I will also test the sit of the tricycle undercarriage before gluing on the resin nose underside. Don't want to have a tail sitter.

    I hope this looks good. Comments welcome.