Macchi C.202 Folgore – Hasegawa 1/48

Started by Colin Gomez · 17 · 3 years ago
  • Profile Photo
    Colin Gomez said 3 years, 3 months ago:

    I came across this partly painted model when I dug out the S.79. The Macchi C.202 is actually a favorite of mine. I have always wanted to build it in 1/32 but was disappointed in the shape of the PCM version, which I bought and finally sold. Hasegawa's little 1/48 version is well-detailed and accurate and well worth building. As you can see, I partially painted the True Details resin cockpit but had originally used MM Acryl Pale Green. Today, while repainting the S-79 pit, I decided to do the Macchi as well. I am so impressed with the detail possible in this scale that I decided I would finish it. I gave it a shot of Tamiya Clear over the newly- applied XF-71 and will do detail painting and an oil wash this week. I haven't cut the resin out yet but that should be doable after painting. Since I also have an Eduard detail set, I am prepared if the resin pit doesn't fit well. Good to have a back up,so I also painted the kit cockpit pieces.

    With enough decals on hand from Sky and Super Scale I can make almost any aircraft possible for the DAW.

    The kit decals are actually quite nice, too. Here are three profiles in the splotch camo I prefer (over the usual "smoke rings"). My plan is to use the Macchi as practice airbrushing Italian camo in this scale before I paint the S.79. They will also be nice companions for this GB, particularly displayed side by side.

  • Profile Photo
    Spiros Pendedekas said 3 years, 3 months ago:

    This is a great entry, my friend @coling!

    The Hasegawa looks to be a very good kit. And, what a selection of "extras" you have acquired! I will be looking forward to your chosen scheme, it's a great idea to use it as an intermediate step for your Sparviero camo.

    I have recently cheaply acquired a Tauro 1/48 202, definitely looking limited run. Crude might it be looking, compared to the refined Hasegawa, I might give it a try sometime...

  • Profile Photo
    John vd Biggelaar said 3 years, 3 months ago:

    Fantastic choice, Colin @coling
    The 202 is also a fantastic looking Italian airplane.
    Looking forward to your chosen scheme.

  • Profile Photo
    George R Blair Jr said 3 years, 3 months ago:

    I found your Macchi, Colin (@coling), so sign me up for the trip. Camo should be fun. :o)

  • Profile Photo
    Pedro L. Rocha said 3 years, 3 months ago:

    Yeah, got the same kit and the wonderful Sky decal sheet. Not only it offers a bunch of options but the decal quality itself is also quite good..
    looking forward for the next steps Colin

  • Profile Photo
    Erik Gjørup said 3 years, 3 months ago:

    Nice "DB-engined" fighter - I'm strapped in!

  • Profile Photo
    Colin Gomez said 3 years, 2 months ago:

    Thanks for your kind comments, Spiros. The Hasegawa base kit is really nice. I will use the True Details set as a kind of experiment as it has been years since I did a complete pit with resin. This is also practice before I do the Cutting Edge P-40B pit from the same kind of materials. Feel free to do the Tauro kit for this GB. Can't have too many Macchis.

    Thanks, John. Hope you like it.

    Thanks, George. I think the camo will be fairly challenging to prefect at this scale. Even with my best airbrush, I may still make stencils for the splotches, at least experimentally. One advantage of that approach is tight control over the pattern.

    Thanks, Pedro. I used Sky decals on my Hasegawa Ki.84 build a while back. They are indeed high quality, if a bit fragile.

    Thank, Erik. The C.202 is indeed a classic Italian/German hybrid. Funny that the Italians got the best out of their designs by grafting on German engines. You would think with all of their pre-war Schneider cup experience they could have done better with home-made power plants. I hope you will be happy with today's build progress (see below).

  • Profile Photo
    Colin Gomez said 3 years, 2 months ago:

    Here is some work I have done on the Macchi. I finally cut the resin pieces from their blocks, touched up paint and proceed with oil wash for highlighting.

    The fitting of the resin pit was quite tricky, in that it doesn't fit in the same gaps provided for the kit parts. Actually the floor section DOES go in the slots for the kit but the sidewalls must be carefully tweaked to fit around where the floor is required to fit. I elected to attach each sidewall to the inner fuselage first, which made the positioning easier. Doing the whole insert as one complete assembly/unit to drop in makes good positioning almost impossible.

    I did the IP using the resin piece since part of the panel was molded in to the resin floor and couldn't be replaced with etch.

    The resin dials are not flat but have crude raised details meant to be painted. It was necessary in most cases to cut these off with an Exacto blade to make a flatter surface for each tiny decal. I punched out instrument faces from various sheets in the spare stash using my punch and die set. Applying such tiny decals with tweezers and redoing many several times was really time consuming and quite a trial and error process.

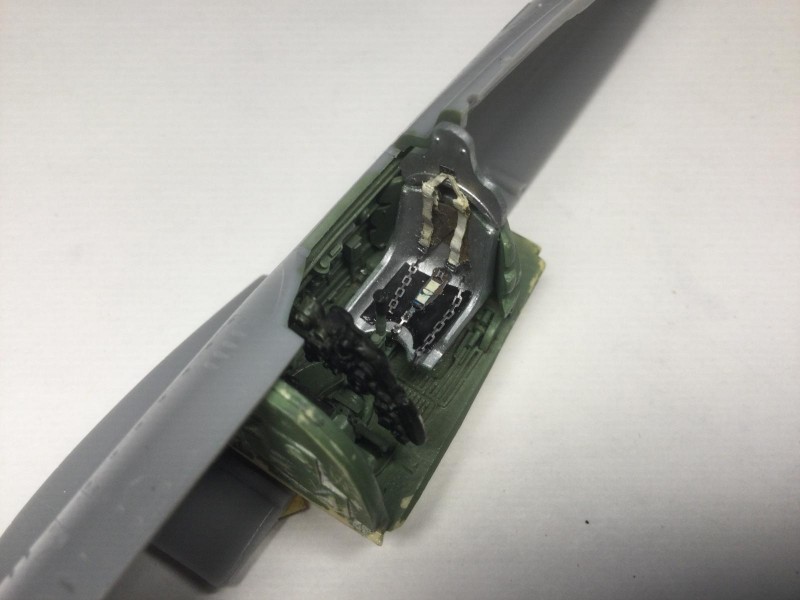
    Even if the IP was troublesome, I was very impressed by the depth and tiny details of most of the resin parts. At the same time one key part - the seat - was a disappointment. In my rush to get on with the build I simply painted the seat carefully, highlighting the belts and buckles and accentuating details with an oil wash. I was very pleased with the look of it and then suddenly realized from my references that it should be in bare metal, rather than cockpit green. Not only that but the Italian style harness is actually very different from what True Details provided. Rather than strip it of paint and sand off the erroneous harness, I decided to start from scratch with the kit seat, which would fit just fine in the resin floor. I had the Eduard detail set for the harness but it was not entirely accurate either. I decided to build up the belt, back pad and chain (!) harness using masking tape glued to scrap etch for buckles. I did the seat itself with RUb nBuff, my favorite way to do smooth metal on small parts. I have to say the whole process of building and painting the seat and harness was quite difficult. What is most difficult for me is having to work with such TINY bits of masking tape and etch. I really admire you guys who work in 1/48 all the time. I find 1/32 much more relaxing by comparison. I have been tweaking the seat as I photograph it. While taking closeup pics, I began to see flaws and couldn't leave them be. I think the final results are pretty good though.

    The back pad is was tricky to construct with tiny masking tape cross pieces, Also, the odd suspension of the doubled-over harness required care to tweak and reposition over and over. I think it finally hangs correctly. The chains are from the Eduard set and are quite nice. There is no lap belt, apparently but I may add a leather seat pad.

    So, that's it for now. I will probably get the fuselage halves together tomorrow if I can stop tweaking the seat. I think it will be fine and I mostly want to get on with exterior the camo work.

    More postings on the SM.79 soon as well. It is coming along pretty well. as far as the interior goes.

  • Profile Photo
    Eric Berg said 3 years, 2 months ago:

    Hey there @coling - glad I noticed this posting on the headlines page. I have the Eduard limited edition of this kit which I felt daunting particularly when it gets to the painting stage and never started it. So it is with great interest I will be following your Macchi journey starting now. That seat and masking tape belts look superb. I’m going to try that. Off to a great start!

  • Profile Photo
    Spiros Pendedekas said 3 years, 2 months ago:

    This is amazing progress and truly fantastic skills, my friend @coling! The cockpit looks amazing, the individual dials look the part, the scratchbuilt seat and harnesses with the chain at the bottom part look simply wonderful.
    Looking forward to your next steps AND the Sparviero!

  • Profile Photo
    John vd Biggelaar said 3 years, 2 months ago:

    Serious work done, Colin @coling
    Your scratchbuild straps, in principle the entire seat, looks very nice.
    Sidepanels are great as well.

  • Profile Photo
    Tom Cleaver said 3 years, 2 months ago:

    Really nice work here, @coling. I've done a couple of these, but long long ago - so long ago I remember using the Jaguar resin cockpit on one. It does make up into a very nice representation of this beautiful airplane.

  • Profile Photo
    Colin Gomez said 3 years, 2 months ago:

    Thanks, Eric, Spiros, John and Tom for your kind comments. I haven't updated this build in a while but I have been busy. The Tempest and Bf-109 have been getting quite a bit of my attention and I will update those next.

    I added some more detail to the pit before finally closing up the fuselage. Specifically, this was a thin leather pad for the seat - very clear in museum examples and some period cockpit pics. I made the pad from Tamiya tape and painted it MM Acryl Semi-Gloss Black. I also created a single strap for the lap belt part of the weird harness. This was done with Tamiya tape, spare etch and a short bit of chain clipped from the excess for the shoulder harness.

    I am quite pleased with the accuracy of the belts I made, however, others might want to use the many aftermarket options from Kits World or Eduard.

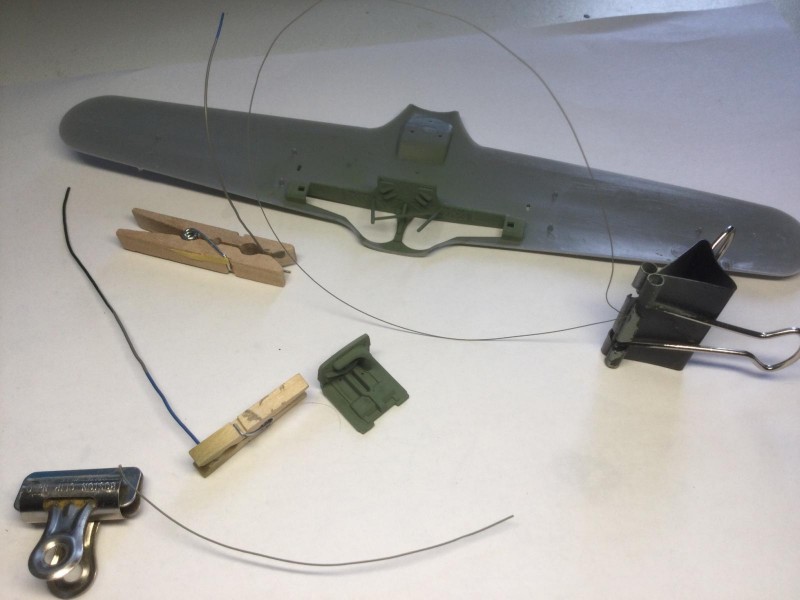
    I sealed up the fuselage in stages to make sure it all wrapped around the cockpit insert, starting with the spine and waiting a couple of days before joining up the fuselage halves on the underside. For the next construction stages, I decided to glue on the upper portion of each wing half. This preserved the correct dihedral and eliminated potential gap or alignment issues with the wings. I also wanted to create a clearly defined space for building up the area behind the engine in the central wheel bay.

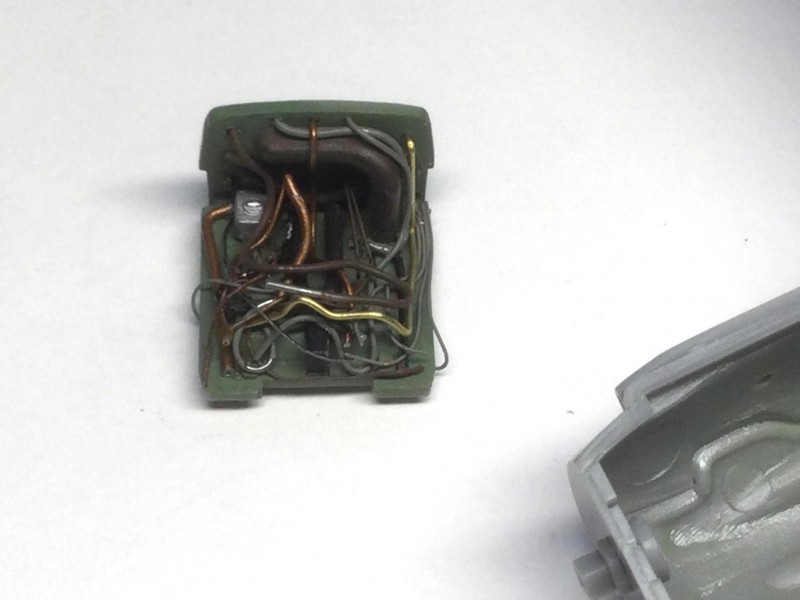
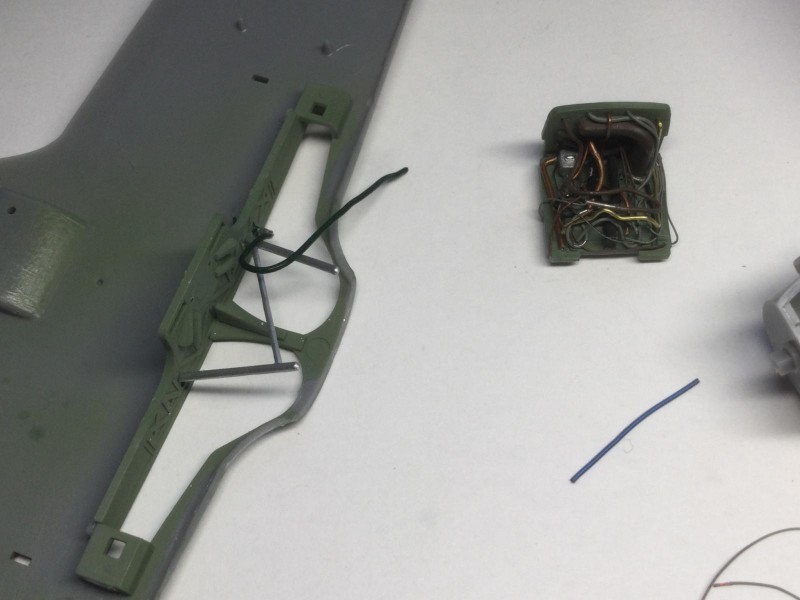
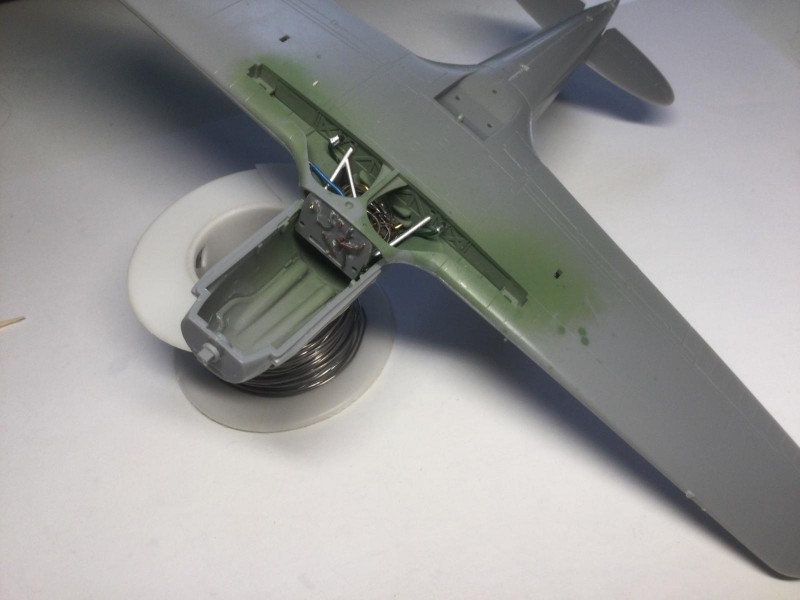
    Museum walkarounds clearly show a veritable maize of plumbing for the DB 605 engine, The kit provides a simplified molded piece with one large duct and a thinner bit of ducting in a tuning fork shape (see photo).

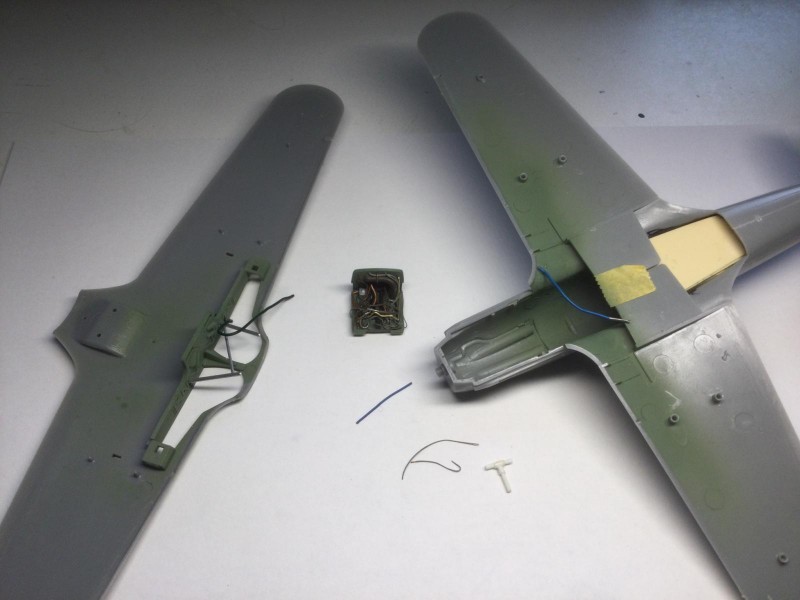
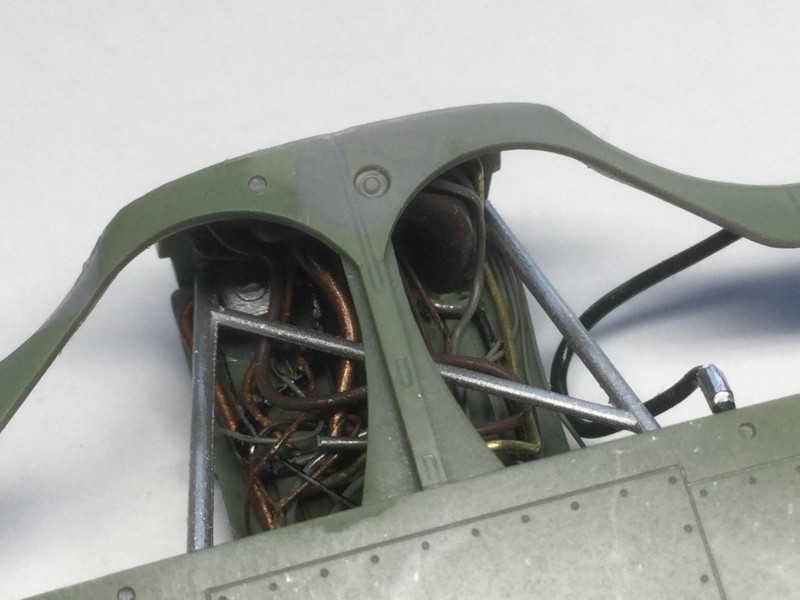
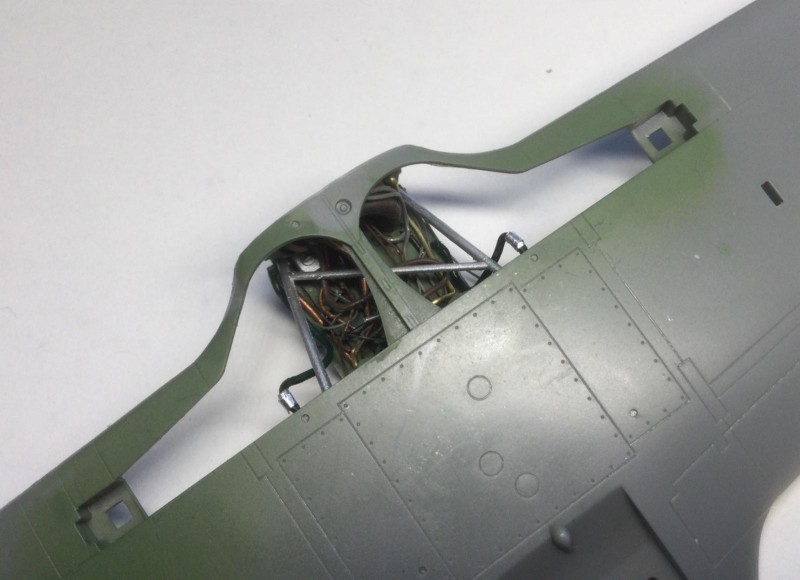
    I started by painting the kit ducting red brown and black and "metailizing" this with rubbed on graphite. I decided to collect a variety of thicknesses of solder and copper wire and paint them to represent all the other different kinds of tubing and wiring behind the engine. I used RLM 02, Red-Brown, Black, Copper, and Dark Brown acrylics to paint different strands. Green and Blue were used for the hoses meant for engine coolant and air. I also had some brass wire, which I left in natural metal for one length of duct. I drilled holes in the firewall piece to glue in lengths of painted wire before I carefully bent them into curves and overlapping layers that matched museum pics. The kit provided bracing over top of the ducting, which I painted with Rub N Buff silver. I took special care with getting this to fit well, look authentic, with sufficient depth and with some hoses having very specific color and placement, such as the green coolant hoses from wing tanks and the blue oxygen hose (or possibly blue for compressed air for the cowling guns).

    Being happy with the plumbing, I assembled the wings and fuselage to lock in the detail, The first pic shows how I attached the wires and solder through drilled holes.

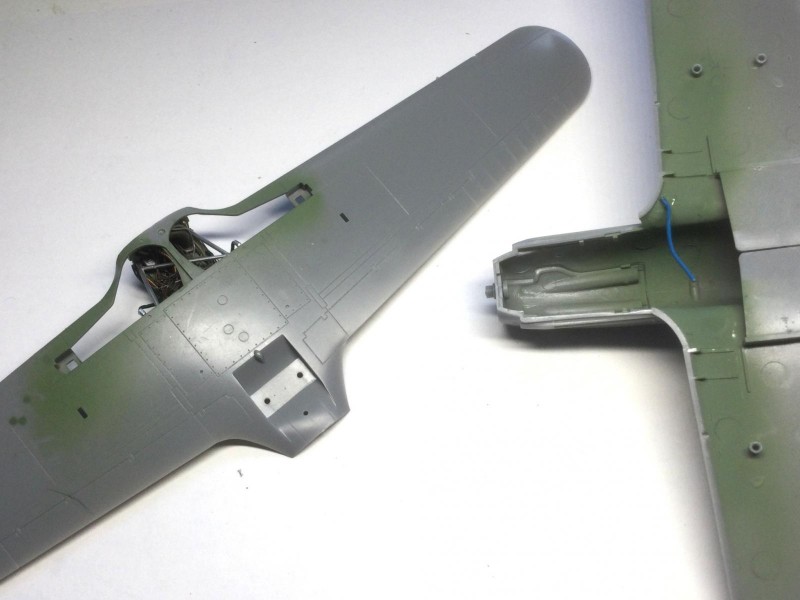
    The other pics show the full assembly with the air hose added and one pic of the full model at this stage. I have been experimenting with my airbrush for the splotch pattern camo, which I will also share in a near future update. For now, I want to get on with other updates.

    I hope this looks good to you. I have never attempted such an elaborate bit of plumbing in this scale before. It was fun learning some of the functions of the elements. It reminded me of doing small engine mechanics in High School by taking apart, sketching and reassembling engines.

  • Profile Photo
    John vd Biggelaar said 3 years, 2 months ago:

    Wow, this is serious plumbing, Colin @coling
    Beautiful work on the tubes and seat pad as well.

  • Profile Photo
    Colin Gomez said 3 years, 2 months ago:

    Thanks. John. Getting started on that detailing held up the build for a while. It was quite relaxing to do though when I finally took it on. It is interesting working on a 1/48 single engine prop for a change. The model seems so tiny compared to 1/32. Hopefully I will proceed to painting this week.