The Day the Music Died – Part 2: The Aircraft

Started by James B Robinson · 69 · 4 years ago · C-64 Norseman, Glenn Miller, Modelcraft, RAF Twinwood
  • Profile Photo
    Greg Kittinger said 4 years, 6 months ago:

    No shame in taking the easy way out! 😉

  • Profile Photo
    Erik Gjørup said 4 years, 6 months ago:

    The Norsemen in Greenland did not have glazed hatches in the roof, however it would appear one of them had a hatch (OY-ABA) but covered, not with glass.
    If they had a hatch it might be more of a service hatch for floatplanes, in order to attach the hoisting chain to the eyebolts to lift them onto a ship. Your solution is perfectly fine, just wanted to add my pennies worth to the info-base 🙂
    Keep the posts comin'

  • Profile Photo
    James B Robinson said 4 years, 6 months ago:

    Greg @gkittinger, Right? I am pretty certain there was not a window in the top of the UC-64's used by the U.S. Military. Funny thing, if you look at the Revell 1:72 kit from 2009, it has the roof window included in the build, but the diagrams showing the paint and decals doesn't show it. Of course, this was just a re-boxing of the Matchbox offering.

    The Norseman was pretty much built to order for the Civil versions, so if someone wanted a window in the top, they probably got it.

  • Profile Photo
    James B Robinson said 4 years, 6 months ago:

    Erik @airbum, This sounds like a more reasonable idea to me. Spragg's book does mention something about a hatch in the roof for escaping. He also talks about the unlikeliness of the use of the hatch at sea since most believe the plane would cart wheel when ditched because of the fixed landing gear.

    It's quite the puzzle. Once I get it sanded down, maybe I'll just scribe some lines to imply it is a covered hatch. 🙂

  • Profile Photo
    James B Robinson said 4 years, 6 months ago:

    Weekend update. Doesn’t look like much, but quite a bit of modelling transpired over the last few days. Finished the seams on the fuselage, added the rigging to the horizontal stabilizer using piano wire. I was afraid it might look a little thick, but to scale it is close to ¾” diameter which felt about right to me.

    Here is the fuselage after final sanding:

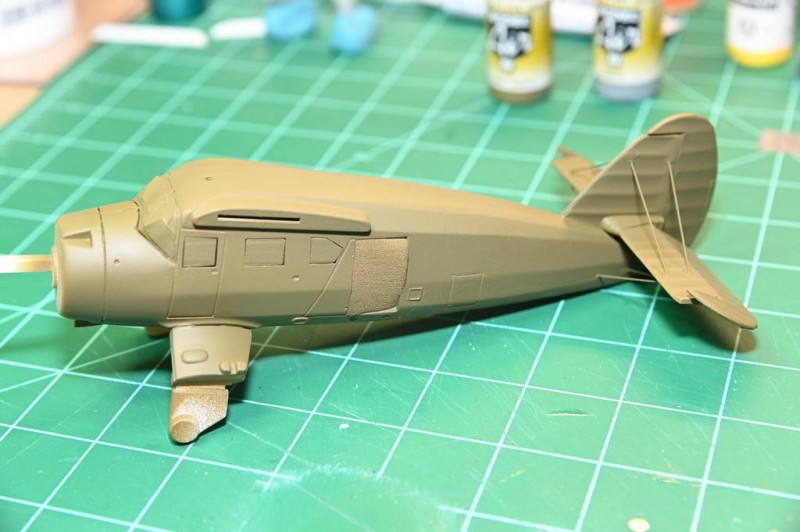
    I installed the landing gear struts. The main struts are used in all versions with floats, skis or wheels being interchangeable. I then gave it a light coat of paint. A few imperfections became apparent, but nothing unsettling that cannot be remedied. I also realized that the rigging may become a problem spot when I go to apply the underside paint and the tail numbers. I think I will remove them prior to that and reinstall later.

    Here is the fuselage after first coat of paint:

    I also assembled the wings and gave them a coat of paint on the topsides.

    Like I said, doesn’t look like much but I did get quite a bit of the sprues off the trees and prepared for paint and installation.

    For now, I will concentrate on getting the rudder prepared for its identification stripes and tail numbers. Since there are no decals representing 44-70285, I will be using stencils from Maketar Paint & Masks. This will be my first time using their products.

    It may be a week or more before the next update. Next weekend is a big Airshow Weekend here, weather permitting, so I will be away from the bench for that few days.

    MTC………James B

  • Profile Photo
    Erik Gjørup said 4 years, 6 months ago:

    Well - that was one of those jobs with a lot of work for little visual - BUT it looks a lot better in the basic color. Happy landings at the airshow!

  • Profile Photo
    James B Robinson said 4 years, 6 months ago:

    Update 10/17/19

    I recently reached out to my previous contact at the Twinwood Aviation Museum with a few questions regarding the Twinwood Control Tower during war times. Specifically, was the fencing present in some of the photographs typical of the period and what was the purpose of the building located to the west of the Tower? I was playing around with possibly enlarging the base size for the Diorama and maybe including another structure.

    Not receiving any response after seven days, I found another point of contact through the Museum’s Facebook Page. A gentleman by the name of Robert graciously responded rather quickly and offered some great insight.

    This recent correspondence with the Twinwood Aviation Museum has brought to light that I made a mistake in believing the Control Tower was painted during war time. It in fact was only painted during the renovation period (between 2000 to 2001) to protect the brickwork from weathering and further deterioration. Really feel a little ignorant for making this assumption now. The building was clearly not painted in some of the photographs prior to the renovation.

    This new piece of evidence will clearly add some time to the process. Instead of one color being applied to the exterior of the structure, I will now be dealing with several shades to correctly portray the brickwork.

    I will have to work on this pretty soon and will share some of my lessons learned in the next article covering the construction of the Tower. Stay tuned.

    To refresh, here is what the tower looked like before the restoration:

    MTC………James B

  • Profile Photo
    Louis Gardner said 4 years, 6 months ago:

    Those are some very useful and very neat looking photos... So was the "Fire Tender" building used to house the airport Fire / Crash trucks ?

    Looks like your UC-64 is coming right along. Hope you enjoy the weekend, and the air show is a good one.

  • Profile Photo
    James B Robinson said 4 years, 6 months ago:

    Hey Louis @lgardner, Yes this is where the Fire trucks were housed.
    Airshow was hot on Saturday and didn't shoot much since I was babysitting Momma and Future Momma in the VIP Tent. Sunday, totally different animal. It's going to be a bit before I have the images posted. Stay tuned.

  • Profile Photo
    James B Robinson said 4 years, 5 months ago:

    Update 11/03/19

    Been a while since the last update. I was struggling a bit with the painting of the tail colors. The top area of the tail had several stripes indicating the plane was used by USAAF Service Command, basically an airborne Taxi.

    I was having a terrible time getting the Orange-Yellow (ANA 506 / FS 13538) to cover the previous Olive Drab 42 coat I had previously applied. I first attempted coating in a white, but the paint build up and subsequent bleed through of the previous coats was unacceptable. A new plan was required!

    I disassembled the tail section and removed a majority of the paint which involved taking apart the horizontal and vertical control services.

    After preparation, I was able to re-paint the previous pieces and a few additional surfaces.

    Since the Identification numbers for Miller’s plane were not supplied with the kit, I had to come up with a few options. First was replacement decals. When they arrived, I realized they were not a close match to the ANA color of the paint I had available.

    Which is the correct color, I’m not sure. I decided to use painting masks instead and guarantee that the numbers and the stripes match.

    MTC………James B

  • Profile Photo
    James B Robinson said 4 years, 5 months ago:

    Update 11/11/19

    After successfully resolving the paint problems with the tail, I decided that the underside or lower color looked a bit dark (see previous images).

    The information covering the colors are based on Modelcraft’s instructions and I have not been able to find any reliable sources concerning the colors used on the exact aircraft at the time. The one color photograph I do have of a UC-64 during the war (previously posted) shows several planes, all appearing to be a silver dope color, strangely enough with invasion stripes. The photo reportedly was taken well after the invasion. Based on one of the best black and white images I have (see lead off image on first page), it appears to me that the lower color was a lot lighter than the ‘Olive Drab’ upper color, so I selected a lighter gray and sprayed the lower sides of the plane and the struts which have not been installed yet.

    I picked up a Vector Resin engine with a lot more detail than the Modelcraft offering, but I’m not sure if it’s going to fit inside the cowling. I will have to assemble it first and check the fit.

    I used copies of the original Noorduyn drawings to layout the ‘wavy’ line between the upper OD and lower Light Gray colors. I will prepare a mask based on this and apply the final paint to the body next.

    MTC………James B

  • Profile Photo
    Tom Cleaver said 4 years, 5 months ago:

    The nice thing with a resin engine is after you assemble it, it you have to sand it down to fit, that's easy, and when it's inside the cowling, nobody on this green earth will know you did it.

  • Profile Photo
    James B Robinson said 4 years, 5 months ago:

    Update 11/17/19

    Although it doesn’t look like much, quite a bit has been accomplished. I assembled the Resin engine and painted with a base coat. Here is an image of the Resin engine next to the kit engine.

    And a more detailed view of the Resin engine after the push rods have been trimmed, ready for final paint.

    I finalized 90% of the painting, moving towards assembly. Retouching the body and horizontal surfaces, the wings and elevators. Given time to dry, I removed the masking from the fuselage to reveal the tail markings and split between the upper OD and the lower light grey.

    Over all, I’m pleased with the masking of the tail numbers. Could have been a little straighter but it’s not bad and the Ident number colors match the tail stripe colors. Here is a photo of the engine after painting, the fuselage and the engine cowling. The engine needed a lot of work on the back end in order for it to fit. It has been test fitted and close to install.

    Some cleanup will be required due to the multitude of masking required, but I’m confident she’ll look great when done. I’ll add a little weathering to the undersides, wheels and wheel struts since this plane operated on both hard surfaces and grass fields. It was basically a Jeep of the air for the USAAC.

    Next task, clean up and finalize for assembly and decals. Hope to get this done before the next holiday so I can turn my attention to the other vehicles and Control Tower build.

    Stay tuned!

    MTC………James B

  • Profile Photo
    Tom Cleaver said 4 years, 5 months ago:

    How does it end up with that serial, which would translate as 47-0285, i.e., fiscal year 1947?

    Inquiring minds want to know!

    Shouldn't it have been 20285? That would translate as 42-0285, which would make a lot more bureaucratic sense. (and it's easy to mistake 7s for 2s and vice versa)

  • Profile Photo
    James B Robinson said 4 years, 5 months ago:

    Tom @tcinla, the guys in the paint shop must have been under the influence. There should be a 4 leading. Looking at all the numbers for different A/C, sometimes there were 6 numbers and sometime there were only 5.

    From the Noorduyn records:

    "NA No. 550
    USAAF No. 44-70285

    Delivered to the USAAF as aircraft No. 44-70285 on July 5, 1944 and flown to Newark, New Jersey the same day. Shipped to the 8th Air Force in Europe on July 14."

    In my haste, I wrote down the last 5 digits when making notes and missed the leading number. Looks like it's going back to the paint shop. I'll probably have to switch to 6" numbers instead of 8" now, both sizes are apparent in photographs.

    Good catch, thanks for the keen eye.