Italeri Macchi Mc. 200 Saetta 1/48

Started by Chuck A. Villanueva · 55 · 5 months ago
  • Profile Photo
    Chuck A. Villanueva said 10 months ago:

    I will participate with the Italeri, Macchi Mc. 200 Saetta in 48th scale. Can't wait to pop the lid, still in it's wrapper, shows that it has PE included. I am intrigued.

    1 attached image. Click to enlarge.

  • Profile Photo
    Spiros Pendedekas said 10 months ago:

    Amazing entry, my friend @uscusn! Looking forward to it!

  • Profile Photo
    Erik Gjørup said 10 months ago:

    Oh yes - this will be great - I shall strap in as soon as the build commences!

  • Profile Photo
    John vd Biggelaar said 10 months ago:

    Looking forward to this as well, Chuck @uscusn
    Always an exiting moment to pop the lid.

  • Profile Photo
    Anthony Ricco said 9 months, 3 weeks ago:

    Ah wow - amazing Chuck @uscusn - can't wait to see this - have some of these Saetta's love them. Enjoy the build.

  • Profile Photo
    Chuck A. Villanueva said 9 months, 3 weeks ago:

    Spiros, this will be a first time attempt on a Saetta and the 2nd Italian WWII fighter, the other is a Hasegawa Veltro

    Hi Eric, nice to have you join the flight. I hope you will enjoy this WIp

    John, looking forward to it as looking at a couple of reviews in how simple yet detailed the Italeri kit is.

    Hi Anthony, normally a kit recently acquired will go straight to the stash and linger for quite a long time, but this little Saetta has me place it in the "to do shelf" looking forward to getting it started.

  • Profile Photo
    Chuck A. Villanueva said 9 months, 3 weeks ago:

    Time to remove the plastic and pop the lid on Italeri's little Macchi.

    With the lid removed the first item that comes to view are the decals and instruction manual/sheet.

    The Italeri instruction booklet is written in several languages, a bit of history of the Saetta, parts map and paint guide.

    A step by step assembly process starts with the seat and cockpit. Nice and clear and seems accurate in parts assembly.

    4 paint schemes are offered in the kit, all quite colorful and interesting, all Italian Air Force in Europe. I will be doing the 2nd scheme.

    The decal sheet looks in register, thin decals. not bad

    The kit only has 2 sprues, don't look like a lot of parts, yet like Hasegawa and Tamiya, enought details to make the cockpit look busy with the include PE parts which is a nice touch and surprise by Italeri.

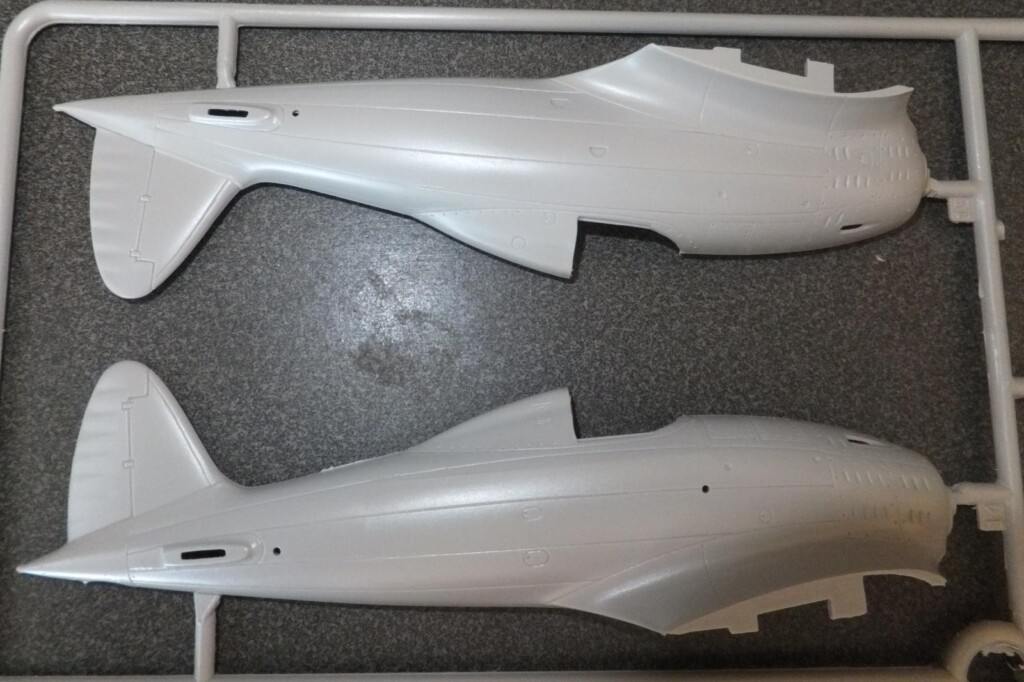
    The 1st sprue contains the fuselage halves, engine components, landing gear struts and doors, cockpit floor, interior side panels, and engine cowlings.

    Italeri can be hit or miss, this one is a bit of hit and really simple. Italeri is not big on parts, but enough to build a decent model of the Saetta. The fuselage halve are engraved panel lines and rivets, well defined not deep or shallow.

    The engine cowling are made up of four parts, with the distinctive tear drop blisters.

    The prop looks correct, though I am not an expert but looks very close to what I have seen in photos, Like there is a MC 200 Saetta around here to walk around and inspect.

    The engines are really nice. The cylinder heads show nice cooling fin detail, crank case, pushroad as well.

    10 additional images. Click to enlarge.

  • Profile Photo
    John vd Biggelaar said 9 months, 3 weeks ago:

    Looks like a decent kit, Chuck @uscusn
    The PE parts are indeed a nice extra.

  • Profile Photo
    Spiros Pendedekas said 9 months, 3 weeks ago:

    Thanks for the thorough kit presentation, my friend @uscusn! A good kit!

  • Profile Photo
    Erik Gjørup said 9 months, 3 weeks ago:

    Seems like a nice kit @uscusn.

  • Profile Photo
    Chuck A. Villanueva said 9 months ago:

    Thanks John it is much better than expected.
    Thanks Spiros, hope the fire issues in your country are better, stay safe my friend.
    Yes Erik, pretty decent, similar to a Hasegawa or Tamiya in just enough details right out of the box.

  • Profile Photo
    Chuck A. Villanueva said 9 months ago:

    Before assembly my usual style of pre painting the interior components while still on the sprues. The seat is Aluminum, as well as the interior of the engine cowl pieces. Using Vallejo Aluminum.


    The engine and propellor are painted Vallejo Flat Black. Then Tamiya Natural Steel is misted over the black engine cylinders.

    The struts and landing gear components are as well.

    For the interior, close to US interior green though a bit lighter, so I went with Pale Green with a couple of drops of IG to get as close to being Italian as possible. Bulkheads, wingspar, wheel bay wells, side walls and the interior of the fuselage halves were painted this color.

    Giving the Saetta its already unique style. It is quite a neat little kit and so far, enjoyable.


    The tail wheel is tire black, and will paint the wheel aluminum later in the build.

    more to follow...

    1 additional image. Click to enlarge.

  • Profile Photo
    Erik Gjørup said 9 months ago:

    Impatient as I am, I usually go straight for some assembly before comitting to paint, but I do like the approach, and have done the same in the past. You usually get a good result fron this method Chuck. Looking forward to the next posts.

  • Profile Photo
    John vd Biggelaar said 9 months ago:

    Preperation of these parts looks great, Chuck @uscusn

  • Profile Photo
    Spiros Pendedekas said 9 months ago:

    Excellent progress so far, my friend @uscusn!