SNJ-3 Texan: 1/48 Modelcraft or Revell (Game time decision)

Started by George R Blair Jr · 232 · 6 months ago
  • Profile Photo
    George R Blair Jr said 8 months, 1 week ago:

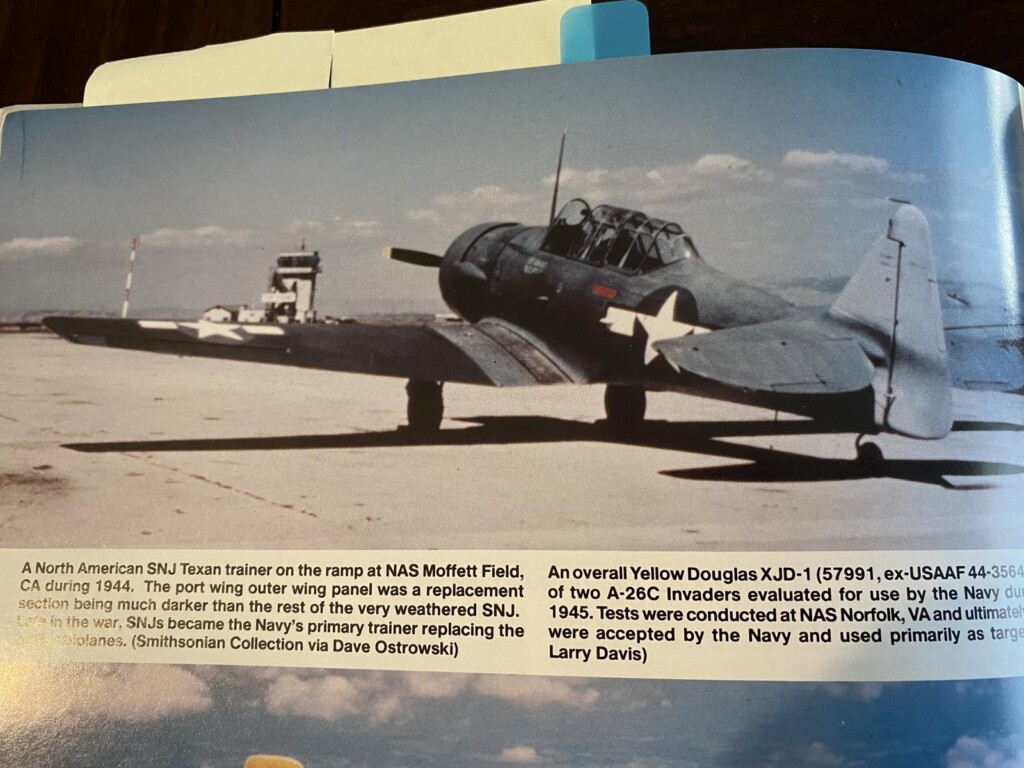
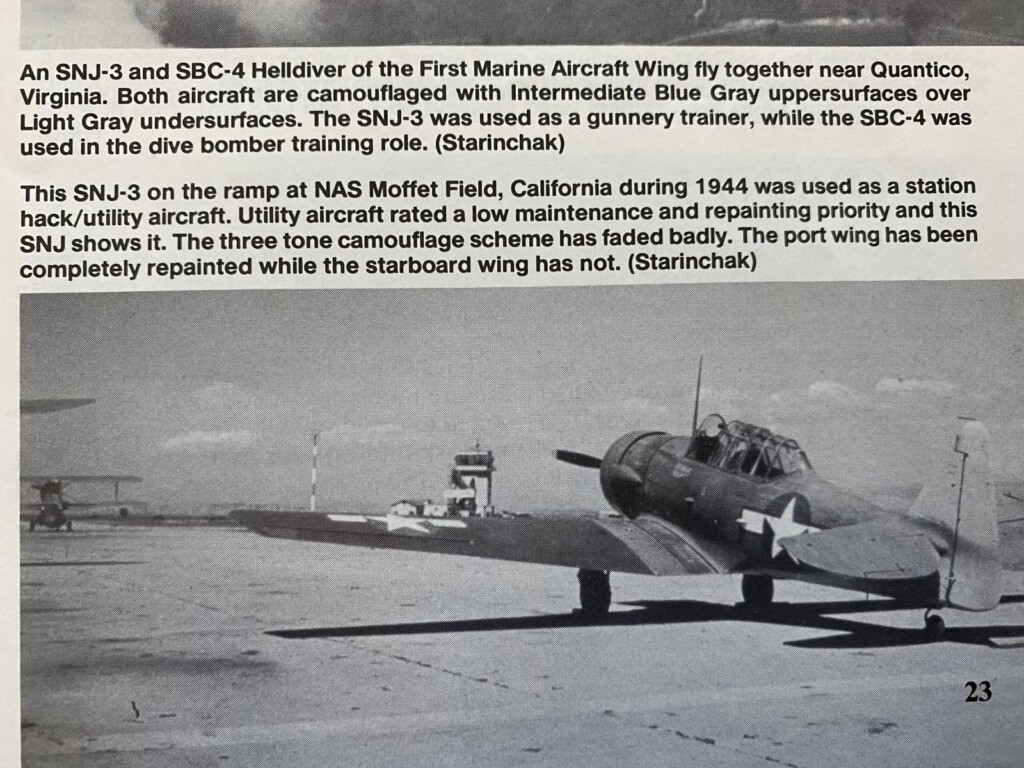
    The cool thing about this group is it gives me a lot of latitude to build models on my to-do list while still working within the group. Having been an instruction pilot for 20 years, I really like building trainers, and the T-6/SNJ is my favorite. I came across a picture in Sullivan's book "Golden Wings" of an SNJ-3 Texan at Moffett Field in California. I was immediately drawn to this particular airplane because it has an extremely weathered finish. The photo in Sullivan's book is in color, and I found the same photo (in black and white) in 3 other books I have in my library. Every caption gives a different reason for the weathered finish on this plane, as well as the paint scheme(s) that is displayed on the plane. There are also 3 different explanations for the dark, new-looking left wing.


    My first task was to figure out the steps which lead to this bedraggled paint scheme. This is purely conjecture on my part, but it does explain the various paint colors on the plane. Figuring out how the plane got in this condition also helps me plan my eventual paint scheme. Here's my story for the plane, feel free to jump in. So, here's what I think (remember, I am not an expert):

    1. SNJ-3s began entering the inventory in 1941
    2. The plane probably arrived at Moffett in the 2-tone Blue/Gray over Light Gray scheme
    3. This plane is identified as a "station" plane, which means it was used as a utility plane by the airfield and probably didn't get a lot of attention paid to its paint and finish.
    4. At some point, the plane was repainted in the 3-tone paint scheme: Sea Blue over Intermediate Blue over Insignia White. I came to this conclusion because the tail is a lighter color than the upper fuselage, which would match this color scheme.
    5. The 3-color paint scheme became extremely weathered, making it look very patchy, and possibly allowing some of the previous paint scheme to show through.
    6. At some point, the left wing was damaged and replaced with a new wing which was already painted in the late war scheme of Sea Blue, which appears very dark compared to the rest of the plane. One source said that the wing was darker because it was repainted and they never got around to painting the rest of the plane. This doesn't make sense to me. I think a replacement wing in the darker color is more likely, especially since the dark paint stops at the exact point where a new wing could be bolted on.

    So, that's my plan for the paint.

    The model:
    I probably have 9 or 10 T-6s from 4 or 5 different manufacturers. For the purpose of this build, I am ignoring kits that are hard to find, such as the Aurora kit, and others. Finding PE and masks might be a chore, especially for old kits, until your realize that all of these kits really only come from two different molds. According to Scalemates, one line was started by Occidental in 1998, and was reboxed and re-released by Heller, Italeri, Belcher Bits, Modelcraft, and Modelismo. The Monogram line started in 1979, and was reboxed and re-released by Revell and Hasegawa. All of the models are basically the same with small changes in parts over the years. The big difference for my purposes is the canopy. The T-6G had a canopy with fewer frames on the side of the canopy, while earlier planes had a canopy with more frames. Some of the kits have both sets of canopies included, while others include only the later canopy. I have a Revell and a Modelcraft kit that have both canopies, so which one I will use will be a game-time decision. The good news is that I have masks for the Italeri kit, which should fit all of the other models from the other manufacturers. I also have PE for the Occidental kit, which should fit the others in the lineage. I also have masks for the Revell versions. I am leaning toward Modelcraft kit to build, but the parts in the Modelcraft and the Revell kit look identical. Decals will come from the spares, since the markings are very generic.

    8 additional images. Click to enlarge.

  • Profile Photo
    Tom Cleaver said 8 months, 1 week ago:

    The Revell kit, which is the old Monogram kit, is the more accurate since it has close-to-scale raised rivets. As someone who polished a lot of T-6 wings at Reno, the raised rivets were a very marked memory.

  • Profile Photo
    Spiros Pendedekas said 8 months, 1 week ago:

    Another amazing entry, my friend @gblair! Looking forward to your kit choice!

  • Profile Photo
    John vd Biggelaar said 8 months, 1 week ago:

    A great entry, George @gblair
    This will be another interesting building thread.

  • Profile Photo
    George R Blair Jr said 8 months, 1 week ago:

    Thanks, Tom (@tcinla), Spiros (@fiveten), and John (@johnb). I need to go back and look at both kits. They looked identical when I was checking them out, but I didn't notice the rivets on either. I hope to get the Kingfisher done in the next day or two and move on to this one. Thanks for stopping by.

  • Profile Photo
    gary sausmikat said 8 months, 1 week ago:

    Another good build to follow, George. Good luck with it and enjoy.
    Like you I picked my Buffalo and NE-1 subjects from the same book. Something different.

  • Profile Photo
    George R Blair Jr said 8 months, 1 week ago:

    Thanks, Gary (@gwskat). I am always looking for something a little different to do. I think the challenge here will be the worn finish on the plane.

  • Profile Photo
    gary sausmikat said 8 months, 1 week ago:

    A good challenge and the darker colored port wing will give it a nice variation..

  • Profile Photo
    Tom Cleaver said 8 months, 1 week ago:

    @gblair - the reason you didn't see any rivets on the Occidental kit is because there are none - the major failing of that kit.

  • Profile Photo
    Louis Gardner said 8 months, 1 week ago:

    George R Blair Jr (@gblair)

    I like your choice of aircraft and I also think like you, about the wing being a replacement, and not yet painted to match. This is a well worn plane. Rode hard and put up wet... I like it !

    I have been wanting to build this one... it was a training plane from NAS Deland and it ground looped nearby at NAAS New Smyrna. I'm still not sure if this one had yellow upper surfaces on the wings or not. Otherwise, it could be an overall aluminum color.

  • Profile Photo
    George R Blair Jr said 8 months, 1 week ago:

    I don't know, Louis (@lgardner). If I was guessing, I would think it was all natural metal, or perhaps an aluminum lacquer.

  • Profile Photo
    Louis Gardner said 8 months, 1 week ago:

    It very well could have been a single color. That’s my first guess too.


    I have found this illustration of a similarly marked instrument trainer that was based at NAS Melbourne.

    Normally I don’t give too much credit for artists impressions though. But I thought it looked cool and I have seen some color pictures that show trainers with the upper wings painted in yellow.

    Like you I’m leaning towards the overall solid color.

  • Profile Photo
    George R Blair Jr said 8 months ago:

    Hi, Louis (@lgardner). Reputable artists usually do a pretty good job doing illustrations for books, but the illustration is no better than the info they have available at the time. I always think about it like writing a paper for a history class: One source with a fact isn't something to count on, but if I can find another source that agrees, then I might be on to something. Personal choice also makes a big difference, too. I would really vote for the silver and yellow with the green stripes.

  • Profile Photo
    George R Blair Jr said 8 months ago:

    The interior of the model is really not too bad, so I am not planning on doing much to the interior. The one place I wanted to do a little work was the interior. I plan to use a Quinta set designed for the Occidental T-6, which will really spruce up most of the interior. I also have an Eduard set for the Occidental kit, but it won't add anything that isn't already in the Quinta set. The kit interior looks pretty good, but I wanted to see if I could improve on some of the parts. The seats in the kit look very similar to those you might find in someone's living room, so I knew those were on the list. The framework for the cockpit sides look pretty good, but the floor looks kind of klunky. I tried thinning the foot troughs and the rudder pedals, and ended up replacing the troughs in the front cockpit with Evergreen plastic channel. I may do the same to the back, but I very much want to make sure the floor framework will still fit where it is supposed to.

    I have found it difficult to find photos of the interior of the T-6/SNJ, especially the seats. I think the front seat is pretty close to what it should be, but I thinned the sides, added a front plate to the seat, and added some structure at the bottom of the seat. The rear seat is a total miss, so I have built something that approximates what I can see in the one not very good photo I found of the rear seat. I found a couple more inexpensive books on Amazon that may have more info. They should be here in the next day or so.

    I have also been talking to Louis (@lgardner) who pointed out that the SNJ/T-6 and the P-51 were both made by North American, and that the seats are either the same or similar. This info may get me going in the right direction. Thanks, Louis!.

    I hope to get some more done tomorrow, although my "honey do" list is getting longer as I am writing this. Even when your are retired, you still have chores. Cheers everyone.

    13 attached images. Click to enlarge.

  • Profile Photo
    George R Blair Jr said 8 months ago:

    Tom (@tcinla) pointed out that the T-6/SNJ has a lot of rivets, so I dug out some photos I had of a T-6G Texan that is located on the parade ground at Lackland AFB. It isn't in the best of shape, but does illustrate the rivets. They seem to be centered on the center portion of the lower wing, but a few can be found in other places.

    6 attached images. Click to enlarge.