Hasegawa 1/48 F4U-5N

Started by Tom Bebout · 24 · 2 years ago
  • Profile Photo
    Tom Bebout said 2 years, 11 months ago:

    Thought I would enjoy the fun and try to build this kit I had in the stash.

    1 attached image. Click to enlarge.

  • Profile Photo
    Spiros Pendedekas said 2 years, 11 months ago:

    Nice entry, my friend @tom-bebout!
    I nave never built a quarter scale Hasegawa Corsair, but I've heard they are nice kits.

  • Profile Photo
    Tom Bebout said 2 years, 11 months ago:

    As they say construction begins with the cockpit. Not bad but it lacks some details on the side walls, in fact there's nothing

    So into the spares box I go where I cut and pieced together some more detail. Not accurate but it sure looks better. Same for the cockpit floor, so I added some strips of styrene.
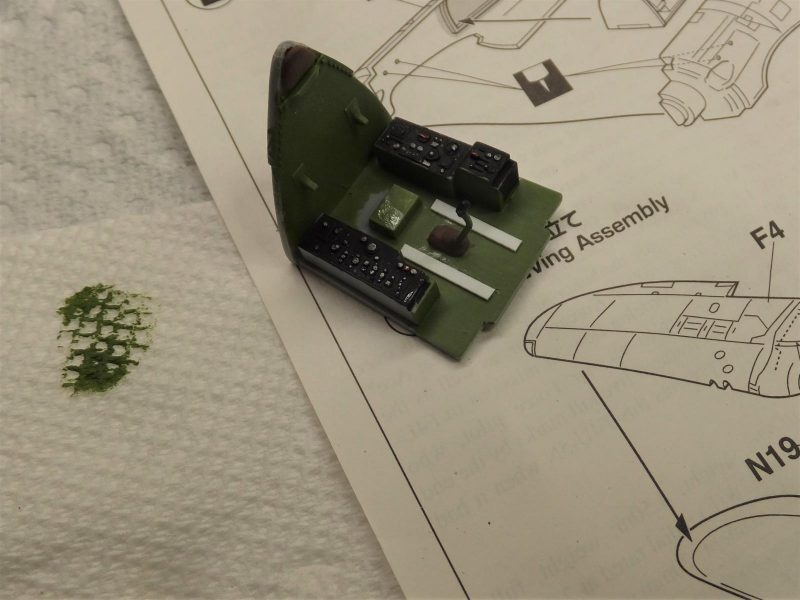
 As usual for me I added an Ultracast seat with molded in belts, because I don't like to work with PE . The kit's IP decal was used and it reacted well to Micro Soft and Set. For added interest I mixed a drop of Future with some clear green so the scope would look more like glass. 
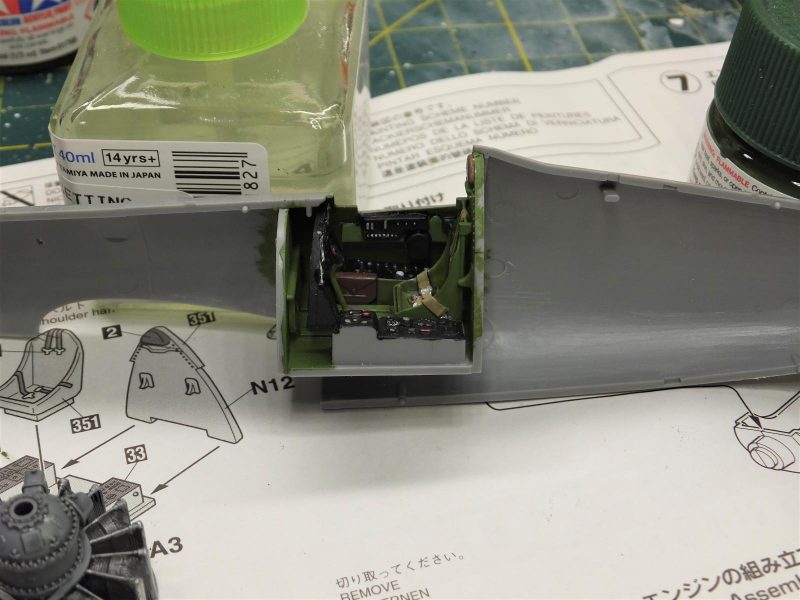
So the cockpit is matted and the fuselage is now buttoned up. Next up was the engine which has some nice detail, I used Model Master gun metal on the cylinders then dry brushed them with chrome. Should have added the wiring but maybe next time. So far so good no real issues yet.

  • Profile Photo
    Spiros Pendedekas said 2 years, 11 months ago:

    Nice beefing up of that cockpit, Tom!
    Solid progress so far!

  • Profile Photo
    John vd Biggelaar said 2 years, 11 months ago:

    Good start on this Corsair, Tom.
    For sure a nice looking interior.

  • Profile Photo
    Tom Bebout said 2 years, 11 months ago:

    Was able to get more bench time in this last couple of days. Mated the top and bottom main wing together and attached to the fuselage, and had no fit issues. If fact the fuselage to wing spar was very tight and will not require any putty.

    As usual I didn't like the representation of the wing tip lights so I cut them out and replaced then with clear sprue. Drilled a small hole in the clear sprue and filled it with red and green paint to represent the bulbs. After sanding with various grades of sanding sticks I liked the representation much better. Flaps were glued together and attached to the wing and added the horizontal stabilizers. Then the engine and cowl was also glued on.. Had a little fit issue with the cowl but after some sanding it went on rather well. Should have some black paint on this bird before too long. It will represent WF 15 of VFM(N)-513 in Korea 1951. So this build could be a twofer for both the Korea as well as Night Fighters GB's.

  • Profile Photo
    John Clark said 2 years, 11 months ago:

    Nice. I have another of those to do in the same VMFN 513 markings. I am watching this one. Looks good.

  • Profile Photo
    Spiros Pendedekas said 2 years, 11 months ago:

    Looking great, my friend @tom-bebout!
    Yes, your tiplights look much better.

  • Profile Photo
    John vd Biggelaar said 2 years, 11 months ago:

    Very nice Tom @tom-bebout
    I really like the way you implemented those navigation lights.
    This is definitely something I will try out as well.

  • Profile Photo
    Tom Cleaver said 2 years, 11 months ago:

    "so far, no issues." Trust me, @tom-bebout - there is an issue sitting there just waiting for you. Look at the forward fuselage, about 1/4 inch back from the cowling, and you will see a bad molding line where the mold wasn't in proper place. Every long-nose Hasegawa late Corsair has it. You need to put some Mr. Surfacer or such on it, sand smooth, then rescribe the detail there. It's not hard to do, it's just one of those "why does this have to be" PITAs. It's the only bad thing on an otherwise-excellent kit.

    1 attached image. Click to enlarge.

  • Profile Photo
    Tom Bebout said 2 years, 11 months ago:

    Got some time at the bench so this bad boy got some Tamiya TS-14 Black from a rattle can sprayed on her. Still have several of these rattle cans left so I'm trying to use them up

    . It goes on well and dries rather quickly. And boy does black show any scratches or defects you may have incurred. A note of caution about the guns. Three separate pieces are required to replicate the 20MM guns. Two are minuscule and two are very small IMHO. So be careful as the carpet monster will eat them. The decals went in very well, the star and bar are actually white which is surprising coming from Hasegawa. The only drawback is they are somewhat thick. Because the black is so shiny I didn't use any Future/Pledge before applying. However, I will use it to seal them, then apply a dull coat.

  • Profile Photo
    John Healy said 2 years, 11 months ago:

    Looks good, Tom. That Tamiya gloss black spray is a great primer for NMF. I always have one can in stock.

  • Profile Photo
    John vd Biggelaar said 2 years, 11 months ago:

    Great progress, Tom.

  • Profile Photo
    Spiros Pendedekas said 2 years, 11 months ago:

    Great progress, Tom! The black from the rattle can looks really amazing.

  • Profile Photo
    Erik Gjørup said 2 years, 11 months ago:

    Great looking Corsair @tom-bebout.