Fujimi Aichi Type 99 D3A1 Val 1/48

Started by Chuck A. Villanueva · 52 · 3 years ago
  • Profile Photo
    Chuck A. Villanueva said 4 years ago:

    While waiting on some goodies for the Jill, I going to jump on the Fujimi Val which was next up, but will go ahead as I have everything on hand to get started. This is a rebox with new decals to celebrate the 50th anniversary of the end of WWII and was released in 1995.

    So lets unwrap the cellophane and pop the lid and see what is in the box.
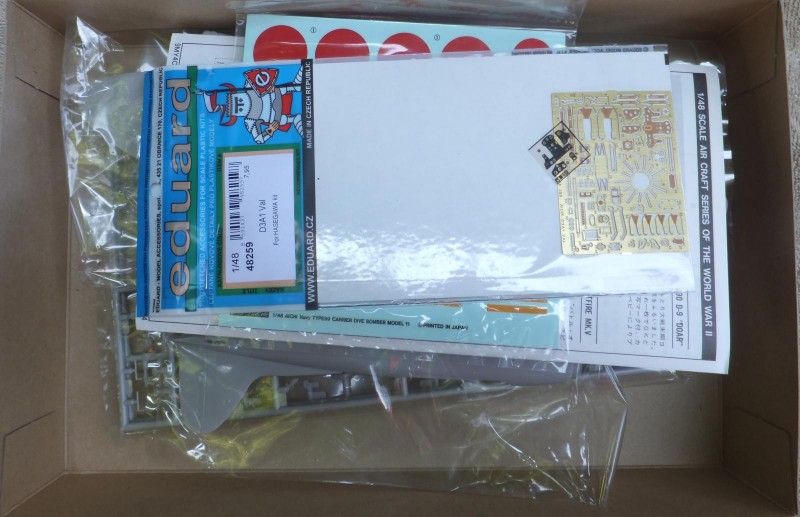
    This is an older molding which in the original packaging was first produced in 1974. The instruction sheet is a basic fold out type in Japanese and English text. With exploded views in the assembly sequence.

    Next is the decal set for one Val flying off the IJN carrier Soryu that participated in the attack on Pearl Harbor 7 December 1941. 1st sqdn 21st section.

    Next is an Eduard's PE set that is designed for the Hasegawa kit but will use it here as I cannot find anything for this kit. Though there are AM parts for this kit available, just can't find them. CMK does have an interior as well as a PE set from Eduards specifically for the Fujimi kit but hard to locate this also.

    Next up the first sprue contains the fuselage halves. Fujimi light grey plastic,engraved panel lines which look ok. Which Fujimi was actually ahead of Hasegawa with this feature. Before Hase ramped up and started popping their new stuff in the late 70's in all 3 popular scales. 72nd, 48th and 32nd scale. It's the inside that is glaringly weak with no details, No side consoles or interior structure at all as separate parts are provided in the kit. The Hase Val which comes almost a good 14 years later in 1998 has a much more complete interior with side panels, boxes, stringers, and side consoles. Hence the PE set to fill in some details. It is quite bare.
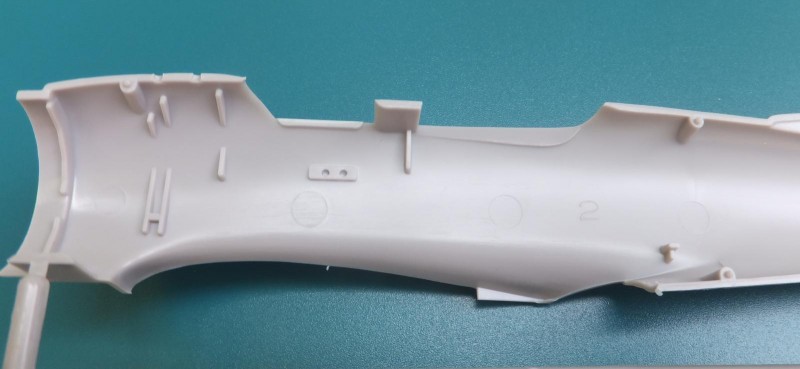
    Next sprue contains the wings. Lower 1 piece and 2 upper panels. Nice detail and captures that elliptical shape quite well on the Val.

    Next sprue contains, the flight deck, propeller, main wheels, engine crankcase cover and the wheel spats.

    The flight deck is quite basic. Like the inner fuselage halves very little detail that will need some work. The prop is not bad, does look to be the proper shape for this version of the Val.

    The wheels are molded as one piece. But will get resin ones to replace them. The main gear spats look so similar to the Stuka.

    The engine crank case cover has some decent detail.

    The last grey sprue contains the stabs, engine and pushrods., seats and some cockpit details and the engine cowling parts.

    The horizontal stabs are 1 piece panels and look ok with the details. 2 pieces make up the engine assy. Will dress this up. The seats could be worse, but not totally unsat, with some work will look a bit better. The 3 pieces that make up the cowling look ok. Will see if any surprise along the way.

    And last the clear sprue. With a 2 piece canopy that looks pretty clear. Not bad.

    Next start pre-painting...more to follow.

  • Profile Photo
    Spiros Pendedekas said 4 years ago:

    What a great outfit, Chuck @uscusn ! I am jealous for you have the PE set! Gonna build mine OOB though.
    All the best, my friend!

  • Profile Photo
    Louis Gardner said 4 years ago:

    Thanks for adding another build to our ever growing collection Chuck. This is going to be a good one to watch, as all of your work in progress articles are packed with tons of photos and excellent descriptions.

  • Profile Photo
    Chuck A. Villanueva said 4 years ago:

    Thanks Louis and thanks for the Japanese cockpit interior reference, that was the kicker to get this party started.
    Spiros, your off to a great start on yours, and also much more details interior wise. The Fujimi kit is very lacking on details.

    Starting as what I normally do, prepainting the interior components before cutting plastic. Using the very fine Japanese reference that Louis provided I used a mix of RLM02,Tamiya XF71 Japanese cockpit Green and Hemp to get close to the shade described J-aircraft.com. Unlike Luftwaffe and RAF aircraft the cockpit interior is pretty standard. Not so Japanese aircraft. They have a variety on each of the different aircraft that flew in WWII.


    The IP is decent despite the lack of details.

    The gun mount pedestal and the interior side walls within each fuselage as well get pre painted.

    Next up will to start assembly...more to follow.

  • Profile Photo
    Spiros Pendedekas said 4 years ago:

    Looks great, Chuck. I love the interior color.

  • Profile Photo
    Louis Gardner said 4 years ago:

    Looks great Chuck ! You really nailed the color ... Perfect.

    I'm glad to be of help.

  • Profile Photo
    Chuck A. Villanueva said 3 years, 12 months ago:

    Getting started on the Val, 1st as standard procedure is to start with the cockpit. Stating with the flight deck which is rather plain to start with.

    The forward bulkhead is then attached to front end of the flight deck.

    Next Fujimi supplies two rear seat pedestals, one to position the seat facing aft or the other is for the seat facing forward. I will use the base that allows the seat to face aft or rearward.

    Next the center bulkhead or back wall to the cockpit is place right behind the pilots seat position.

    The rear ward facing defensive gun pedestal is placed in front of the rear ward seat position, the tanks are painted aluminum and placed at the rear section of the gunners compartment. Will attach the gun later.

    The first PE is a lever ratchet assy place on the RH front orfthe floor.

    A drivechain and sprocket assy is then placed near the lever angling towards the front bulkhead.

    Now to start to work on seats that look like generic seats at first. Rather thick and basic in shape.

    Next to add the PE belts which will help these quite a bit.

    Starting with the rear/gunners seat will be just lap belts and installed facing rearward onto the flight deck.

    Then the pilots seat is a lap belt and one should harness set up and then placed into the cockpit floor.

    Now to add the few detail bits to the rear compartment.

    Finally to add the control stick, and weather the flight deck with a wash and silver pencil to highlight the foot wear areas. Surprisingly Fujimi does not supply any foot control pedals.pedals. Going to see if I can dig up a set.

    More to follow...

  • Profile Photo
    Erik Gjørup said 3 years, 12 months ago:

    Very nice PE details!

  • Profile Photo
    Chuck A. Villanueva said 3 years, 12 months ago:

    Thanks Eric, this set is actually for the Hasegawa kit, bit I figured I can use it to help out this kit a bit. As it is rather bland.

  • Profile Photo
    Chuck A. Villanueva said 3 years, 11 months ago:

    Next up to assemble the engine. Not bad in detail though a bit bland. First painted the engine overall black and then Steel lightly airbrushed over the cylinder heads.


    The two rows were assembled and give a wash to give the cooling fins some definition.

    The crankcase cover is aluminum.

    The exhaust ring and manifolds will be attached behind the engine.

    1st the 3 parts are assembled to created the engine a touch more weathering and put aside for now.

    For the Aotake, I use Mission Models for the engine interior color. It looks correct in the Blue/Green shade when it dries. 1st airbrushing the forward interior of the fuselage.

    Next the engine fire wall, inside the cowling parts as well as the interior of the landing gear spats.
    ]
    The exhaust manifold ring is attached to the engine.

    The engine is placed on the firewall.

    7.7 mm type 92 rear defensive machine gun is painted Vallejo Dark Gun Metal and highlighted with silver pencil and mounted on the gun mount/pedestal. (i have a feeling I should pull it off and reinstall after painting)

    More to follow.

  • Profile Photo
    Spiros Pendedekas said 3 years, 11 months ago:

    Looks great, Chuck! Coming along nicely!

  • Profile Photo
    Robert Royes said 3 years, 11 months ago:

    Nice progress!

  • Profile Photo
    Chuck A. Villanueva said 3 years, 11 months ago:

    Thanks Spiros and Robert making some headway. Not a difficult kit but it does need some detail work.

    With most of the interior work finished, I place the flight deck into the RH side fuselage to check alignment of the bulkheads and floor. The fit is good here.

    Next is to assemble the cowl.

    It is made up of 5 pieces. The interior is painted Aotake.

    The side cowl panels are attached to the cowl ring.

    Then the cowl flaps which are molded in the closed position are then attached on each rear side section of the cowl.

    Once the cowl is assemble, I put that aside for now. Next is to attach the LH fuselage half mated to the RH side and let that set. This goes well, everything lines up and no issues with gaps from stem to stern.

    Next the engine assy is place into forward section of the nose, good fit and sits perfectly in place.

    Next the cowling is attached over the engine, again, no fuss and the fit is very good here very little chance of being off as alignment and locating pins are correct. The gun port openings are on top, which makes this easy to install correctly.

    Next up the wings and tail. More to follow.

  • Profile Photo
    Spiros Pendedekas said 3 years, 11 months ago:

    Coming along realy nicely, Chuck! This Aotake on the inner cowling looks great!

  • Profile Photo
    Chuck A. Villanueva said 3 years, 11 months ago:

    Thanks Spiros, the Mission Models seem to have the perfect shade of Green when it dries. When first applied wet it is very blue.