Lockheed F-104C 1/48th USAF

Started by Chuck A. Villanueva · 28 · 1 week ago
  • Profile Photo
    Spiros Pendedekas said 3 months, 2 weeks ago:

    Excellent progress, my friend @uscusn! Indeed, notable differences.

  • Profile Photo
    Chuck A. Villanueva said 2 months, 2 weeks ago:

    Thanks John and Spiro's now to get back into it and get started.

  • Profile Photo
    Chuck A. Villanueva said 2 months, 2 weeks ago:

    Unlike the Hase kit which starts with the seat, Eduard's starts with the instrument panel.

    The kits panel is well detailed but will have them sanded off to make way for the PE panels to be applied.

    Each PE panel is carefully placed on the IP. Starting with center components working out to the outer panels then to the top gauges.

    Next up the control stick is painted white. And then placed on the LH front portion of the console.

    The PE side console panels have been attached at this time as well.

    Next to install the cockpit rear panel.

    Finally the center control stick is installed.

    Next up the main gear and nose gear bay and engine exhaust nozzle.

    more to follow

  • Profile Photo
    John vd Biggelaar said 2 months, 2 weeks ago:

    That's a fine looking pilot's office, Chuck @uscusn

  • Profile Photo
    Spiros Pendedekas said 2 months, 2 weeks ago:

    Excellent cockpit, my friend @uscusn!

  • Profile Photo
    Chuck A. Villanueva said 1 month ago:

    Thanks John and Spiro's nice that it is included with other nice upgrades. Makes it a better kit. So far the kit is coming along with no issues to report as yet.
    Happy Easter!

  • Profile Photo
    Chuck A. Villanueva said 1 month ago:

    Happy Easter/Ressurection Sunday everyone. Witbh tht cockpit done, next to work on the exhaust nozzle assy.

    The interior is painted with a mix of Vallejo metallics. Before assembling. I left the exhaust nozzle off. I will paint and install towards the end of the build.
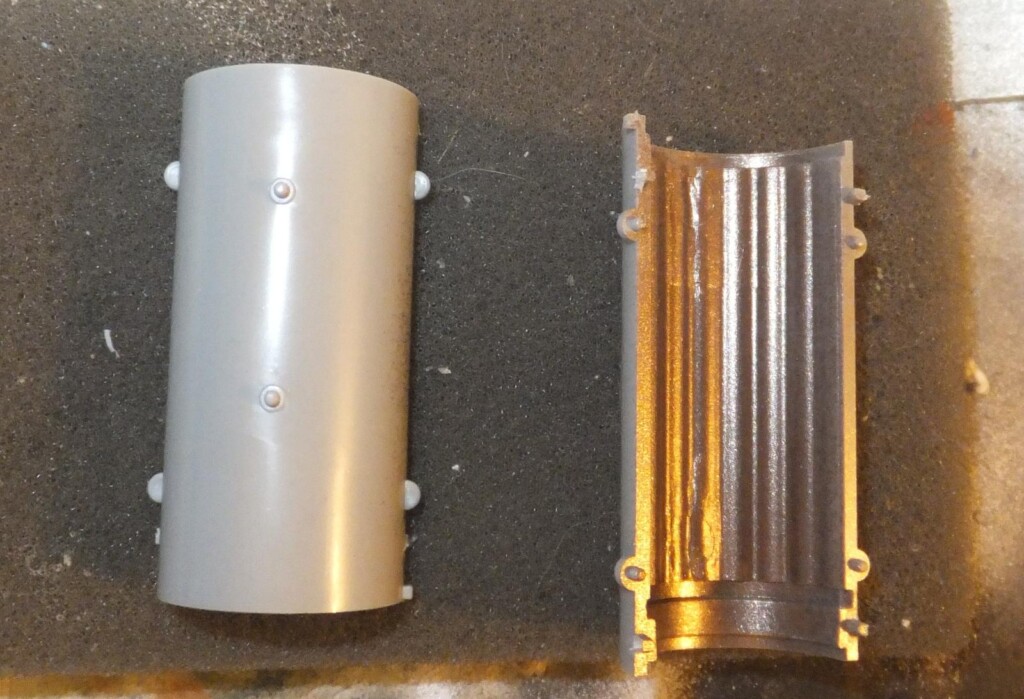
    Next is to work on the nose gear well bay. This is differs from the Hase kit which has this moulded into the lower section of the nose insert. Eduards/Kinetic has more details involved as separate side walls, roof and front and rear walls. And a bit deeper.

    All the interior of the nose gear bay is Aluminum lacquer.

    An Eduard's PE panel is attached to the LH side wall of nose bay.

    The rest of the parts are ready to start to assemble.

    The RH side wall is attached to the roof panel, then one of the acuator arms is also attached. These are moulded into the nose bay on the Hase F-104.

    Next the rear wall is attached.

    Next the other actuator is installed, the LH side wall and forward wall.

    Next the wheel bay assembly is installed into the front lower fuselage insert.

    Like the Hase F-104, the nose cone is in upper and lower halves.

    The nose cone is assembled and put aside.

    Next up assemble the main gear bay...

    More to follow...

  • Profile Photo
    John vd Biggelaar said 1 month ago:

    Some excellent progress, Chuck @uscusn
    Happy Easter

  • Profile Photo
    Spiros Pendedekas said 1 month ago:

    Excellent progress indeed, my friend @uscusn!
    Happy Easter!

  • Profile Photo
    Chuck A. Villanueva said 1 week, 2 days ago:

    Thanks Spiros and John, wow since Easter the last update, time flies.

  • Profile Photo
    Chuck A. Villanueva said 1 week, 2 days ago:

    Back to the Eduard's F-104, will resume with the main gear bay assembly. The roof, ft and rear wheel bay walls and center divider.

    The bay assembles rather quickly and the parts fit well. The details are much sharper here compared to the Hase F-104, slight improvement otherwise. Once completed as a sub assembly ready to install into the RH fuselage half.

    Next a pair of square holes are opened to accomodate the external fuel probe.

    The canopy, main gear bay and avionics bay are placed into the RH side fuselage, And the LH side is mated to seal the interior components, it aligned perfectly. whew!

    The top seams are nice and will be easy to clean up with no putty required.

    From the top, the cockpit and avionics bay sit square with in the fuselage. The seat will be installed later in the build.

    Next is to remove the details to install the rather comprehensive PE enhancement bits to follow.

    Now to apply the Eduards PE bits.

    Patience will leave a very nice looking avionics bay which will be diplayed opened.

    Once the main bits were applied. The smaller detailed boxes, conduits really pops when attached over the main pieces.

    Next up to install the fuselage inserts and more into the cockpit.

    More to follow...

  • Profile Photo
    Spiros Pendedekas said 1 week, 2 days ago:

    Excellent job so far and fantastic looking avionics bay, my friend @uscusn!

  • Profile Photo
    John vd Biggelaar said 1 week, 2 days ago:

    Superb work on the wheel and avionics bays, Chuck @uscusn