N. American F-100D Super Sabre, ESCI 1/72nd USAF

Started by Chuck A. Villanueva · 37 · 1 week ago
  • Profile Photo
    Chuck A. Villanueva said 1 year, 8 months ago:

    As the "K" moves along, it was time to work on my 2nd project for the "Nam" GB, which was a great excuse to finally work a really good kit of the F-100 in 72nd scale. Though produced in the late 70's by ESCI I believe reboxed under Italeri, which most of the old ESCI kits ended up with.


    In an era where raised panel lines were the norm, this little gem has fine engraved panel lines. Well defined panels, that look pretty accurate at first glance.
    So lets take a look what is in the box.
    I purchased the kit several years ago while in Connecticut. So almost 20 years I have had it. The box is a bit soiled from the humidity. As I pop the lid, first item on top are the instruction sheet.

    A fold out type with exploded views for the construction process. Aged to a yellow tint yet still quite clear and easy to follow. The paint options are listed as well and flagged to what color a particular part will be painted.

    Step 1 starts with a basic cockpit, not bad for the scale, compares to Hasegawa in some of their basic 72nd scale kits.

    The decals provided have yellowed and are not protected just loose in the box. For a Turkish and a French bird.

    To help with the cockpit I purchased a PE zoom set for the Italeri boxing. They will work fine for this kit.

    I have had a pair of Super Scale F100D decals before I got the kit. New in the envelope they should perform with out any problems when it's time to decal the model. The set carries not only the squadron scheme, but also all the airframe stenciling and stripes. Just need to dig through the decal spares for the Stars n bars.

    Now on to the plastic. Moulded in silver, the sprues are safely kept in one bag. No loose parts. Kit is well preserved despite years of several moves. The first sprue has the cockpit tub, seat, nose intake cone, landing gear struts, and exhaust cones.

    The gear struts look decent for and accurate as I compared them to a 48th Monogram F-100. Nice, though no brake lines.

    The nose intake is a bit shallow as it attaches to the forward section of the nose, in this scale it won't be much of a factor.

    The cockpit tub is devoid of any raised details, dials or knobs, hence the Eduards PE to help here. Though decals are provided for the side consoles and instrument panel but doubt if they will still be viable. The seat thankfully looks like an ejection seat not a lounge chair. Again detail painting and PE Belts will be a big help.

    Nice touch that ESCI provides a tail exhaust cone with open afterburner cans or closed.


    The next sprue contains the fuselage halves, exterior details like the dive brake door, landing gear doors, wheels and wing strakes.

    The pleasant surprise for this scale and age of the kit, is a nice fuselage that will be simple to assemble and apply a bare metal finish. The rear section in particular as this will be enhanced when we get to the painting, as this area was always darker due to the heat from the engines, on camouflaged schemes it was left unpainted.
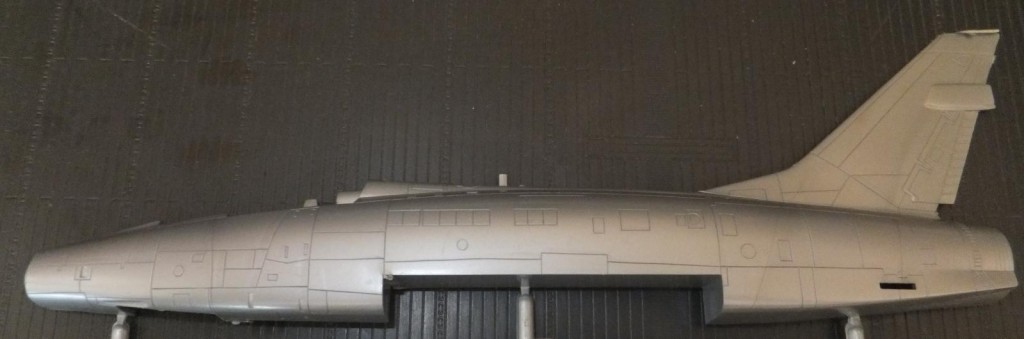

    The wheels look ok with the unique F-100 style hubs. Nice.

    The gear bay doors and dive brakes have very nice interior details which normally are never shown on a kit this scale and again from the time frame. A lot of effort was really put into this model.

    Though not really easy to see once the cockpit is assembled and the halves mates the side walls have no details.

    The next sprue are the wing panels and flying surfaces/

    The wheel and dive brake bays again well defined not just interior walls with stringers.

    The wing panels like good as well, no warpage, the wing strakes are separate parts.

    There are no weapons provided, just a pair of drop tanks which again have the Super Sabre unique shape.

    Finally the 1 piece canopy is clear and has well defined framing.

    next is to paint the interior bits and then get started on the cockpit
    More to follow

  • Profile Photo
    Erik Gjørup said 1 year, 8 months ago:

    Count me in to follow this one! I have always had a soft spot for the F-100, having seen them at open-days with the RDAF. Boy could they produce sound! Regarding the exhausts, I do believe it is a matter of old and new, the J-57's having their afterburners replaced with some from the F-102, changing the look of the business-end of the plane, easing maintenance and improving engine reliability, being less prone to compressor stalls.

  • Profile Photo
    Spiros Pendedekas said 1 year, 8 months ago:

    Yet another great entry, my friend @uscusn!
    Thanks for the great presentation of this little gem of a kit.
    Looking forward to it!

  • Profile Photo
    John vd Biggelaar said 1 year, 8 months ago:

    This will be another beauty, Chuck @uscusn
    For sure going to follow this build.

  • Profile Photo
    Allan J Withers said 1 year, 8 months ago:

    Good one Chuck.

  • Profile Photo
    Chuck A. Villanueva said 1 year, 8 months ago:

    Thanks Eric, good to see ya, Been wanting to get to this kit, the Nam GB was the perfect opportunity to start on this. I was 19 when I built the Monogram F-100 when the kit was first produced. Always wanted to build another one.

    Thx Spiros, with all the amazing new kits that keep coming from different kit makers these days, we tend to neglect some older ones that are still good kits to build a newer kit that may not be any better than the one that is 30 years old.

    Thanks John, this won't take too long, more like just staying with it and not linger.

    Thanks Allan, it's good to get a 72nd kit in every once in awhile.

  • Profile Photo
    Chuck A. Villanueva said 1 year, 8 months ago:

    After my normal painting the interior 36320, Dk Gull Grey. Work starts in the cockpit

    The seat cushion is Khaki Drab, Dk gull grey seat frame, red headrest.

    Next is to add the PE details parts, side consoles and rear wall details.

    While the cement set, I attach a fishing weight using White Gorilla glue to keep it in place.

    After attaching the shoulder harnesses, the seat is then installed into the cockpit tub.

    Next is to attach the PE lap belts.

    A test fit of the tub into the fuselage temporally taped closed. The fit is good and the center of balance is also established with the weight, when finished the F-100 will sit on its nose.

    The PE instrument panel is assembled.

    The nose gear bay is not bad, and will be inserted into the RH fuselage half before they are assembled.

    The cockpit tub sits nice and level after a test fit.

    Next up is to assemble the fuselage.

    More to follow.

  • Profile Photo
    Stephen W Towle said 1 year, 8 months ago:

    I've got this kit in the stash partially completed. It seems nobody makes a decent ejection seat in this scale for the F-100. Good to see that you can still spruce up the cockpit with P.E.. Lookin good Chuck.

  • Profile Photo
    Spiros Pendedekas said 1 year, 8 months ago:

    Great progress and equally great looks, my friend @uscusn!

  • Profile Photo
    John vd Biggelaar said 1 year, 8 months ago:

    Very nice work done, especially considering this scale, Chuck @uscusn

  • Profile Photo
    Chuck A. Villanueva said 1 year, 5 months ago:

    Getting back into this build, Thanks Steve, yeah don't ya know it, the seat is quite basic, and not even really have an accurate shape. Just use the Eduard's PE to spruce it up. With the canopy closed it will be ok in this scale.

    Thanks Spiros, your penchant on building older kits influenced this build on the old but pretty decent F-100. Good overall shape and details. Engraved panel lines also a plus.

    Thanks John, been awhile building an F-100, a long while. The Monogram kit when it was first produced around 78. Still a great kit.

    With the cockpit finished and installed into the RH half of the fuselage. Time to close it up.

    Once the halves are assembled, fit is good not much seam work filling needed. Things will progress rather rapidly as there is not much to complete the airframe. Next is to attach the upper dash panel console over the front instrument panel coaming.

    Now to work on the lower wing panel assembly.

    Here the lower hard point location slots for the drop tanks are opened. No ordnance is provided in the kit just the drop tanks. I do have the proper ordnance in the weapons spare box, but will configure this clean with the tanks only.

    Next is to assemble the wings and then attach them to the fuselage.

    The fit of the wing to the fuselage contact point is excellent and no worry for filler here.

    Next to attach the horizontal stabs, moulded as one piece, with a tight fit into the slots in the tail. The fit here is good and they stay nice and level.

    The basic air frame is completed. Next up is to attach the detail bits around the air frame and canopy/

    More to follow...

  • Profile Photo
    Spiros Pendedekas said 1 year, 5 months ago:

    Great progress, my friend @uscusn!

  • Profile Photo
    John vd Biggelaar said 1 year, 5 months ago:

    Nicely progressing, Chuck @uscusn
    Love to see those instructions in various languages to drill a hole.

  • Profile Photo
    Chuck A. Villanueva said 1 year, 3 months ago:

    Thanks Spiros, nice easy hassle free build.
    Hi John, yes the old school simple break down I miss compared to the new complicated over engineered and for the most part vague location points.

  • Profile Photo
    Chuck A. Villanueva said 1 year, 3 months ago:

    Finally off to a good start in 23 on getting ongoing projects completed. First to attach some detail bits over the top and lower surfaces.

    The wing fences will be first bits to attach on the wings.

    Next up are some details under the airframe. First the gun port panel under the nose. Which is a good fit as it snaps into place. A little clean up of the seam, good fit other wise.

    Next is attaching the main gear bay center support brace.

    At this point I painted the gear bays and dive brake bay Interior Zinc Chromate Green,

    Continuing with the lower details, next is to install the tail hood and tail bumper.

    At this time I assembled the drop tanks. I will only have the tanks hanging under the wings, no weapons load out.

    Next I attach a decent canopy, it is moulded in one piece and will leave it that way in closed position. Then went ahead and masked it off.

    The final exterior parts is the refueling probe under the RH wing.

    And the distinctive nose pitot tube that can also be folded up when parked. I will leave it extended.

    Next up is the overall Glossy Black overcoat before applying the NMF finish.

    More to follow.