N. American F-100D Super Sabre, ESCI 1/72nd USAF

Started by Chuck A. Villanueva · 37 · 7 months ago
  • Profile Photo
    George R Blair Jr said 1 year, 10 months ago:

    Great looking F-100, Chuck (@uscusn). The molding looks similar to the old Hasegawa F-100. The Eduard set really helped out in the cockpit. I got a flight in an ANG 2-seat F-100 back in the 70s which was really fun. NMF should be fun.

  • Profile Photo
    John vd Biggelaar said 1 year, 10 months ago:

    Very nice work on the details, Chuck @uscusn
    Good to see this one being picked up again.

  • Profile Photo
    Spiros Pendedekas said 1 year, 10 months ago:

    Indeed, great progress and great details, my friend @uscusn!

  • Profile Photo
    Chuck A. Villanueva said 1 year, 6 months ago:

    Hi George, I have not seen the Hase F-100, though that kit may have raised panel lines, I would have to look into that.
    must been a nice ride that day, much better than an "E" ticket ride.
    Thanks John several other reviews mentioned that the ESCI kit is about the best F-100 kit in this scale.
    Thanks Spiros, as always, coming along slowly.

  • Profile Photo
    Chuck A. Villanueva said 1 year, 6 months ago:

    Now after a long hiatus, time to start painting.

    First the glossy black coat is airbrushed over the airframe. Using Tamiya Gloss Black.

    Let it sit for about an hour and then airbrush Humbrol Aluminum Enamel. It leaves a dull finish which I was after.

    Now to let it sit overnight before masking off to paint the rear fuselage section.

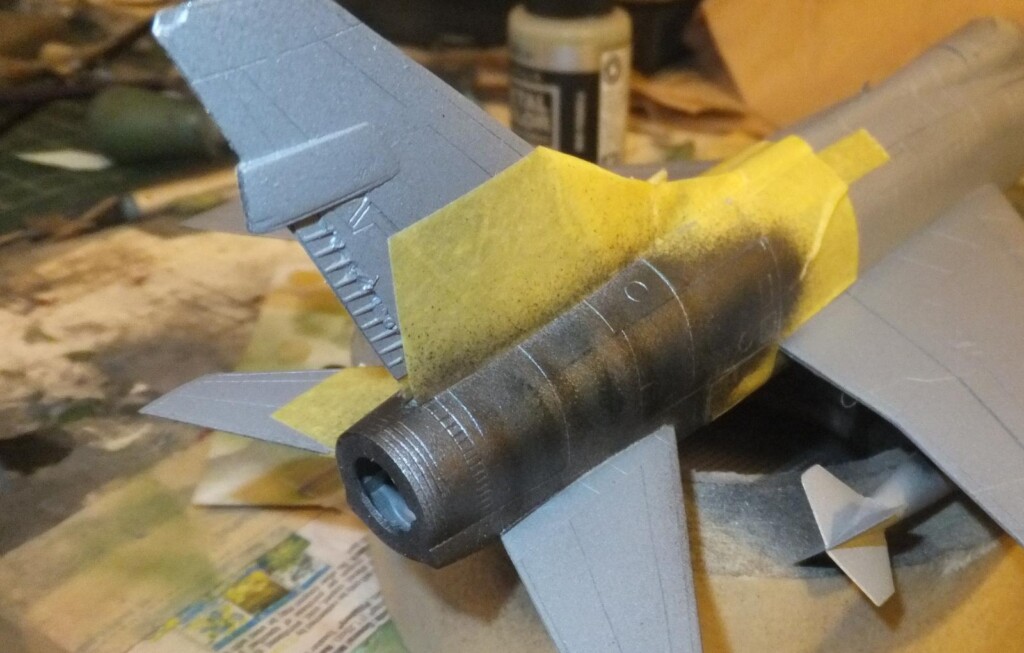
    Once masked off, I used AK Burnt metal over the rear section. Then a thin mxture of Vallejo Burnt Metal Blue over the panel lines. Then a mist of Tamiya smoke to tone down the blue.

    Then the masks come off and the finish looks ok.

    Next a 2nd metal shade over the center panels of the wings, horizontal tail and rudder.

    More to follow.

    1 additional image. Click to enlarge.

  • Profile Photo
    Spiros Pendedekas said 1 year, 6 months ago:

    Superb painting, my friend @uscusn!
    Especially the rear "heated" area rocks!

  • Profile Photo
    John vd Biggelaar said 1 year, 6 months ago:

    Very nice paintwork indeed, Chuck @uscusn
    The burned metal looks really great.

  • Profile Photo
    Chuck A. Villanueva said 9 months, 3 weeks ago:

    Thanks Spiros and John, long time, but ready to finish this up.

  • Profile Photo
    Steven Corvi said 9 months, 3 weeks ago:

    Coming along nicely I built this one years back Great kit StilL!

    Steve

  • Profile Photo
    George R Blair Jr said 9 months, 3 weeks ago:

    Glad you are attacking this one again, Chuck @uscusn. The F-100 is one of my favorites, and I have heard that this one from ESCI is very good. I had a ride in the back seat of an F-100 when I was a young lieutenant, so it is near and dear to my heart. Looking forward to the big finish.

  • Profile Photo
    Chuck A. Villanueva said 9 months, 3 weeks ago:

    I just updated with a new PC this weekend. Now I have to upload images that I hope I can recover from the old PC. Via Google drive/Cloud.

  • Profile Photo
    Chuck A. Villanueva said 9 months, 3 weeks ago:

    Getting back to work on the F-100, with a quick update. Masked off the outer portions of the wings, stabs and tail to paint the center sections of each flying surfaces.


    Masks removed to and now we have two different metal panels.

    Next the nose and upper spine panels are painted Flat Black.

    Finally the tip of the tail is masked and painted Light Grey.

    The clear coat is applied. Next up decals.
    more to follow

  • Profile Photo
    John vd Biggelaar said 9 months, 3 weeks ago:

    Nice work on the various panel colors, Chuck @uscusn

  • Profile Photo
    Chuck A. Villanueva said 8 months, 3 weeks ago:

    Thanks John, still have no idea where that gash came from on the RH side of the rudder.

  • Profile Photo
    John vd Biggelaar said 8 months, 3 weeks ago:

    @uscusn, a weird kind of damage indeed. Looking back at your pictures, it seems like it occurred somewhere in the beginning of your build. You might be able to get rid of it by filling it with some thick paint and polish it.