A tale of two Mosquito's. One a De-Havilland plane, the other a Moskito, the not so famous cousin.

Started by Louis Gardner · 111 · 1 year ago
  • Profile Photo
    Louis Gardner said 3 years, 2 months ago:

    Here it is as promised. A man is only as good as his word. A while ago I promised to build something for Erik's @airbum
    "De Havilland" group build.
    I have finally started work on these two kits, after too much delay with other life related "stuff" getting in the way.

    This will be a build of two kits, both are 1/48 scale. First up is the Tamiya Mosquito. It will be finished in an overall PRU Blue scheme.


    The other model is a Revell Monogram "Pro Modeler" Focke-Wulf Ta-154A-0.

    I know the second build isn't a De Havilland plane... I'm using the Moskito name to link it in, and since it was also mainly constructed of wood, had two engines, and was named the same, these two planes share a lot in common.

    If time permits, this build journal could develop into some more 1/48 scale De Havilland Mosquito models being built. I have several more of the Tamiya Mossies, one of the "new tool" Revell kits, and an old Monogram kit that I have had for years.
    So pull up a chair, strap in and get ready... Here we go !

  • Profile Photo
    Eric Berg said 3 years, 2 months ago:

    Wow. Good to see you tackling the Revell Moskito (DML/Dragon). I love this kit despite a few problems. Know that wings are warped downwards so one needs to do the popsicle stick insert thing to straighten them out. However Dragon seemed to have fixed the problem with their newer 3 in 1 release but I still had to use those sticks to straighten the wings a bit more.

    There is a great reference book from Valiant: Airframe Detail no 6 worth every penny.

    I am definitely pulling up a chair for this one.

  • Profile Photo
    Spiros Pendedekas said 3 years, 2 months ago:

    What a great double entry, Louis @lgardner!
    I love your correlation between the two kits!
    I have both of them to build one day!
    Looking forward to them!

  • Profile Photo
    Erik Gjørup said 3 years, 2 months ago:

    Chair pulled up, straps tightened - hit me!
    Interesting twosome you got there my friend. Apart from the wood, the Moskito was one of the first to use resin for structural strength! - but that is another story 🙂

  • Profile Photo
    Louis Gardner said 3 years, 2 months ago:

    Eric, @eb801
    Yes the wings were warped on mine too... The Pro Modeler kit was perfect other than that. I fixed mine without the use of any popsicle sticks. The idea did enter my mind though. You would be surprised how easy the fix is. Please stay tuned as it is coming up next.

    Spiros, @fiveten
    My dear friend, it is so good to hear from you. I know you have been busy with the F-104, and I am way past due with making a comment over there on your build log. I will be making some good notes here on this one, so you can use it as a guide for when you get to build yours. Oddly enough, the Ta-154 Moskito has most of the building part done now. It goes together ultra fast, and other than the wings, it is a simple build. Please stay tuned and I'll show you what I did next.

    Erik, @airbum
    You did it again... and taught me something ! Thank you... 🙂

    I didn't know the "Tego" resin was also part of the structural strength. I know the bombing raid that damaged the resin plant actually caused the substitute glue to be used. The substitute glue actually ate into the wood, and caused several airframe failures... This led to the ultimate demise of the project. This was a good thing for the Allies, as the Ta-154 had very good performance. Was it as good as it's wooden cousin, The Mosquito ? Probably not, because it didn't have Rolls Royce Merlins... But it "could" have developed into something very lethal. In fact several were in service with NJG groups at the end of the War.

    You probably knew this already, and have likely forgotten more about the Luftwaffe planes than I ever knew.

    Thank you my friends for the warm welcome, and please stay tuned for the next installment on the Mosquito... um, I mean the Moskito... You know what I mean. 😉

  • Profile Photo
    Stephen W Towle said 3 years, 2 months ago:

    I wonder if the two a/c ever crossed paths? The Brit Mosquito's would do night time interdictions into German held airspace at night. Going after aircraft landing in the pattern while waiting for the ground staff to turn on the airport lights and the German pilots to briefly turn on their landing/formation lights. Once the German aircraft hit the ground the anti aircraft guns would go wild. So for the Mosquito crews timing was everything. Finding another "Wooden Wonder' would be interesting.

  • Profile Photo
    Louis Gardner said 3 years, 2 months ago:

    Armed with some information and pictures of the Moskito in William Greens book "The Warplanes of the Third Reich" I got busy... Had I known about the Valliant Airframe book #6, I likely would have picked it up too. I have had this book for many years. It is a very good source of information on Luftwaffe planes.

    I never realized the different radar antennae sets that were used on this plane. The FuG 220 I knew about, and it comes with the kit. Here's a good picture of that.

    There was one version of the plane that was kept with a "clean" nose and it was used for various speed trials and other performance testing. This was the V-7 preproduction plane. Part of me is tempted to build that plane... This plane is very tempting, as I have several pictures showing the top and both sides of it. This is always a plus when you want to build an accurate model. Because of this, "TE+FK" is a contender as the subject of this build. This is not set in stone just yet, time will tell.

    One thing for certain and that is the distinctive angle these planes sat at while parked. Like the American Grumman F7F Tigercat, and Lockheed P-38 Lightning, this one also sat in a "Nose High" configuration until it was loaded with fuel, ammunition, and crew. The weight lowered the nose considerably. Look at the high angle of attack in this next picture that is in the book...

    Because of these variables, I am not sure if I will do anything to the nose gear or not. The main gear can also be adjusted to sit "lower" with a little modification, since it mimics the real life structure realistically.

  • Profile Photo
    Louis Gardner said 3 years, 2 months ago:

    Everyone has talked about the wings being twisted and bent on the Pro Modeler Ta-154. Mine was no exception. I went about fixing things a little differently. Since this is supposed to be the worst part of the build, I wanted to take care of it first. Some take the plastic and submerge it in hot water to remove the twists. I'm sure it works out OK. Others have added wooden sticks or even metal wire to keep the wings straight.

    Here's what I did. I must warn you, this might not work for everyone. If you try this and it makes a mess of things, don't say I didn't warn you. This all happened by accident by the way...

    Having said that, here is my "disclaimer".

    I don’t recommend this method to anyone, and extreme caution must be used when doing this wing “fix”. But with some care and luck, you can fix this problem in a matter of a few minutes. Plus you don't have to worry about burning yourself with scalding hot water. It works...

    I was holding the upper wing and exerting some pressure on it to see if I could remove the twists. As I was applying pressure, I heard a "crack" and then realized the plastic had broken just behind the engine mount area on the leading edge of the wing. In horror, I thought I had destroyed the part. To my amazement, it actually looked better ! The wing was now almost perfectly straight.
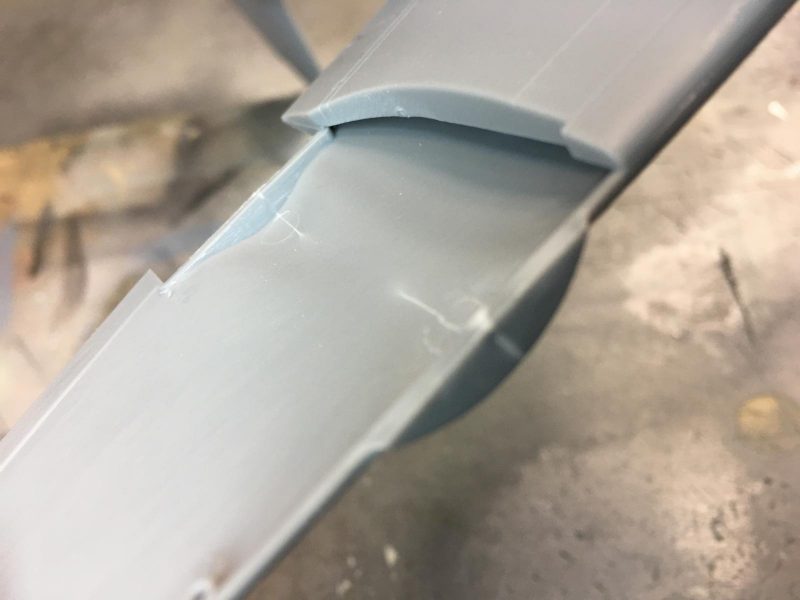

    Not being content to leave well enough alone, I continued and carefully exerted more pressure on the upper wing section. This time I applied force along the rear area where the engine nacelle will eventually be installed. I cracked the plastic here too ! Now the wing was straight as an arrow...

    If you look close at this next picture, you can see how the cracked area shows up as a lighter color, almost like a fault line in the plastic. Luckily it didn't go all the way through and remains hidden just below the surface.


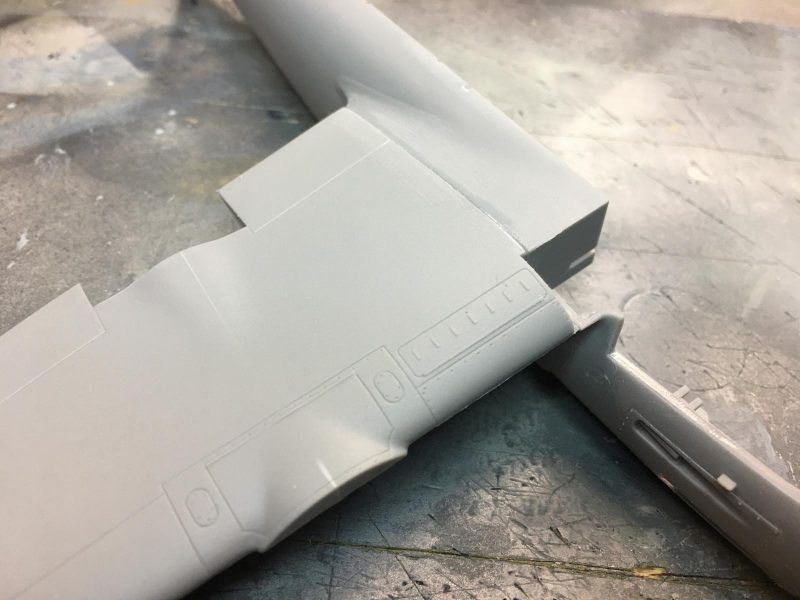
    Next I glued the upper wing section in place against the bare fuselage half. This allowed me to get a nice tight fit with no gaps present. A little sanding work will be needed here, but no filler.

    Next I cut off the locating pins and installed the inboard lower wing sections, making sure they fit tightly against the fuselage. I also added the cannon covers. This allowed me to get the fit on the cover almost perfect, since I could work at the seams from both sides.

    This was assembly was then allowed to dry overnight.

    The following morning I was curious to see how the wings turned out. As you can see in this next photo, they are straight as can be.

    I sanded the upper wing joint smooth. It looks very nice. I will leave the line present where the inner portion of the flap meets against the fuselage. This line should be there, so don't try to fill it in.

    I built the engine nacelles, and after allowing them to dry overnight, I installed one. I pressed it tightly against the seam of the lower wing. I used liquid glue on the joints. As I pressed it tightly against the wing, some liquefied plastic oozed out. This was exactly what I wanted. You can see how nice the joint lines are. Again no filler is needed if you build it this way.

    Since I was on a roll, I installed the outer lower wing panel. The fit was perfect at the nacelle joint. I wanted it to dry straight, so I clamped the assembly and let it sit overnight.
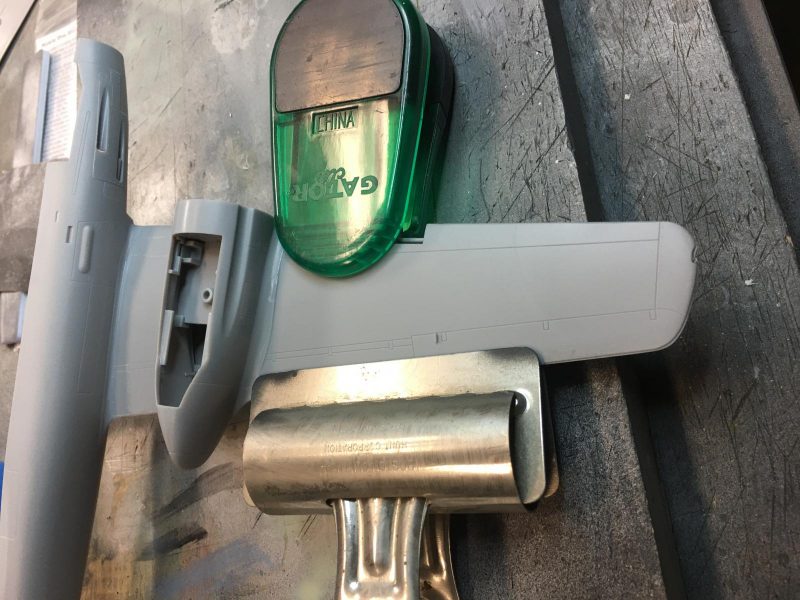
    There is some very slight misalignment along the leading and trailing edges of the wing. This is easy to fix with a few swipes of sand paper.

    Stay tuned for the next installment. This Ta-154 is coming together very fast...

  • Profile Photo
    Eric Berg said 3 years, 2 months ago:

    When DML/Dragon re-issued their improved 3 in 1 Moskito they included a set of PE antennas. I chose to build the version on page 243 above with the “claw” style radar, V3. The etched parts were super thin and almost impossible to work with so I pilfered the styrene radar parts from the Promodeler kit and used them even though they seemed a little pudgy and oversized. I found the antennas the most difficult issue with the kit and easy to break off. Looks like V7 doesn’t have any so that will make your life easier and I think looks much cleaner.

    To me the Moskito is just as good looking as the Mossie.

  • Profile Photo
    Eric Berg said 3 years, 2 months ago:

    I just saw your wing photos. Looks good. Great solution but it does seem a bit daunting. I never like the sound of plastic cracking.

  • Profile Photo
    Louis Gardner said 3 years, 2 months ago:

    Remember the engine nacelles that I mentioned earlier ? Here they are. The fit was perfect, and after some very light sanding work, the joints are flawless. No filler was needed anywhere on this model so far.


    I also assembled the landing gear. These look very nice and they fit into the nacelles with positive locating pins. You can adjust the "squat" or ride height of the plane by shortening the retraction cylinder a little. There are two of them, one on each side of the LG. The other part is a pivot and it will follow the length of the cylinder if you shorten it.

    I left mine alone and didn't modify this area.

    Speaking of the landing gear, here are the doors. I wanted to install these parts prior to adding the main gear assembly. This is not possible. I will try to add the smaller doors before painting, but the large one piece rear doors will prevent you from adding the landing gear if you install them on now. I will add these parts just prior to painting the exterior of the plane.


    I also built the engines and the propellers. They look OK to me, but I have read where some have mentioned the shape of the propeller blades is off somewhat. I have not compared them to pictures, so I can't comment on my own observations here.

    I then built the forward sections of the engine nacelles. This also included the air intakes. The air intakes will likely need a little filler where they join against the engine mount / rear cowling areas. I will also use one of Erik's tricks and thin the opening down some so that it looks more realistic.

    The nose wheel is a one piece part. I assembled the main wheels. Now they will be lightly sanded to remove any seams that are visible. The fit has been spot on so far, other than the air intakes, and they are not too bad either...

    The tail surfaces were built up next. You can do a little surgery and make it so the elevators can be posed offset from center. I chose to leave it alone and built mine up box stock so far. The fit is perfect here. No gaps are present on these parts. They have since been sanded down and are ready to install.

    Here is the end result of building all the small stuff. I still have to assemble and paint the cockpit, and that will likely get done tonight.

    These are the remaining parts left from the Moskito box. I am not a big fan of the way these boxes were done, so I try to use small reseal able containers when it's possible. This takes a big bulky box off the table and keeps the parts clean and dust free while you are working on other projects.

    This has been a very enjoyable build so far... I now wonder why I waited so long to build it up.
    As usual, comments are encouraged. Thanks for looking.

  • Profile Photo
    Louis Gardner said 3 years, 2 months ago:

    Erik, @eb801
    Thanks for checking in. It sounds like you have built the V3 machine, which was "TE+FG". I have seen where one person actually used staples from an ordinary stapler to build that nose radar array. I have also read where the Dragon release was a nice kit, and how they had "fixed" the wing warp problem.

    I am still undecided on which plane I will make mine as, but V7 is definitely in the running simply because it looks better and will be easier to construct without the radar array on the nose. Like you, I also think the Moskito is a good looking plane...

    Yes it was very daunting when I heard the plastic snap ! I immediately thought that I had just destroyed the model. The crazy thing is that I went back and purposefully cracked the plastic again 3 more times !

    It worked... I thought to myself should the crack go through to the outside I could fill it in... after all, we are modelers and fixing imperfections is what we normally do.

    I just got lucky I guess... 4 times !

    I wouldn't recommend this method to anyone, unless extreme caution is used when doing this wing "fix". As I have shown, it can be done. Just take your time and go slow with it.

  • Profile Photo
    Morne Meyer said 3 years, 2 months ago:

    Hi Louis. This is gearing up to be an epic build! Sometimes little accidents can be a blessing in a build. With my latest CF-100 build numerous scratchbuilding pieces broke and had to be replaced and the replacements often turned out better. I will follow this build for sure! Can't wait for the next installment!

  • Profile Photo
    Eric Berg said 3 years, 2 months ago:

    You are really zooming along with this build Louis. You're right. I built V3 and here's a photo of of it.
    I put to much weight in the nose and I think it sits too level in hindsight. I have enough parts between the two kits to build a second Moskito and you've inspired me to do so.

    1 attached image. Click to enlarge.

  • Profile Photo
    Erik Gjørup said 3 years, 2 months ago:

    Cracking good save on the wing my friend! Please do not do it on the Mosquito . . . . . 🙂