Thanks, Greg (@gkittinger) and Tom (@tom-bebout). I still watch the movie every couple of months. The acting may be a little stilted, but the planes and flying is really cool.
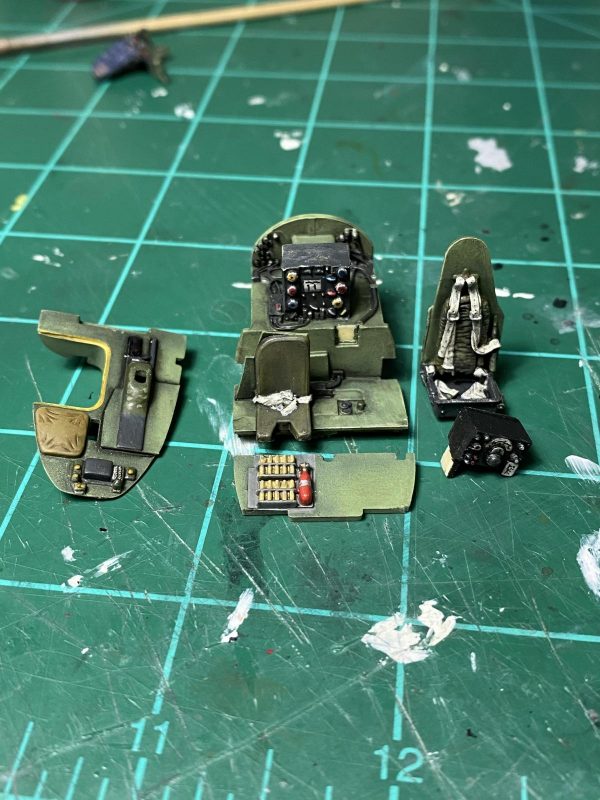
I have spent the last few days doing the detail painting on the cockpit. It turned out to be a "frankenpit", since I used most of the pieces from the KMC resin cockpit, substituted three pieces from the kit, and then added some of the Eduard set that I had. I have had all three of these sets for many years, and decided it was time to put them to use. The resin pieces appeared to be exactly the same size as the plastic parts they replace, so I anticipated an effortless installation. It didn't turn out that way, of course, and I ended up doing the old test-fit, sand, check again, and repeat. I think it will all fit together now. The resin parts were extremely detailed, and I got to do lots of detail painting, which is one of my most favorite tasks (picture that being said in a sarcastic manner). It is now done and I am waiting overnight to be sure everything sets solid before I seal everything up in the fuselage.
-

1. Floor and wall with extinguisher are kit parts.
2. KMC resin parts
My friend Erik (
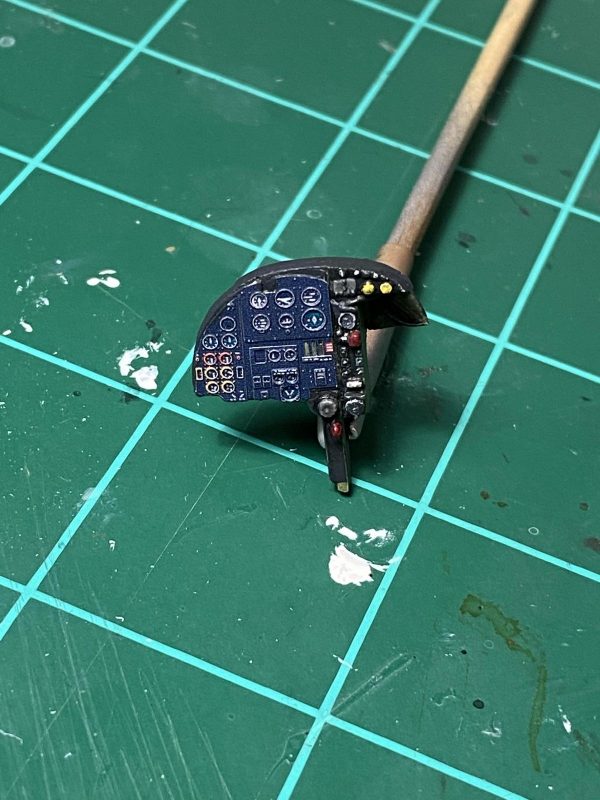
@airbum) and I have been trading messages about the instrument panel. All of the Mosquito types have different instrument panels, but you can break them down into two main types: planes with a glass nose will have a panel only on the left side of the cockpit to allow access to the nose, but if the plane has a gun-nose then the panel will cover most of the front of the plane. The resin panel I am using comes from a set for the FB Mk 6, which has a gun-nose. The panel closes off the nose completely. I cut down the right side of the resin panel so there would be access to the nose, but I failed to cut one stack of instruments off that are attached vertically to the center post. As Erik and I posted about the two types of panels, I realized that I probably should remove the extra stack of instruments and black boxes. The problem wasn't that it would be too hard to cut panel down, but the real problem was that I had already painted the panel and I didn't want to lose the work. I dug into the internet and discovered that when the Mk 35s were converted to target-tugs, they usually added some instruments into the space in question. I suspect this was done because access to the nose wasn't quite as important in post-war target tugs as it was in a wartime bomber. With this cheat in hand, I decided to leave the extra instruments, since the movie used postwar TT Mk 35s. That's my story, and I'm sticking to it. Thanks to Erik for the great discussion about the panels.
-

1. Eduard etch
2. This is the extra stack of instruments.
The tail wheel assembly is added to the fuselage before you bring the two halves together. As I was cutting the parts from their sprue, I noticed that one side of the assembly had its arm broken off. I looked in the plastic bag that it came from, as well as in the box, and didn't manage to find the piece. I scratchbuilt a replacement arm that I think will look OK once it is painted and on the plane.