Movie Star Mosquito

Started by George R Blair Jr · 52 · 4 years ago · 1/48, 633 Squadron, Airfix, Mosquito Mk VI
  • Profile Photo
    Spiros Pendedekas said 4 years, 1 month ago:

    This particular work at the kit could be addressed as "very limited run" style...
    Glad your tapered wing openings look good now, George @gblair!

  • Profile Photo
    George R Blair Jr said 4 years, 1 month ago:

    It is finally painting day. I also wanted to try making some masks using my wife's San and Cut machine. I planned to use the machine to cut the masks for the camouflage as a trial to see how it would work for me. If you have ever tried one of the older machines, you may have found them to be cumbersome to use. The old machines required a lot of trial and error, as well as a lot of guess-work concerning which blade to use and how deep to make the cut depending on what material you are cutting. The Scan and Cut is basically automatic and takes all of the guess-work out of the equation. The machine works flawlessly, and is simple to use. The machine is capable of doing a lot more than I am asking of it in this simple trial, but you have to start somewhere. In preparation for today, I painted the bottom of the plane using Tamiya Medium Sea Grey. When it was dry, I masked the edges of the Sea Grey in preparation for the application of the upper camouflage.

    Using Brother's Scan and Cut:
    The first thing you need to do is have the design which you will copy. It is possible to scan something that is not the correct size and then use the machine to enlarge it, but I wanted to try to keep things simple for this first trial. I copied the camouflage from the kit instructions and enlarged them on my computer printer to 1/48 scale. The Scan and Cut machine does a lot better if the edges of your design are sharp and have contrast. I used a light and some glass as a platform to trace the edges of the camouflage onto some white copier paper using a marker. After that, it was simply a matter of scanning the design into the Scan and Cut. I had a full sheet of masking paper from AK, which is very thin and attached easily to the carrier platform for the machine. Once the sheet is loaded, it was simply a matter of telling the machine to begin. It only took about 90 seconds to cut all of the masks required.

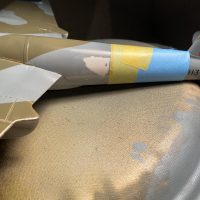
    I cuts the masks for the green camouflage, so I painted the areas on the plane that were to be green using Tamiya Dark Green. Once that was dry, it was a simple matter to add the masks. I wasn't really sure how to cut the masks for the curved portion of the fuselage, so I masked the fuselage camouflage using Tamiya tape. The final color, Tamiya Ocean Grey was sprayed over the masks. When this was dry, the masks came up easily and cleanly leaving a sharp edge. Although a sharp edged demarcation probably isn't appropriate for a Mosquito, I noticed the photos of the movie planes appeared to have a sharp edge demarcation, so I wanted to replicate this.

    This machine is really easy to use and I think it will be useful for making masks for insignia and lettering on my models, but I need some more practice before I tackle small and intricate designs.

    Some clear gloss and the Mosquito will be ready for decals. I have researched the letter codes and registration numbers used on the movie planes, so I plan to replicate one of the planes that actually flew in the movie. I am looking forward to finishing this model. I hate to say it, but it has been one problem after another, and I have reached the point where I just want to finish it and move on to something else. Cheers to everyone, and stay safe.

    13 attached images. Click to enlarge.

  • Profile Photo
    Erik Gjørup said 4 years, 1 month ago:

    What a great way to use the technology available to you George! I notice that the off-set pencilline even got cut precisely, what a treat.
    The moviestar is looking better each time, and without having to do the work myself, it all looks easy. Hope you will keep sane till it is finished 🙂

  • Profile Photo
    Tom Cleaver said 4 years, 1 month ago:

    @gblair - You're right you wouldn't want that hard edge on a model of a "real" Mosquito. The way to get a "soft-yet-distinct" edge using your mask machine is to run thread about 1/16 inch in from the edge of the pattern, which will raise the mask.If you aim the airbrush slightly toward the mask, you will get "scale overspray" along the border between the two colors. Just so you know if you're doing an RAF airplane, the paint was applied "lighter to darker" - in other words, you would apply the Ocean Grey first here and mask that, then apply the green where you want the "scale overspray".

    This project is looking good despite your frustration with it.

  • Profile Photo
    Spiros Pendedekas said 4 years, 1 month ago:

    Nice implementation of modern technology, George @gblair!
    This looks like a wonder machine that can be useful in modelliing.
    I love the looks of your Mosquito.
    Looking forward to some decals?

  • Profile Photo
    George R Blair Jr said 4 years, 1 month ago:

    Thanks for the tip, Tom (@tcinla). I have not tried using thread to raise the edge of the mask. I have used thin rolled Silly Putty to raise the edges of the mask, but thread sounds easier and quicker.

  • Profile Photo
    George R Blair Jr said 4 years, 1 month ago:

    Thanks Spiros (@fiveten) and Erik (@airbum). This is an easy machine to use, so far, but I haven't tried anything complex yet. I found several free fonts online for RAF lettering, and I am thinking about trying to make the lettering for the Mosquito. I have found the letter codes and registration numbers used on the Mosquitos in the movie, so I could cut the masks to do the lettering in the sky color used on the movie machines. The registration numbers would be way too small to create masks, so I will piece these together from the spare decal box. This machine is certainly capable of making insignia like roundels, but they would be a complex paint job, so I may find some decals to use for this build. You all stay safe. Cheers.

  • Profile Photo
    Greg Kittinger said 4 years, 1 month ago:

    Excellent work! My wife got a Cricut for Christmas last year, and I've been looking for an excuse to do something similar! Nice movie star in the making...

  • Profile Photo
    George R Blair Jr said 4 years, 1 month ago:

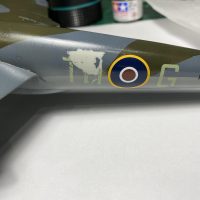
    Today was decal day, and a real case of one step forward and two steps back. I wanted to try the Scan and Cut for making the letter codes for the Mosquito. I found several fonts for RAF WW2 aircraft on the internet and imported them into Microsoft Word. I printed a set of codes on my printer and then ran them through the Scan and Cut. Apparently using the machine was not as easy as I thought, because I kept getting letters that had rounded corners. Everywhere there was supposed to be a 90 degree intersection in the letter, the Scan and Cut added a rounded fillet. This, or course, wasn't going to look right. I tried several different things to fix the problem, including a short reading of the instructions, all to no avail.

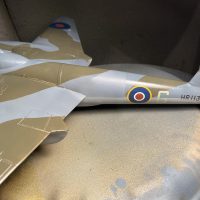
    No problem. I had decals for the codes in the size and color I needed, so I proceeded with decal session. These planes were all painted in WW2 colors for the movie, and I have not found a picture of a plane that appeared in the movie that had any stencils, or "No Step" markings, and so on. I planned to mirror this idea by adding just the roundels, letter codes, and black registration numbers. A quick trip through my decal stash turned up some roundels and fin flash of the right sizes, as well as sheets of lettering and numbers for the codes and registration. Everything went on fine with some MicroSol and MicroSet. I left everything to dry for the day.

    I went up during half-time of the Thursday Night Football Game to be sure everything had dried when I noticed that I had been struck by a case of drain bamage, no, wait, make that brain damage, earlier in the day. The codes for the aircraft in the movie are HT. When I added the individual decals for the codes earlier in the day, I had reversed them to TH. Well, I have a cardinal rule: I never work on things like models, home repairs, or computer issues after 8 p.m. I rapidly reach a point of diminishing returns. Well, although it was well after 8 p.m., I decided that I could quickly remove the decals by pressing some masking tape over the errant decals and pull them up. So, I cavalierly pressed the tape on and gave it a pull. It did pull the decals off, as well as the paint beneath the tape. This hole in my paint really bothered me, so I decided to fix the problem at 8:40 p.m. during the remaining halftime of the game. I first sanded down the edges of the paint that remained on the plane, then wiped the plane down to get rid of the sanding dust. Airbrush cranked up, paint booth humming, and ... everything seemed to work. The new paint does stand out a little, but I think it will all blend when it gets its coat of clear gloss. Yeah! Back to the game.

    3 attached images. Click to enlarge.

  • Profile Photo
    George R Blair Jr said 4 years, 1 month ago:

    Thanks, Greg (@gkittinger). I think there is a lot we can use these die-cutting machines for in our hobbies. My wife also has a Cricut that I used to cut thin plastic for the walls of a scratchbuilt building for my train layout. Worked like a champ. I designed the walls and the cuts needed using the Cricut software. I really like the idea of the Scan and Cut because you can conceivably scan just about anything into the machine and have it cut it. As I found out, there is a learning curve. I actually resorted to reading the instructions to figure out what I was doing wrong (this shows you how desperate I was).

  • Profile Photo
    Tom Cleaver said 4 years, 1 month ago:

    @gblair -

    When a man breaks down to the point he actually consults the manual, you know the situation is desperate. 🙂

  • Profile Photo
    Erik Gjørup said 4 years, 1 month ago:

    Nice save! Hope you learned to concentrate on the builds and leave the football alone. . . .

  • Profile Photo
    Spiros Pendedekas said 4 years, 1 month ago:

    I have done goofs recoveries at 02:00 am or even later, George @gblair ...just couldn't go to bed and sleep...couldn't leave it like that!

    You applied the letters in reverse...how about having applied the cockpit walls reversed (left to right)? The throttles at the right BACK side, hidden by the seat?

    The walls being impossible to be removed?

    The plane ready for decaling?

    Don't ask me how I know, but I understand you can imagine...

    Great save on your job and great progress too!

  • Profile Photo
    Greg Kittinger said 4 years, 1 month ago:

    I hadn't thought about cutting thin styrene with the Cricut...possibilities just flooded into my drain, er...brain!

  • Profile Photo
    George R Blair Jr said 4 years, 1 month ago:

    Thanks, Spiros (@fiveten), Erik (@airbum), and Greg (@gkittinger). Maybe we should start a group concerning our biggest or latest goofs on models. And then how we fixed them. I once built a DC-9 with the two top wing pieces glued to each other. I didn't realize the mistake until I went to build the other wing and discovered that both pieces had slots for the engine pylons. It was obviously the manufacturer's fault for building wings that could be assembled incorrectly. Of course, I hadn't looked at the instructions either. I finished the kit with the wings assembled incorrectly and I put it in my model case to remind me to slow down, don't take anything for granted, and to read the instructions.