1/48 Hasegawa Bf-109G-10 a wonderful gift from Tom Bebout

Started by Louis Gardner · 60 · 1 year ago
  • Profile Photo
    Louis Gardner said 1 year, 7 months ago:

    George, @gblair
    Thanks ! This is what drew me to build a model of this particular machine. I also thought it looked very good, and hopefully it will be easy to spray since I have to make some home made masks for the fuselage codes. I might even try to spray on the German National markings as well. Time will tell.

    Spiros, @fiveten
    Thanks for cheering me onwards. I agree that painting the gear wells in 02 was a better choice.

    John, @johnb
    Thanks my friend ! Please stay tuned, as I'm posting the results of the painting session next.

    Erik, @airbum
    Thank you for the added information about the sliding window. I zoomed in on the picture, and sure enough, just as you said it was there.


    I might just tempt fate and try to scribe it carefully on once it's almost wrapped up. I'm not going to drill it out and open it up as it is in the photo though. That is stuff for builders such as yourself who are a few pay grades above my skill set. Thanks again, and I will likely have some more 109 questions for you and our good friend Pedro.

    Tom, @tcinla
    That's a good looking model ! I saw it when I was searching the net trying to find good pictures of an overall RLM 76 Bf-109.

    I have decided on this particular aircraft only because I found photos of it online that showed both sides of the plane.
    Now I just might have to build another one, (providing I can find good pictures that is) of a late war 109 I found that had a red RVD band on the fuselage. I "think" it was "Weiss One", from JG 1.

    I saw another overall RLM 76 Bf-109G that was Black 14, but it didn't have the fuselage RVD band... going from memory here. It could have been a dedicated Wilde Sau fighter.

    Please stay tuned everyone, as I have another installment coming right up. 🙂

  • Profile Photo
    Louis Gardner said 1 year, 7 months ago:

    As promised, here are the pictures of todays progress on Weiss 43.
    I'm using MRP paints on this one, and I like how they spray. They are pre mixed, ready to go. It takes several light coats but the coverage is good afterwards.


    I started out by spraying the model in overall RLM 76.

    I also sprayed the outer side of the landing gear doors, and the exhaust shrouds.

    Next I sprayed the landing gear wells in RLM 02. I also installed the exhausts at this time.

    The inside of the main landing gear legs were also sprayed using RLM 02 at this time. Once it dried, which was in no time flat, (as this MRP stuff dries incredibly fast), I added some "Ultra Bright Chrome" Bare Metal Foil on the oleo strut portion of the landing gear.

    Finally, I glued the main gear in place.

    Now "Weiss 43" can stand on it's own two feet.

    Tomorrow I hope to start painting on the other things, like how the wing root area is done in black. I might even start trying to make some homemade number masks, since I was not able to locate the proper style font numbers in my Luftwaffe decal sheets.

    As always, comments are encouraged.
    Thanks for stopping by.

  • Profile Photo
    George R Blair Jr said 1 year, 7 months ago:

    Paint looks great, Louis (@lgardner). It looks like MRP comes out as a really smooth semi-gloss. Your 109 is really moving fast.

  • Profile Photo
    Spiros Pendedekas said 1 year, 7 months ago:

    Nice progress, my friend @lgardner and really great looks!

  • Profile Photo
    John vd Biggelaar said 1 year, 7 months ago:

    Very nice progress indeed, Louis @lgardner
    The bare metal foil looks great.

  • Profile Photo
    Louis Gardner said 1 year, 7 months ago:

    George, @gblair
    Thanks for the compliments, and I am happy with the progress with this build speed on this one. It seems that these Hasegawa 109's and especially the Tamiya ones build up very quickly.

    Yes Sir, I am also very pleased with how the MRP paint sprays and performs. It dries quickly, and it has a nice semi gloss type sheen to it once it's dry, (with this color anyhow). The color I used is called "Blaugrun" Late War RLM 76 variant, part number MRP-181.

    Thank Spiros @fiveten
    You are rocking your 109 builds too. By the time I get done typing my response, you will likely be finished with yours. You are SO close to having it completed and it looks fantastic.

    Thank you John. @johnb
    I am very impressed with the latest postings you made on your Tamiya Bf-109E. The cockpit, (and especially the seat harness), looks incredible.

  • Profile Photo
    Louis Gardner said 1 year, 7 months ago:

    Tonight I made a little more progress on the 109. All I got finished was painting the black areas behind the exhaust.


    Using the photos I found online, and a thin 000 brush, I carefully hand painted these areas using a mixture of Testors Gloss and Flat Blacks. I mixed them in about equal parts and thinned them down a little. I did this in hopes it would use the capillary action to draw the paint into the panel lines and make things look smoother here where the RLM 76 color meets the black I just hand painted.

    I didn't get it perfect, so I will have to mask it off and spray on a little touch up in two places. This should be a fairly straightforward fix though.

    He says now... 😉

    I'll keep you posted with the outcome, hopefully tomorrow.

    As always, comments are encouraged.

  • Profile Photo
    Spiros Pendedekas said 1 year, 7 months ago:

    Your hand painting results look really nice from here, my friend @lgardner. Your airbrushing touch up will make things perfect!

  • Profile Photo
    John vd Biggelaar said 1 year, 7 months ago:

    Very nice result, Louis @lgardner
    A few touch-ups, but as you said, if you think that it should be an easy task, usually turns out to be more complex than expected.

  • Profile Photo
    Louis Gardner said 1 year, 7 months ago:

    Spiros, @fiveten
    John, @johnb
    Thanks gentlemen for the kind words. Today I managed to get some work done on this one. I had some errands to run so my bench time was limited. Here are some pictures along with a short description.

    I didn't take any photos of the touch up work along the exhaust panels. However these areas were successfully touched up.

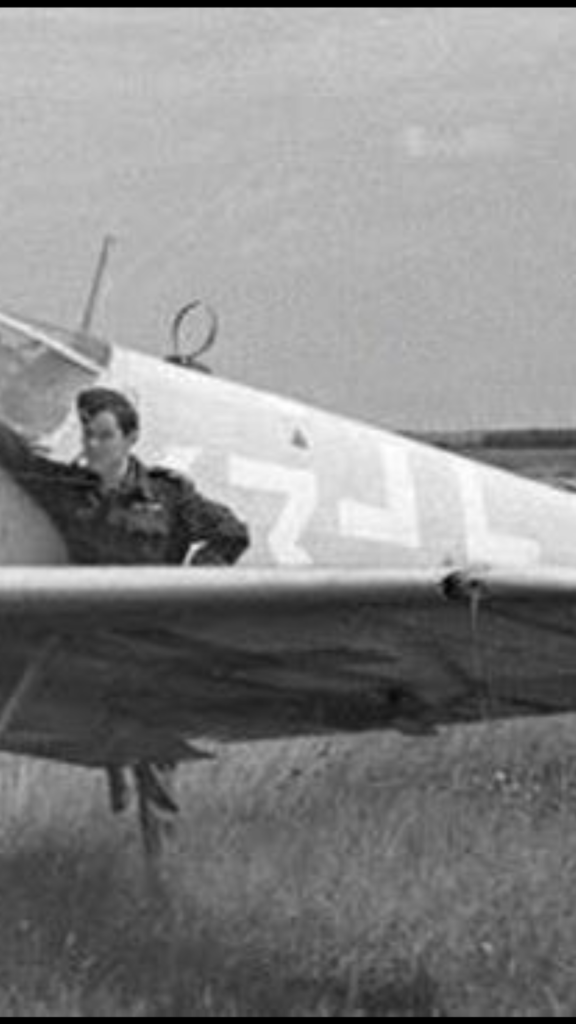
    I located these pictures online at various places. Falke Eins was one of them, and there are a lot of great Luftwaffe subjects to browse through there. This particular Bf-109G plane I'm building was numbered "Weiss 43".


    The numbers "4" and the "3" on the fuselage sides were not your standard Luftwaffe style fonts. I'm guessing here, they "could" have been brush painted on by hand. I went through all of the decal numbers I had in the decal stash, but I didn't have anything that would look proper.

    So I came up with an idea... I'll just make some homemade masks and try to spray them on. Brilliant !
    I took one of the pictures that was taken from almost a dead on side view, and enlarged it enough so that I could pick out the minor differences. The numbers look to be very similar on each side of the fuselage.


    Then I took some fine edge masking tape and laid out two layers on a glass surface. After some quality time with a machinist's steel ruler, a micrometer, a 6 inch metal straight edge, and a brand new #11 razor blade in the trusty exacto knife, I went to work.

    After a little while, I had something that looked like this. Presto !

    I knew if I didn't mask more of the airframe off it would all end up being covered in a fine white over spray. Now the 109 looked like this:

    The next step was to mix up some white paint and carefully spray the masks. Here is how it looked at this point.


    Like a little kid on Christmas morning, I removed the masks once the paint had dried enough. What appeared next was OK. Not perfect by any means, but a good place to start from especially when I didn't have the correct decals.


    I zoomed in on another picture, and I might have accidentally stumbled across something. To me, it looks as if the Cross that was under each wing "could" have been the Late War "simplified" style using only one color paint. This case it would have liekly been a Black color. I can't see anything around the outer edges that appear lighter, and possibly indicating a white border you typically find here.

    Now emboldened by the recent success, and knowing how easy it was to make some masks for the German National insignias, or "Balkencruz", I tempted fate once more and decided to make a set of masks for the insignia under the wings.


    This is what I ended up with, and how it looked after spraying. I really went crazy here, as I didn't mask everything off for fear of breaking off the aileron counter balances and the under wing mounted Morane mast.

    One of the underwing crosses is not exactly perfect, but I can do a little touch up work and it should be good to go.
    Once the home made masks were carefully removed, this is how the G-10 looked. I got VERY lucky, as no Black paint ended up where it shouldn't have. I think by reducing the air pressure, it also helped cut down the over spray.

    I'll leave you with this final picture tonight. It shows both of the "simplified" Late War under wing crosses.

    Now I have to add the Swastika on the fin, and somehow cobble together a Werke Number. Then I will work on the spiral for the spinner, getting closer to completion with each completed task.

    As always, comments are encouraged.

  • Profile Photo
    Spiros Pendedekas said 1 year, 7 months ago:

    As usual, great research and great result so far, my friend @lgardner! Fantastic job with the masks, everything looks prefect from here. You already have a gorgeous looking model!

  • Profile Photo
    John vd Biggelaar said 1 year, 7 months ago:

    Very nice result, Louis@lgardner
    You made a good choice to spray those markings instead of using decals.
    It looks much better this way.

  • Profile Photo
    Louis Gardner said 1 year, 7 months ago:

    Spiros, @fiveten
    John, @johnb
    Thank you for the kind words. I am also very happy that I decided to spray on the numbers and insignia markings. Tonight I took the easy way out and used a pair of decals for the Swastikas on the vertical fin ahead of the rudder.


    I also scrounged up a "C-3" fuel triangle decal, and a werke number data tag. I used these decals here, because they are the only ones I can see on this particular airframe, anywhere in the pictures I have. I'm not saying they were not there, it's just that I can't see them clearly in the pictures available. Here is a case where less is more. 😉

    As far as the werke number painted on the fin, it is very blurry in the pictures I have. I am relying on the captions that went along with the photos that gave the werke number, because I can't make it out in the photos. One of the numbers started to break up as I was sliding it around to position it in the proper spot. I actually like it better this way, because it gives the illusion you can't really see what the number is. Plus it looks a bit more authentic (at least to me), as these numbers were often hand painted on in the later stages of the War. This mistake gives it that look. It is supposed to read 130369.

    In order to replicate this, I used some tiny numbers that are present alongside each decal on your typical decal sheet. They are in various sizes, styles and fonts, according to who made the decal sheet you are looking at. I ended up using these tiny numbers from the leftover decals that were provided in a Revell / Pro Modeler 1/48 scale Ta-154 "Moskito".


    Anyhow, I didn't get much done today, but here's a final picture showing the progress.

    Maybe tomorrow I can get some more work done on this one.

    As always, comments are encouraged.

  • Profile Photo
    Spiros Pendedekas said 1 year, 7 months ago:

    Nice step , my friend @lgardner! I like your approach with the werke number.
    All looking great!

  • Profile Photo
    John vd Biggelaar said 1 year, 7 months ago:

    Very nice work, Louis, @lgardner
    The way you created the werke number is great.