N. Korean T-34/85 Tank, Academy 1/35th Scale.

Started by Chuck A. Villanueva · 40 · 2 years ago
  • Profile Photo
    Chuck A. Villanueva said 2 years, 10 months ago:

    There is only one Soviet era piece of armor I have ever attempted to date. That was a DML 1/35th scale Iraqi T-72. Never finished it and in fact need to find where the heck it is. The only other Academy armor kit I have built to date is the Hummer. And that kit was bought when it first came offered by Academy in 1992. That kit is finished just been adding bits of details to it ever since off and on. This will be my first attempt of a T-34/85 of any kind. So lets go take a peek in the box.

    Popping the lid reveals documentation and the instruction sheet. Parts molded in Dark Green plastic in separate parts bags.

    The instruction booklet has the pic of the tank on page 1.

    Paint chart/guide lists the colors recommended to use as well as several vendors available to choose from that carry those paints available. Nice.

    Opening the booklet to page 2, starts with step 1 building the lower hull. The back of the booklet shows several marking choices for tanks operating in the N. Korean conflict but also late WWII as there is an option to build an earlier variant within the kit.

    Academy also has a warning document that lists do's and don't for novice modelers.

    Another document to assure the kit is complete with all the parts to build it, but in case of inspection and you find missing or duplicate parts that may prevent you from completing the kit this will help in getting those parts replaced.

    The decal sheet contains the markings for 5 tanks. Rather simple set as these tanks were only painted one color Russian Dark Green. Your choice of which version or scheme you wish to build.

    Finally Academy provides a fret of PE for the rear deck screen.

    Now to the plastic. The first sprue from the top are the tracks molded in Gun Metal Steel color. No rubber or vinyl tracks, you build the tracks provided in styrene.
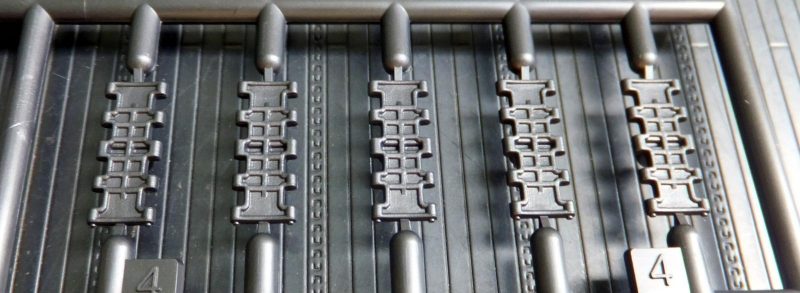
    The next sprue contains the late and early turret, rear deck plate, front plate and mantle.

    What is cool is the texture on the turret. The first turret is the type used in the N. Korean conflict, the 2nd choice is late WWII.

    Academy really put some thought into this with the rough cast texture on the turret and through out other parts of the tank.
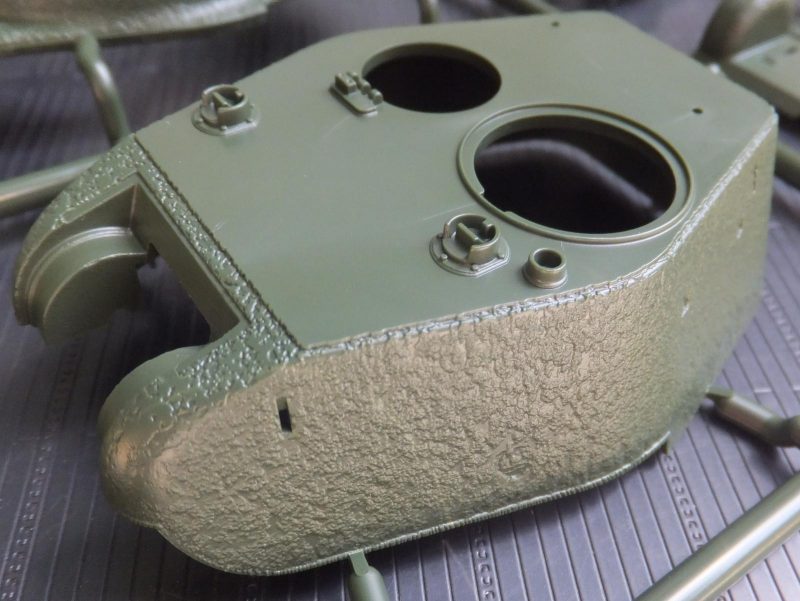
    The front plate also has this feature as well.

    The rear deck plate, the mufflers and fuel tanks will hang on this when we get to that part of the build.

    The filter covers on the Korean version, these sit on top of the turret.

    The next sprue contains. The hatch cupola and the 2 different type of hatches used on the T-34, Korean or WWII Russian. Also the gun barrel is molded as one piece.

    The different types of hatches.

    Then the WWII style of filters that sat on top of the turret.

    The next sprue contains the upper hull and components.

    The upper hull is 1 piece and will all kinds of details added along the way. As most of the grab handles, hooks, levers and latches will be added on as we progress along.

    Front fenders

    The next sprue contains the mutli piece lower hull. A first for me as to date all the tanks I have built the lower hull was a 1 piece tub with some of the suspension molded on already. Not the case on this kit.

    The side panel where the suspension will be attached to.

    The lower hull panel. The side rails attach to this on each side.

    Another set of fender's, apparently as I look at this sprue there are two style of fenders for this tank.

    Academy gives you a choice of a molded in plastic rear deck screen or the other choice of attaching the PE screen.

    Spare track, machine gun rear mount and headlamp.

    The next sprue, 1 of 2 for the Christie style of suspension for the T-34. Has the drive sprockets , shocks and springs. Fuel tanks and upper hull details.

    The shock and springs nice details, which you will not see once the kit is assembled.

    Set of external fuel tanks.

    The idlers nice details on these wheels.

    Provided thread for the steel cable, cut to length for on each side.

    1 of 5 sprues for various handle details for the hull.

    And finally 1 of 4 sprues for the road wheels. Very nice details.

    No clear parts.

    Next up is to start getting this bad boy together.

    more to follow...

    1 additional image. Click to enlarge.

  • Profile Photo
    Spiros Pendedekas said 2 years, 10 months ago:

    Everything looks great in the box, my friend @uscusn!
    What an amazing entry!
    I have practically zero experience on armor: I have a friend here in Greece who's IN LOVE with Academy armor!
    Looking forward to your progress!

  • Profile Photo
    John Healy said 2 years, 10 months ago:

    Interesting kit, Chuck. I only build the occasional tank and to be honest, link and length tracks scare me off. I’ll be watching with interest.

  • Profile Photo
    Curt Cayemberg said 2 years, 10 months ago:

    The kit looks quite nice, great subject!

  • Profile Photo
    Chuck A. Villanueva said 2 years, 10 months ago:

    Hi Spiros, in my teens it was a bit more armor than building aircraft, mostly Tamiya kits and some Italeri in 35th scale. I discovered Polly S and Humbrol paints. German armor seemed the tanks and soft skins to build at the time. Didn't get around to build any Russian Armor. Lately interest in armor has been a factor as a change of pace. And Louis is a big influence as well. Also the appearance of other kit producers such as AFV, Takom, ICM, Academy, DML/Dragon, Rye, along as the usual Tamiya.

    Hey John I lean more towards soft skins like the halftrack, cargo trucks, jeeps, Hummers, and armored cars compared to tracked vehicles.

    Hi Curt, the kit has some great detail parts, i piece of PE, otherwise I think this will build into a quite accurate T-34.

  • Profile Photo
    Chuck A. Villanueva said 2 years, 10 months ago:

    Time to get started. As armor goes at least for me, unlike aircraft modeling, I would normally pre paint parts on the trees before assembling. With armor, break out the adhesives and lets start building.

    So starting with the lower hull.

    The last two tanks I built were a Sherman and Panzer IV Lang/70. The hulls were one piece as per Tamiya. The Academy has you assemble the lower hull, it is not a 1 piece tub affair. So the floor and side panels will need to be assembled..

    I will use the center bulkhead panel to keep things aligned.

    Using the bulkhead as a guide, I first attach one of the side hull panels. Contact points are excellent and let set at a 90 degree angle.

    Then the RH side panel is installed and allowed to set for about 30 minutes. Being my first Academy tank, the multi-piece lower hull is new for me. So being careful here that all is aligned as the rest of the tank is built on the hull. So a good solid and accurate foundation to start things off.

    While that is setting, next to assemble the suspension struts and housings.

    4 on each side.

    I first install 3 of the RH side inner hull panel. The center bulkhead is removed for this process.

    The openings on the outside of the hull which shows the bottom strut mount will be hidden from view when the wheels and trailing arms are attached.

    A few parts already coming together. So far the fit is excellent, and the parts fit where there are supposed to go. No issues so far.

    Next up the suspension. More to follow.

    1 additional image. Click to enlarge.

  • Profile Photo
    John Healy said 2 years, 10 months ago:

    Nice progress.

  • Profile Photo
    Chuck A. Villanueva said 2 years, 9 months ago:

    Thanks John nice change of pace from the winged things.
    Now to continue work on the lower hull.


    The center bulk head is now permanently installed.

    Next the rear panel is installed. The texture steel details are very nicely rendered. So far the fit of the parts are excellent.

    Some detail bracket parts are attached to side hull panels. Hole have to be drilled out for these to fit.

    These 2 brackets are mounted towards the front on the RH side.

    On the LH front side, what may be an inspection hatch is installed.

    Next the idler spindles are attached to the front of each side panel.

    Now to install the Christie design torsion suspension arms, 5 on each side.

    The fit on each of these parts are excellent. Easy no muss and no way really to mess this step up when installing.

    In about 5 minutes all 10 arms are attached to the hull.

    Next to install the rear lift points and tow hooks on the rear panel.

    Nato Black is airbrushed over the lower hull in the wheel bay area. Then Russian Armor Green will be applied over that.

    Next up the wheels. more to follow...

  • Profile Photo
    Erik Gjørup said 2 years, 9 months ago:

    Just dug in - but I shall check up on this very interesting piece of metal now and then!

  • Profile Photo
    Chuck A. Villanueva said 2 years, 9 months ago:

    Thanks Eric, won't do a loop with this one, still keep strapped in for the ride.

  • Profile Photo
    Spiros Pendedekas said 2 years, 9 months ago:

    Great progress on this, my friend @uscusn!
    Love this NATO black shade.

  • Profile Photo
    Chuck A. Villanueva said 2 years, 9 months ago:

    Time to get rolling, installing the road wheels and idlers.


    Nato black is first airbrushed on the wheels and idlers. Then using Mission Models Russian Armor Dark Green.

    The Dark Green is lightly over sprayed lightly for now over the main road wheels
    Front and back.

    Then the idlers and drive sprockets

    A bit more on the back side of the wheels.

    Then the lower hull is sprayed Dark Green before installing the first set of wheels.

    First the idlers are assembled.

    Then attached in position at the front of the hull slipping into their axles.

    Then the hub covers are installed.

    The first set of wheels are installed.

    Next the drive sprockets located in the rear position of the hull. Are then assembled. So far the fit is excellent to this point of the build.

    The drive wheels are then slipped onto their stub axles.

    Next the center caps are attached to the wheels.

    The front and rear idlers and drive wheels are installed to this point.

    Now to assemble the main road wheels. 5 sets on each side.

    Starting on the LH side, working from rear to front.

    I slip each road wheel onto the stub axles. Will attach all 10 sets on both sides.

    Finally the center hub covers are installed on each set of road wheels. Didn't lose any to the deck monster.

    Next up, more detail work on the lower hull.

    More to follow...

  • Profile Photo
    Chuck A. Villanueva said 2 years, 9 months ago:

    Now this session is to start work on the upper hull.


    The basic upper hull is one piece. Well detailed with fine bits to enhance the tank.

    The rear panel also has the engine service hatch that indicates that Academy may have a version with an engine and full interior kit available.

    Holes are opened up before attaching to the upper hull.

    The rear vents are installed over the rear deck. In the closed position though they can be posed open as well.

    The side screen/vent is attached to the LH side of the rear deck.

    The top engine access hatch is then placed on the rear deck. No engine to see it will be closed.

    What may be some kind of tool or accessory for track repair mounts on the LH side front of the hull.

    The defensive gun mount is then attached in place on the front of the hull. Nice details on this part.

    Finally the tow hooks, lifting points are attached as well as the 2 piece rear panel

    A quick temp fit on the lower hull and we have what looks like a T-34.

    next up more details to add to the upper hull.

    More to follow.

  • Profile Photo
    Spiros Pendedekas said 2 years, 9 months ago:

    Coming together nicely, my friend @uscusn!

  • Profile Photo
    Erik Gjørup said 2 years, 9 months ago:

    Lots of progress here! I could almost hear the theme from Rawhide when I read the previous post.