N. Korean T-34/85 Tank, Academy 1/35th Scale.

Started by Chuck A. Villanueva · 40 · 2 years ago
  • Profile Photo
    Spiros Pendedekas said 2 years, 6 months ago:

    Looking great, my friend @uscusn!
    Amazing how it homogeneously comes together!

  • Profile Photo
    Louis Gardner said 2 years, 6 months ago:

    Chuck, @uscusn
    You are definitely on a roll with this one ! It looks very good too I might add... Keep it up my friend.

  • Profile Photo
    Chuck A. Villanueva said 2 years, 5 months ago:

    This session is building the tracks. This will be the first time ever I will attempt to put a track set together. Not the band type vinyl tracks I have worked with over the years.

    Now to be honest this process will have one large upper piece track and a lower piece for the bottom set/ Building the ends to wrap around the front and rear sprockets,

    Building the end portions of the track will entail a set of interlocking pads to assemble.

    So not a true individual set, but a hybrid let say of a track that is partially complete and assemble the section that wraps around the front and rear sprockets. The tracks are moulded in a steel color which will be enhanced with silver pencil and a rust wash.

    I start by placing the upper 1 piece track atop the road wheels. And 1 track link at a time at each end.

    Using a quick drying cement at the contact point and let sit for a couple of minutes before attaching the next link. There are 2 types that are to be used. One with a center guide and the other is a flat link. One after the other as you assemble the track. A wedge is place between the track and fender well to keep the top piece from moving around as you assemble.
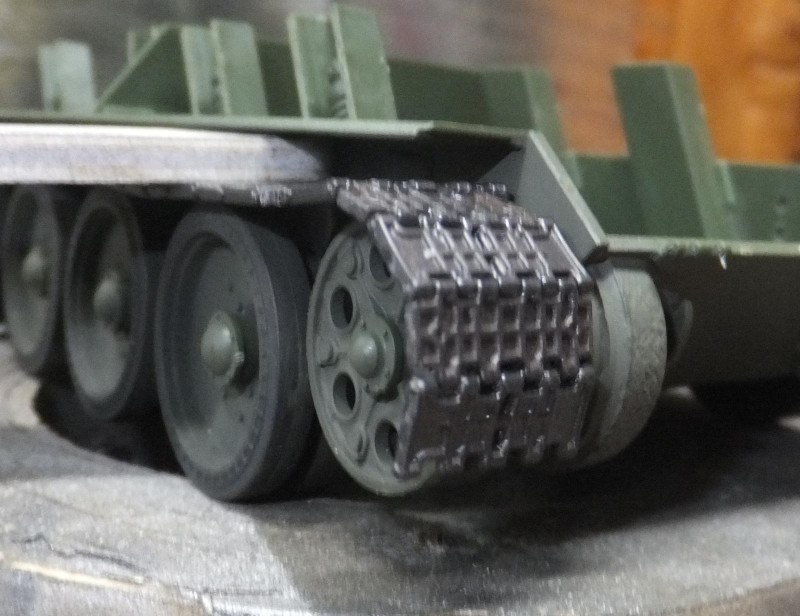
    Next is to place the lower 1 piece track under the road wheels and center it and make sure the individual track will be equally placed on both ends as you finally get to the last piece on each end.

    And it is quite a relief that the darn thing actually fits with no gaps or too tight of a fit, it all goes together rather nicely. whew!

    A bit of sag on each end looks great. Now to let it sit and dry so I don't accidently push the tracks in on each end while handling the tank.

    Now with just one side completed, I set the tank on its track for a look see how it looks.

    Now with the turret mounted.

    It has the unique T-34 forward look that Soviet armor tend to have.

    Some rust wash applied and now to complete the other side.

    Next to paint the upper deck and turret.

    More to follow

  • Profile Photo
    Chuck A. Villanueva said 2 years, 5 months ago:

    This session will finish up working the other set of tracks.


    Using Mig's rust wash you can see the difference on the set untreated with the wash.

    Thankfully the tracks went together well. Just careful handling being careful not to touch the sections not supported by any of the road wheels and idlers.

    Now with the turret mounted before adding the final details before painting the Russian Green.

    The front lift and tow shackles are attached to the front plate.

    Next the fuel tanks and brackets are installed starting with the rear set attached to the rear deck plate.


    Next is to prepare the fuel tank mounting brackets. Attach and then install the fuel tanks.

    Once they set, then Mission Models Russian Green is airbrushed over the top decking and turret.

    Then again the turret is placed on the top portion of the hull.

    Finally with the finish dry, time to clear coat the turret sides only.

    Next a quick decal process.
    More to follow

  • Profile Photo
    Spiros Pendedekas said 2 years, 5 months ago:

    Coming together beautifully, my friend @uscusn!
    Love the "rust: effect at the tracks!

  • Profile Photo
    Chuck A. Villanueva said 2 years, 4 months ago:

    Thanks Spiros, time to get her finished up.

  • Profile Photo
    Chuck A. Villanueva said 2 years, 4 months ago:

    Finally after some time away from the T-34, time to finish her up and move on the next armor project.

    Clear has been applied only on forward side sections of the turret. The tank will only have 2 decals which are the side numbers that seemed the only markings applied on N. Korean tanks in the Korean War.

    These decals did not perform very well from the kit. It took a lot of Solva set to finally have them settle down into the textured surfaces of the turret.

    I thought for sure there would be some silvering when the flat coat would be applied. But in the meantime letting the decals set. I put a bit of Testor's clear into the headlamp lens that will dry clear over the Molotow Chrome that was painted into the housing.

    Next was to attach what are links of some kind that sit on the RH side fender. 9 pieces in sets of 3 fit in bracket along the top of fender.

    No issues having these installed.

    Next to install the defensive gun barrel into the front ball turret.

    Next a test fit of the turret, and soon to shoot the flat coat. Even though the decal still has not settled overnight. I slice it up a bit then apply some more Solva Set.

    Vallejo Flat Clear is then airbrushed over the decals, and totally stoked that no silvering appears on the decals.

    With that the T-34/85 is done.

  • Profile Photo
    Spiros Pendedekas said 2 years, 4 months ago:

    What a finish, my friend @uscusn! Great that the decals did not silver at all! This is a superb looking T-34! A great contribution to the "Korean War" GB!

  • Profile Photo
    John vd Biggelaar said 2 years, 4 months ago:

    Superb end result, Chuck @uscusn
    Great looking armor and great addition to your armor collection.
    Merry Christmas and Happy New Year

  • Profile Photo
    Louis Gardner said 2 years, 4 months ago:

    Chuck, @uscusn
    First off, I hope that you had a wonderful Christmas, and that we all have an even better New Year.

    I have been watching as you were building this one. I have not been as active on here lately, but this doesn't mean I have not been occasionally dropping in. 😉

    This T-34 you masterfully constructed looks magnificent. It's also surprising to see how much bigger the T-34 is when it's parked next to a Sherman. The decals snuggled down nicely and the turret numbers look painted on.

    Those "links" or track looking things you mounted on the fender were ice grousers. They were connected on the tread faces of the tracks at spaced intervals, and were used to help with traction in icy conditions. I'm sure there was a lot of that in Korea during the harsh winters.

    Thanks for the tip about using the Molotow chrome pens. I have started using them, and they really work well. Thanks again for building this tank. As an older US Army tanker myself, I am partial to anything armor related. I am also looking forward to watching you work your magic on the new Modelsvit F-82. The detailed kit review you posted was very impressive.

    Take care, stay safe, a late "Merry Christmas" to you and Happy New Year.