USMC M8 Greyhound 1/35th Tamiya

Started by Chuck A. Villanueva · 74 · 2 years ago
  • Profile Photo
    Erik Gjørup said 3 years, 3 months ago:

    Happy to see this build progressing again Chuck. Those PE guards look just right - nice!

  • Profile Photo
    Chuck A. Villanueva said 3 years, 3 months ago:

    Erik and Spiros, that is the first time I was able to get the PE headlamp guards to go on and stay on correctly. First I would muck them up by not bending them correctly. Or would mess them up trying to attach them. This time no muss no fuss.

    John, always liked the Greyhound, built the earlier version from Tamiya as a teen, and that was more of a kit that was motorized, so I remember the running gear had metal axles and the motor drive and rubber tires. Not as detailed. More toy like as I don't remember any interior despite the open turret.

  • Profile Photo
    Louis Gardner said 3 years, 3 months ago:

    Chuck, @uscusn
    It has been a while since I stopped in to make a comment. This doesn't mean that I have not been watching the build as it progresses. In particular, I am very impressed with the work you did on the interior, the tires, and the PE headlight guards also look very good too. This is something that is hard to replicate using the kit supplied plastic parts.

    Looks good bud ! Keep it up. 🙂

    We had one of these parked in front of our Squadron HQ when I was in the Army. They are neat vehicles.

  • Profile Photo
    Chuck A. Villanueva said 3 years, 2 months ago:

    No worries Louis, you have a lot going on. I wish I could comment on every build going, but I do look at all of them. Quite fascinating all the work in progress.

  • Profile Photo
    Chuck A. Villanueva said 3 years, 1 month ago:

    A little catch up time on the Greyhound. Been really working on the things that fly not much on the ground pounders. So a bit of work on the Greyhound.

    First a bit of details on the back end. The trailer hitch and mount is attached.

    Next the taillamps. Managed to lose one the floor monster.

    Next the front lower hatches. These flip forward. A grab handles faces up within reach of both the driver and front passenger to close quickly.

    Next the top hatches. These flip outward and rest on a bracket so the don't flip all the way down the side panels.

    Then both top hatches are placed in the open position on either side resting on the bracket.

    Next up to start on the turret.

    More to follow...

  • Profile Photo
    Spiros Pendedekas said 3 years, 1 month ago:

    This is such amazing progress, my friend @uscusn!
    I just love all these little details added.
    Looking forward to your progress!

  • Profile Photo
    Chuck A. Villanueva said 3 years, 1 month ago:

    Thanks Spiros, quite a bit of details. Really a great improvement over the original 70's era M8.

  • Profile Photo
    Chuck A. Villanueva said 3 years, 1 month ago:

    This session is to start assembling the turret.

    The turret comes in L and R halves.

    Next I will use Eduard's PE to replace the kit supplied shell racks

    Carefully using Cyano cement to attach the RH side shell rack.

    Reinforcement support is attached.

    Then the LH side turret half is mated to the RH side.

    Then the 2nd PE shell rack is folded into shape and attached to the rear wall of the turret.

    The reinforcement support is also attached to the back wall right above the rack

    The front turret cover is attached.

    Next to paint the interior white and build the 37mm cannon

    more to follow.

  • Profile Photo
    Erik Gjørup said 3 years, 1 month ago:

    Very nice PE additions there Chuck. They add a lot to the looks.

  • Profile Photo
    Spiros Pendedekas said 3 years, 1 month ago:

    How can one not love the PE!
    Especially when crafted at such excellency as yours, my friend @uscusn!
    This turret looks great, the internal detail spectacular!

  • Profile Photo
    Curt Cayemberg said 3 years, 1 month ago:

    Amazing work on your M8!

  • Profile Photo
    Chuck A. Villanueva said 3 years ago:

    This where PE really does enhance an already well detailed kit on its own Erik and Spiros.
    Thanks Curt, appreciate that.

  • Profile Photo
    Chuck A. Villanueva said 3 years ago:

    Next up to assemble the 37MM cannon.


    First placing the binocular case in it's location with in the turret.

    Next to start assembling the cannon. Nice basic details.

    Next the breech is placed at the rear of the main body of the cannon.

    The extensions are in halves, assembled and placed behind the breech.

    After they are set in place the gun is taking shape.

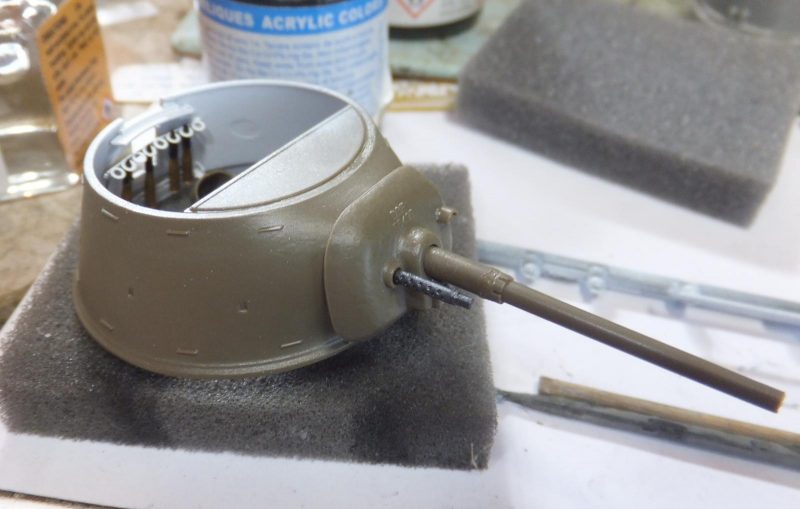
    Next the 1 piece barrel. So glad this part was not in halves.

    Next the pivot carrier is attached to each side of the cannon. This allows the gun to traverse up and down.

    Next is what may be the housing that allows the cannon to traverse when the wheel is turned.

    Next the sight assembly is installed.

    Height adjustment wheel.

    Then the whole assembly is painted OD and some bit of a wash.

    Now to paint the interior of the turret white.

    The binocular case holder is repainted OD.

    Now to attach the Browning .30 cal machine gun that mounts next to the cannon

    After painting the 37mm shells brass casing with black war heads. I place them some on the shell racks.

    Then the cannon assy is then installed through the front turret opening. Check that the cannon traverses fully, it does.

    From the front side the glacis plate is carefully slipped over the barrel of the cannon and the Browning, good fit.

    Finally the rear access hatch is installed.

    Next is to complete the rest of the turret details and start work on the pioneer tools.
    more to follow

  • Profile Photo
    Spiros Pendedekas said 3 years ago:

    Oh, yes, my friend @uscusn! It is coming together beautifully! Loved all the turret innards assembly!
    The cannon looks very realistic!

  • Profile Photo
    Chuck A. Villanueva said 2 years, 12 months ago:

    Thanks Spiros a very fun and enjoyable build so far.