1/48 scale Monogram B-24 J “Tubarao” assembly ship

Started by Louis Gardner · 75 · 1 year ago
  • Profile Photo
    Louis Gardner said 4 years, 3 months ago:

    Today I spent a little time at the work bench. I managed to get a lot done in this short time.

    The plan was to take a single flat piece of .040 plastic card stock, and use it to replace the areas I cut out. Once I got it trimmed to where it fit decently, I glued it in position.


    I used various clothes pins, tape and clamps to hold it in place while the glue dried. You will also notice the wheel fairing has been cut away. This made things a lot easier to install the large single sheet of plastic. Once I get the rivets added, and the wheel opening cut, I'll add the wheel fairing back in position.

    The upper wing half was temporarily placed into position to ensure the lower wing section would dry properly aligned. You can't see it here, unless you look into the now open wheel wells. In this picture, you can see I placed the wheel fairing back in place for now. It shows you how it will look once the wheel opening has been cut. The main wheel fairing was only laid there in place to take the photo... and has not been glued down yet.


    I wanted this plastic sheet to go under the open end of the nacelles, just as it does on the real plane. This is how it looks in this location now there is a new wing skin added, and the ends of the nacelles were opened up and the blanked off end sections removed. This is the outboard engine nacelle.

    And this is the inner nacelle, which is next to the main landing gear well.

    I flipped these photos upside down, so it would be easier to visualize what I have done. These pictures are of the real thing, and show the open ends of the engine nacelles on "Witchcraft". I'll scratch build an oil collection box for the turbocharger... you can see what is left of the original in this picture below.

    The box is missing altogether on the remaining engines. I'll build one for each engine nacelle.

    I am liking this scratch building stuff !

    As always, comments are encouraged.

  • Profile Photo
    Allan J Withers said 4 years, 3 months ago:

    Looks like you're having fun Louis and doing a good job of it, keep it up !

  • Profile Photo
    James B Robinson said 4 years, 3 months ago:

    Nice progress LG, the anticipation of what is to come is building! 🙂

  • Profile Photo
    Louis Gardner said 4 years, 3 months ago:

    Allan, @kalamazoo
    This has been a lot of fun... now I'm getting into a new level of work and that's re scribing the panel lines and adding some rivets... Stand by for another update...

    Thanks my friend.

    James, @jamesb
    You wont have to wait any longer... The next installment is coming up next !

    I have been doing some leg work on the 1/32 scale Revell P-51-D-5NA Mustang kits that are sitting next to the work bench at the moment. Some nice resin upgrades have since arrived and I was taking some pictures of the new parts and photos of the real thing to show as a comparison for an upcoming review.

    While I was there at the shop, I snapped a few more detail photos for the B-24... This build could get a little crazy.


    Take care buddy...

  • Profile Photo
    Louis Gardner said 4 years, 3 months ago:

    Here's tonight's update.

    Remember the large single piece of plastic that I replaced on the lower wing section ?

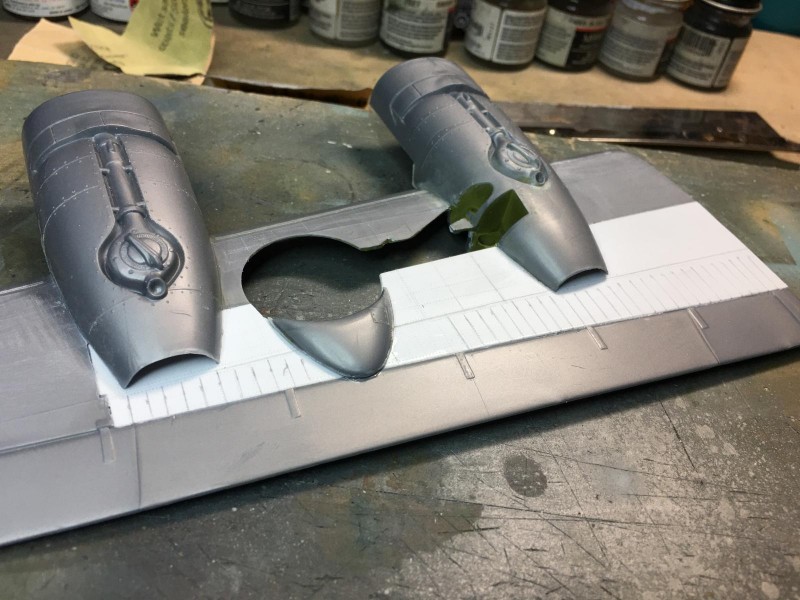
    Tonight I was fitting the wheel fairing and this involved some careful trimming of the kit supplied part that I cut off to make it easier to install the new sheeting. I also removed all of the raised panel lines and sanded the wing surface smooth.

    This next photo shows how it looks once the wheel fairing was glued in place.

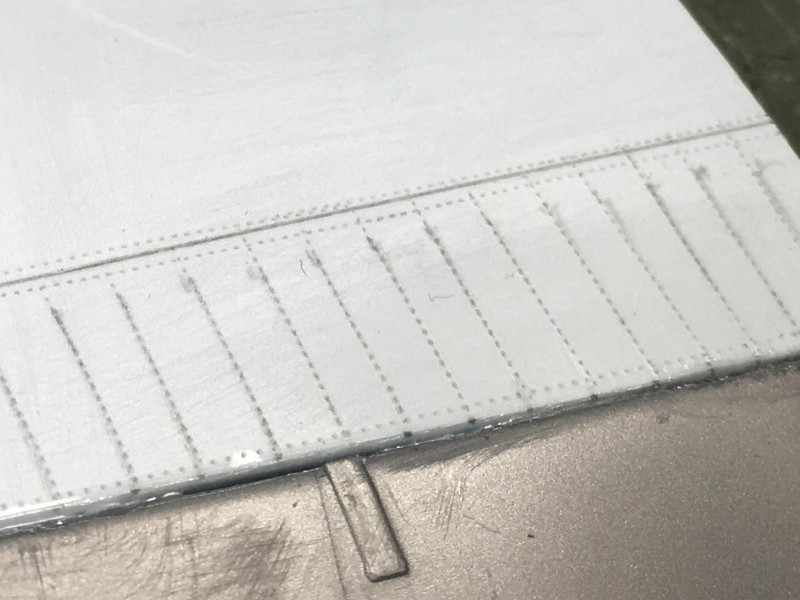
    There is a small problem with using roller wheels to scribe on a rivet pattern. You can't carry the rivets all the way up against a vertical obstacle. The rivet wheel hits against the nacelles when it gets really close. (They make a special tool that allows you to scribe the rivets up close in tight confines).

    I don't have the tool... so I did it the old fashioned way. I used a pin and simply pressed the individual rivets into the plastic where it was too tight for the wheel to work.

    Using the pictures I took of "Witchcraft" as a reference, I laid out some new lines in pencil. Then I went back and using the back of a #11 blade, I scribed the new panel lines.

    This is my first attempt at doing this on something at this level...


    Are the lines perfect ? Nope... not at all. Are they spot on the money as far as spacing... No, I used some "artistic license" here, since at this 1/48 scale, it would be next to impossible to add all the rivets that are present on the real thing...

    This is close enough for me. I have a lot more work to do here. I'm just getting started with the new lines and rivets.
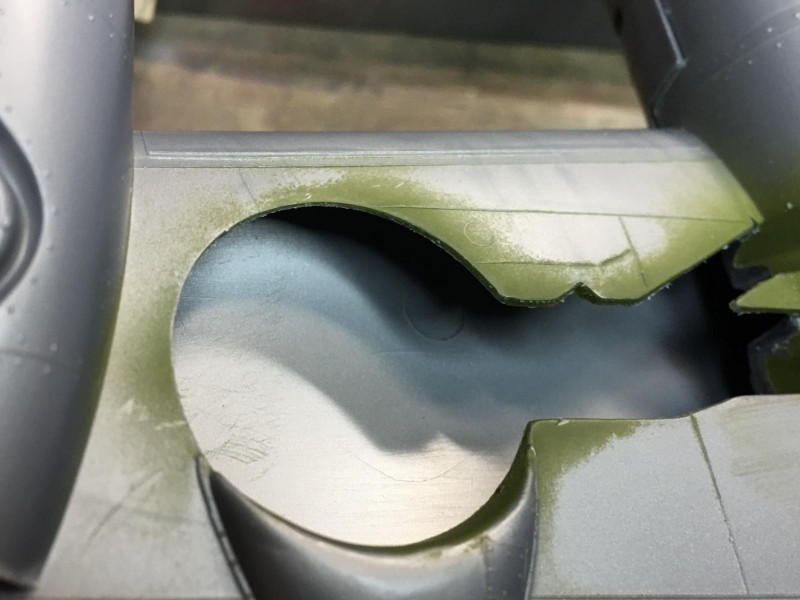

    I am especially happy with how the engine nacelles look now that the ends are open, and there's some plastic sheeting that is more true to the real plane. This is more of a true life representation of the real plane now.

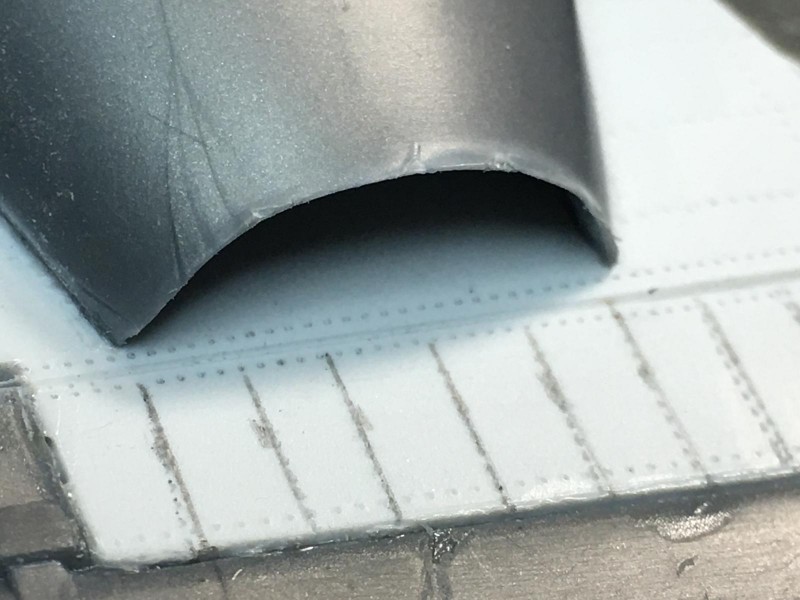
    I also noticed a small problem that Revell did when they molded the wing section years ago. They have the trailing edge of the landing gear opening with a short offset on one end. After studying the pictures I took of the real plane, I discovered this trailing edge should actually be straight.


    So I left the sheet plastic straight and decided against cutting the offset into it... I can't wait to get scratching the details on the gear wells next.

    I'll post up a few pictures showing what I'm talking about soon. It's getting late here and tomorrow is a busy day.

    Thanks for stopping in, and as always, comments are encouraged.

  • Profile Photo
    James B Robinson said 4 years, 3 months ago:

    Close enough to perfect to Me Louis. Well done!

  • Profile Photo
    Louis Gardner said 4 years, 3 months ago:

    Thanks James ! @jamesb

    Tonight I made a little more progress, and located another error.

    Using the photos I took of "Witchcraft", I decided to scribe the panel lines and add rivets to the areas where I have replaced the kit plastic on the wing surface. The area specifically is inboard of the engines, next to the bomb bays.


    There are also a few inspection panels located here in this area. I used some .005 thousandths of an inch card stock to duplicate these panels, since they stand out just a little proud on the real plane. I will go back later and lightly sand them to reduce the thickness even more.

    Not really paying close attention, I made a mistake. I followed the kit's panel lines on the remaining plastic that is located in between the two engines. If you look, these lines are not straight in line with each other. This next photo shows the kit's panel lines as they come from the factory.

    The problem is that they are angled. They should be straight and in line with each other. The inner wing section on the real plane is a single piece unit, that stops just outboard of the outer engine on each side. This is where the outer wing panel is bolted on the real plane.

    It becomes more obvious when you place a ruler next to the panel lines. The problem is visible on both wing halves.


    I have been considering replacing the wing skin on the inboard section too. If I do this now, I can fix the problem. If I leave things as they are, it will be noticeable, probably only by me, but I will know it's there... Unfortunately, I have already scribed the panel lines and added the rivets in the incorrect locations. So it might be easier to replace the sheeting with new plastic and go from there. Otherwise, I am probably looking at a lot more sanding and filling work to fill in the "Rivet divots" and lines.
    So I will probably take the plunge and do some more cutting. This way I can get it "right".

    As always, comments are encouraged.

  • Profile Photo
    Erik Gjørup said 4 years, 3 months ago:

    it will be noticeable, probably only by me, but I will know it’s there…………..

    My bet is that you will go for the difficult solution - your attention to the details are so great! This is a real joy to follow - keep the wisdom comin' - I try to let it all soak in!

  • Profile Photo
    Pedro L. Rocha said 4 years, 3 months ago:

    Louis @lgardner, what a hard task you are going about there.

    We all have that notion that a mistake we see in our build is usually not perceived by other people, with an odd exception here and there, but somehow we deal that mistake as a fatal flaw and try everything to fix it...and in the end no one will spot the difference, trust me.

    That butcher work and fine tuning is just awesome, god knows I wouldn’t venture into that path. Keep it going buddy!

  • Profile Photo
    Louis Gardner said 4 years, 3 months ago:

    Thanks for the kind words and encouragement gentlemen.

    Tonight I took the plunge and cut away a little bit more plastic.


    This should make it look a little better once I’m done with it.

    I’ll make an adjustment for this by installing a larger plastic sheet on the other wing. I also think that I can add the rivets and panel lines before I permanently install the new part.

    This will be interesting to see what happens next.

    I’m not going to do this this time around, because the deadline is coming up soon, but I’m seriously thinking about dropping the flaps on the next build, which will be the “Dragon and his Tail”.

    I took some really nice pictures of the area so I know how it should look. Here’s one of the many pictures I took showing the details of the inner workings of the wings.

    As always comments are encouraged. Thanks for stopping by.

  • Profile Photo
    Pedro L. Rocha said 4 years, 2 months ago:

    Louis, if you consider the amount of information and details about the B-24 that you captured on camera, I’m quite sure that you could go full “super-detail” on any kit, even more when you’re tackling a 50 year old one and in 1/48!

    Let be the devils advocate here and say that you might just get bogged down with so many scratch work (and I’m not considering those flaps or interior parts).

    Personally, I had that experience some years ago with the Revell 1/48 Do. 217 E, simply by wanting to do a lot of reworking on the kits parts...well it just wore me out half way the build and it’s in the box ever since. It takes a lot of enthusiasm and will power to embrace such a project. Hope you have both buddy!

  • Profile Photo
    Louis Gardner said 4 years, 2 months ago:

    Pedro, @holzhamer

    Point well taken... I can see how this could take the fun out of a project if it didn't go the way you wanted it to. But I am trying to learn these scratch building skills, and I'm already picking up a lot of stuff that I never thought of doing before.

    One such example would be to cut a single large part for the patch I cut out in the lower wing. I would trim it to fit the cut opening in the wing, and get that part taken care of first. Once I was happy with the fit, I would go back and add the panel lines and rivets before I permanently installed the plastic sheeting to the lower wing.

    Since this is all new to me, I'm having fun and learning at the same time. I hope this enthusiasm continues, and I don't get bogged down. I'll keep these refinements simple on this build so I can try and meet the deadline.

    When I build my next B-24, (most likely "The Dragon and His Tail"), I may do even more scratching and try to improve the bomb bay area, since I have photographed and documented this entire area. The waist gunner's positions also could use a little help, so that might be on the agenda too. It can be seen with the side windows raised, so not all of that work would be done in vain. The same thing goes for the bomb bays. because I would probably leave the ordnance out, and have the doors open. It would be silly to do all that work and have the doors closed. No one would be able to see all of your hard work. Another thought I had would be to build the "Dragon" as it was seen in the Arizona scrap yard at the very end with the engines off...


    That would be fairly easy I think, and would solve several problems the kit has, such as the fit of the engine nacelles. Plus you wouldn't have to worry about it being a "tail sitter"... as that is exactly what you want it to do.

    Thanks again my friend for the comments.

  • Profile Photo
    Pedro L. Rocha said 4 years, 2 months ago:

    Scratch building parts is very rewarding, no doubts about that, and we have a lot of people that present us here just how far one go using some plastic sheet and brass tubing. I also have no doubts you can get there easily if you want to Louis! The scrap yard photo would indeed provide a most unusual diorama for you to build my friend 😉

  • Profile Photo
    Louis Gardner said 4 years, 2 months ago:

    Hello Pedro ! @holzhamer

    I also think it would look cool as a diorama. We are very fortunate to have members here on Imodeler who can build practically anything they want. They are so talented, and I strive to learn from them when I can. Time will tell if I decide to build the scrap yard scene or if I go with the plane as it was in use in the Pacific. Thanks for the comments. Stand by as I have another update coming next !

  • Profile Photo
    Louis Gardner said 4 years, 2 months ago:

    Tonight I made some progress with the replacement panel that goes ahead of the main landing gear well. On the other side, I will probably incorporate this part into a single large piece and scribe the panel lines and rivets into it before it is glued in place. Tonight's experiment proved that it can be done successfully... Here's the part I'm talking about.

    In this next photo you can see how it fit into the pre cut opening.

    This is the main reason why I did this extra bit of work. The real plane has a panel line that goes straight in line as you can see since I placed the ruler on top of the area . It represents the lines in question...

    They are probably a little more easily seen now in this photo, since the ruler has been removed.

    I wanted to see if I was on track with my scribing and rivets. So I applied some bare metal foil to see how it looks.

    I am very happy with the end result. This foil may get damaged during the assembly, but if it doesn't I'm a little ahead of the game.

    Here you can see how the lines look. I think they are better than the kit parts were originally.

    This final photo shows the panel lines and how they should all be in line with each other. They taper closer together as you get farther out to the wing tip. This is how it should look. Now I am very pleased with the outcome...

    As always, comments are encouraged.