Douglas A-20G Havoc Pacific Theater Attack

Started by Carl Smoot · 44 · 1 year ago
  • Profile Photo
    capt. R said 1 year ago:

    Great work! Superb diorama and figures!

  • Profile Photo
    Carl Smoot said 1 year ago:

    This A-20 was going to be my first Olive Drab aircraft since returning to modeling and learning new techniques for weathering. Olive drab aircraft can be very weathered and I have seen some really fine examples of this. I am still fairly new to weathering but I wanted to continue down this exploratory path.

    I started off with the black basing and marbling approach as I have used this fairly successfully on a few other builds.

    I was also going to use painted on markings as much as possible. This is another new technique I was experimenting with. I had tried it on another kit about a year ago but used the wrong type of vinyl mask which was nearly impossible to remove and ended up ruining the finish. But I have since worked out the details and this kit was going to be my new experiment. I made my national insignia and large tail lettering using the Silhouette Studio software and vinyl cutter.

    I started by giving a faded and blotchy white where the tail lettering and starts would be. I normally use Tamiya paints thinned 2 to 1 (sometimes more) and I was intentionally trying not to get complete coverage. Then the first masks were applied.

    After each color, I touched up the black basing and then applied the next color. IN this case the dark blue for the national insignia and a lighter blue for the tail tip, nose, and wing tips.

    These were masked off and the black basing again restored. I painted wing walk strips on the wings and masked them off and once again restored black basing .

    Finally, getting to the actual aircraft colors, I had decided to try out Vallejo Model Air colors for this model. The neutral gray undersides were sprayed using a very thinned down mixture, trying to allow some of the black basing to show through. I also lightened the gray and applied random highlights to the centers of panels.

    On to the Olive Drab. This was also Vallejo Model Air paint, also thinned way down and applied carefully trying to allow black basing to show through. And it was also highlighted with lighter shades of the base color.

    All of this took about six days and then I could finally begin unmasking. I was really pleased with the way the markings came out as well as the other colors on the aircraft.

    Then on to the few decals on the nose. An acrylic gloss coat was applied and then I I did a wash using a dirty brown oil and white spirits. After this was cleaned up and dry, I clear coated it with a satin clear (Tamiya). Then I added a few slight exhaust stains using my airbrush and very highly thinned black and gray and brown mixtures. Finally, again using oils I added some streaks and splotchiness to the paint. This was done with lighter shades of the base color mixed from oils. Another flat coat and it was ready for the final work.

    All this additional weathering took another five days and I spent a lot of time looking at reference photos to try and get it close. The aircraft could have been more heavily weathered, but I was getting nervous about screwing up the further I got in the process and finally decided to call the weathering done.

    Tomorrow I will post the final photos of the build process. Overall, I am happy with this as it represents an improvement for me over previous efforts.

  • Profile Photo
    Walt said 1 year ago:

    That is really an impressive and beautiful build! Your paint and weathering work is fantastic. I love how it is turning out.

  • Profile Photo
    Spiros Pendedekas said 1 year ago:

    Painting and weathering are really superb, my friend @clipper! Looks are awesome, as are the techniques used!

  • Profile Photo
    John vd Biggelaar said 1 year ago:

    Your applied techniques did create a beautiful result, Carl @clipper
    Seems like your experience with Vallejo Model Air is quite positive as well.
    At what pressure did you set your compressor.

  • Profile Photo
    Martin Trachsel said 1 year ago:

    Great work !

    Here it has great pictures of A-20.

    Early A-20A of 3rd Bombardment Group (Light)
  • Profile Photo
    Carl Smoot said 1 year ago:

    Thanks Walt @luftwaffe-birdman, Spiros @fiveten, John @johnb, and Martin @matra . All of your positive comments are truly appreciated. It's tricky for me knowing when enough is enough. And there was a lot to this project, so the risks increased, the further I got into it. I am happy that it turned out, and it gives me confidence to tackle something like this again in the future.

    Martin, thanks for the link. I have visited this site before and found many useful photos there.

    John, my experience with Vallejo Model Air was okay. I feel that Tamiya paints are superior and easier to work with. The Vallejo colors were hard to thin properly and they take longer to dry. The main reason I tried them was because of their color range which saved me having to mix these colors. I am going to give AK Interactive colors a go on a project at some point because they also have a wide range of colors. I am not sure yet, but I believe they are more like Tamiya paints.

    That being said, I will also be willing to continue using Vallejo colors, but just keep in mind that I will need to test any painting prior to applying to the model. As for air pressure. I keep my air compressor pretty constant at around 15 PSI (I am not sure what that translate into in bars). I adjust the pressure at the airbrush using a valve on my airbrush hose.

    I use very low pressure when doing detail work using very thin paint 2, 3, or even 4 to 1 thinner to paint ratios. I determine the pressure desired by testing it first on a paint mule. Too thin and you get spidering of the paint. Too high of pressure, you get spidering with thin paints or too much paint if not as thin. Too low of pressure and it spits, so I always test first before committing to the model.

    My airbrush has been an Iwata HP-CS for many years. I have two new airbrushes, a HArder & Steenbeck INfinity and a Mr Hobby PS-270 that I got for a good price. I have not used these yet, but will be trying them out soon. I also have a cheap Master Models airbrush that I started with (from Amazon) which I generally only use for heavy paint applications these days as it is not as good as the Iwata.

  • Profile Photo
    Carl Smoot said 1 year ago:

    So this will be the final build post for this model. It was a lot of fun trying all these new techniques and I learned a lot. Even better, I've given myself renewed confidence to expand on what I've learned here and to try more dioramas. My Constellation build will be a diorama and that is getting closer to the painting stage.

    And I feel that I have come up with a satisfactory approach to simulating propellers in motion which has been a long term goal of mine. We'll see how that technique works with other spinner types, but it definitely works with this type of propeller hub.

    I also learned that thicker acrylic for the cover looks fine. I had initially tried thinner acrylic when I was attempting to build version 1 of the cover and it never really was satisfactory. It did work out for the support piece, but if the model had been much heavier, it may not have worked.

    Okay so enough of that. On with the post.

    As I mentioned earlier, I wanted to add external bombs to the wings. These were installed at this point.

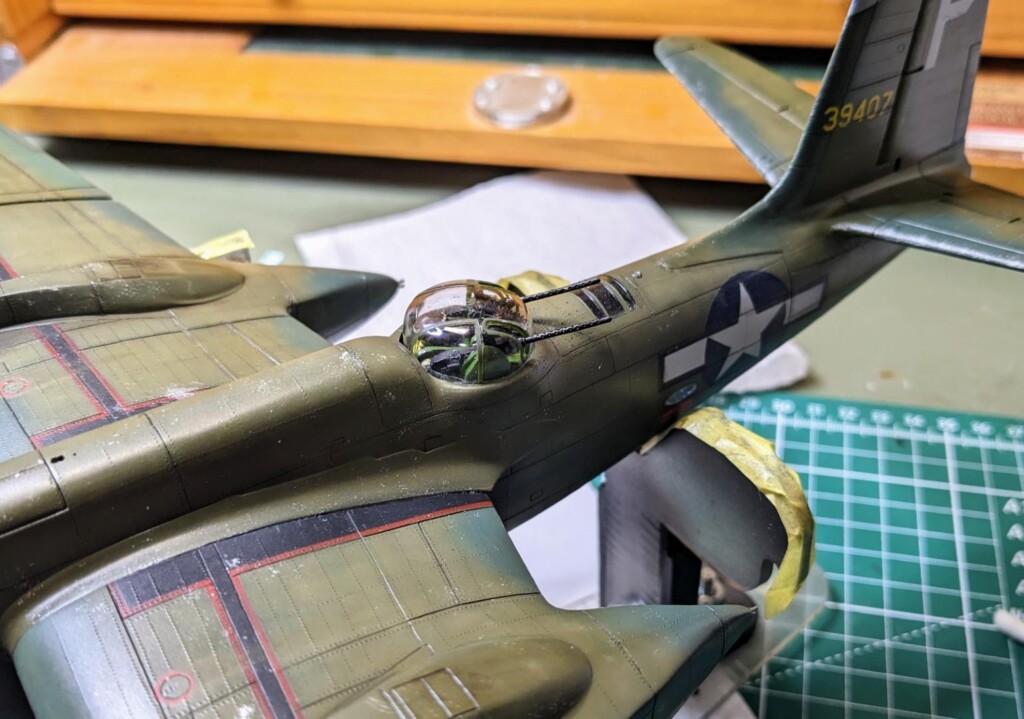
    The gun turret, was going to have some additional detailing added including the upgraded barrels from Quickboost and some photo etch machine gun belts from Eduard. However getting all this into the turret was difficult and not entirely without problems which I could do nothing about. Specifically, I had trouble getting the belts laid into place and staying put long enough for the CA glue to hold. I eventually got them where I wanted. But when I put the clear dome on, the fit was tight, not so tight that I felt there was serious interference, but tight nonetheless. So I glued it down and immediately added tape over it to hold it in place. UNfortunately, one of the belts broke loose and I am unable to get in there to fix it.

    The next step was to get the plane mounted to the acrylic support. I had already drilled the holes for the brass rods before installing the acrylic sheet to the base, so the position of the aircraft was already determined earlier. I had already determined that 5 minute epoxy was not going to work as it is too rubbery and not strong enough, so I had purchased 30 minute epoxy to use instead. This worked much better. Because the mounting point on this display was small, I wanted to give the epoxy plenty of time to cure and supported the model for 24 hours before moving on.

    While that was curing, I started painting the propeller blade simulations. This was done using very thin black and yellow paints with very low pressure and lightly applied in numerous light coats. I had practiced this several times on other clear acrylic cut to prop shapes before doing it on these. THen these props were installed and the outer wing was added as well.

    Next I added the machine gun barrels in the nose. These were quickboost barrels as well. I believe however, that I should have trimmed off more of the base of these as they stick out too far. But live and learned at this point. I used a technique I learned for making micro tubes by stretching plastic cotton bud applicators over heat. Then these were threaded over some Easy Line for the rigging. The entire thing (Easy Line and micro tubes) were super glued into place and the micro tubes painted to simulate insulators / shock absorbers.

    I also made a new loop antenna from copper wire and attached it to a small Milliput putty base which was then added to the fuselage and painted. Finally, I made a small aiming piece for the nose and glued this into position on the nose. The model was complete.

    So should I wait until next time to reveal the model. Ha Ha. No I won't do that. Here it is from a few different angles on my desk. I don't have a proper photographing setup yet.

    And here is it displayed with my other models.

    I've enjoyed sharing this build with you all and hopefully someone will be able to use some of these techniques or be inspired to try something similar.

  • Profile Photo
    John vd Biggelaar said 1 year ago:

    The Havoc looks amazing being displayed in-flight, Carl @clipper
    Thanks for sharing this build progress and how you achieved this amazing result.
    Your cabinet houses some very nice kits.
    Thanks also for the airbrush settings.

  • Profile Photo
    Andrew H said 1 year ago:

    Wonderful build Carl, the paint and weathering are terrific, but moreover, the in-flight display and case are incredibly well done. Thank you for taking the time to share the build, your tips, and your positive attitude toward focusing efforts on all of the little extra details.

    Also, that's a fine display of models you've got there.

  • Profile Photo
    Pedro L. Rocha said 1 year ago:

    Bookmarking this WIP for a future reference, lots of good and innovative ideas. The result is nothing short of awesome

  • Profile Photo
    George R Blair Jr said 1 year ago:

    Ditto for me on all the previous comments, Carl (@clipper). Great model and inventive display. I have had pretty good luck using Vallejo Model Air, but my favorites are Tamiya and AK Real Colors. I have found that AK Real Colors are very similar to Tamiya, with a much wider range of colors. I was wondering which masking material you used for your markings. I have experimented with my wife's Brother Scan and Cut for markings, but I am still trying to find a suitable masking material.

  • Profile Photo
    Spiros Pendedekas said 1 year ago:

    Amazing final result, my friend @clipper! Absolutely stunning! Thanks for sharing these wonderful techniques with us! Great models display, as well!
    Congratulations!

  • Profile Photo
    Carl Smoot said 1 year ago:

    Thanks John @johnb, Andrew @pb_legend, Pedro @holzhamer, George @gblair, Spiros @fiveten for all of your kind comments. It was a fun build and I enjoy being able to share it with others. Also, thanks George for giving me some idea what to expect when I try out AK colors. As for masking material, I used Oracal 810 vinyl for the masks I cut on my vinyl cutter and Tamiya masking tape for everything else. I also use Tamiya tape for curves for those areas where regular Tamiya masking tape has trouble conforming. The masks on the wind screen and turret were Eduard.