1/32 Hasegawa Ki-44 Shoki ”Tojo”

Started by Louis Gardner · 159 · 3 years ago
  • Profile Photo
    Spiros Pendedekas said 3 years, 8 months ago:

    Looks absolutely stunning, Louis @lgardner!

  • Profile Photo
    Erik Gjørup said 3 years, 8 months ago:

    Sorry to hear that the cowl no longer feel like a snugfit. But WOW - that is one terrific lookin monsterplane you got here! cant wait for the last 90% of the build now that 90% is done 🙂

  • Profile Photo
    Louis Gardner said 3 years, 5 months ago:

    It's hard to believe it has been 3 months since I have done anything with this kit... All this changed last night. I'm going to breathe a little fresh air into this group again, and maybe get it "going again" similar to how it was before.

    Spiros, @fiveten
    Thanks for the compliments my friend.

    Erik, @airbum
    It seems that the last 90% has been going rather well. The fit of the cowling is something I can live with. It looks "close enough" and I'm happy with it.

    Please stay tuned gentlemen, as I have an update to post. Now that I have completed several projects, I'm on a roll, and I might as well knock this one out too... After all, there's only 5 percent left now... 🙂

  • Profile Photo
    Louis Gardner said 3 years, 5 months ago:

    Here's the progress I made last night, and earlier this evening. I had this cool picture stored on my computer. It happens to also be a plane from the 246th Sentai, which happens to be the unit my plane served with. In this picture, it appears that the fabric covered control surfaces were painted using Aluminum Dope color. The rudder looks like it is a very close shade of the color of the bare metal that is next to it. The ailerons also look to be the same... I know the Ki-61 "Tony" was built this way too, so it's possible. It's hard to "guess" about colors using a Black and White photo, but in this one, it's fairly obvious.

    Using this Black & White photo as a reference, I posed the elevators in the "UP" position. It's a little hard to see the angle of deflection in these pictures, but trust me it's done. This will be more evident in the final reveal photos.


    I also installed the tail wheel and doors. I finished painting the tail wheel tire, and then covered the doors with Bare Metal Foil.
    You "kind of" get a feel for the angle of the elevators in this picture too.

    The landing gear assemblies were built and installed. I also covered the main gear doors in foil at this time, just prior to installation.


    The inner gear doors were also covered with foil and installed. The inner gear door retraction arms are nicely represented, and these parts look very good.

    There's a series of linkages and four individual small doors that are mounted in the lower surface of the wings, with two per side. I'm not 100 percent sure about this, but I think these parts were part of the retraction mechanism, or possibly the landing gear locking mechanism. These small "door" parts were also covered in foil and installed, once the actual "mechanism" part was glued in place. I will go back and lightly touch up the Blue Green "Aotake" in several places along the gear door edges.

    Now the big "Shoki" can stand up on it's own feet...


    The next area to receive attention will be the cockpit. I am very pleased with how it looks right out of the box. The only "necessary" upgrade was a set of aftermarket seat belts (which you don't see in these pictures... 🙂 )


    I still have to finish up the 1/48 scale Hasegawa B5N-1. It too will have a bare metal finish, and should look stunning trimmed in red. I still haven't decided if I'm going to "fold" the wings on this one or not.

    So please expect regular updates on this "Kate" as soon as I get the Ki-44 completed.


    Then there are these two kits in the stash, which have been calling my name for quite a while now... If things work out as planned, there will be two more builds added to our Empire of Japan group build. I introduce you to a pair of 1/32 scale Hasegawa kits, a "Jack" and a "Tony".

    These two new 1/32 scale builds will get a new build journal started for each plane.

    The Tony will be done in a plane that was delivered in... you guessed it... Bare Metal. It just might sport a cool looking bright red tail surface... as this is one of the decal options provided in the kit.

    The Raiden will most likely be completed as one of the kit provided options too. But I do have some spare 1/32 scale Japanese decals in the stash, so it could get interesting...

    Let's not forget about our mutual Ki-45's... Spiros @fiveten
    has started his Nichimo kit, and now I'm ready to join him with these two.

    As usual, comments are encouraged. Stay safe.

  • Profile Photo
    Tom Cleaver said 3 years, 5 months ago:

    @lgardner:

    I love that Bare Metal Foil. Not easy to use, but with a talented modeler like you at work,it came out looking as real as real gets.

  • Profile Photo
    Tom Cleaver said 3 years, 5 months ago:

    This is my Ki-44, done back in 2009, when I mistakenly thought Hasegawa had made the job so much easier by providing decals for all markings. They did, but unfortunately they didn't insure they all fit right. It became a nice model to see out at Chino from a distance of a few feet, behind glass, looking at the "good side."

    1 attached image. Click to enlarge.

  • Profile Photo
    Spiros Pendedekas said 3 years, 5 months ago:

    Louis @lgardner, your Tojo looks amazing. I love the bare metal foil: such quality work! After this, I am ashamed to present my Humbrol 11 NMFs! 🙂

    I also loved all the dynamic posture of the elevator, the small details at the landing gear, the amazing cockpit, and I would assume the finish line might not be too far away...

    This is a superb looking Tojo!

    What a great scheduling for the next EoJ projects! The EoJ is such an amazing GB!

    I am so tempted to decide upom my next EoJ project: I finally discovered Hasegawa'1/48 Saburo Sakai's Zero, a pilot and person I adore.

    A Tamiya 1/48 Gekko is winking at me, promising to look gorgeous and "different" -ish in its wraparound green...

    But how about an Italeri 1/72 BR-20 Cicogna in That amazing Japanese camo?

    I am leaning towards the latter...we'll see...

    Tom @tcinla, your 2009 Tojo looks amazing too! Pity that the so promising one piece combined Hinomarus did not fit as per the drawings. Still, a great result.

    I re-read your nice review in MM and I was amazed by the fact that it was discovered that rookies had no problem adjusting to the Ki-44 or the more demanding Ki-84. No "forces of habit" on them as to the experienced pilots being used to the previous doctrine of "emphasized maneuverability on the horizontal plane at all costs"...

  • Profile Photo
    Erik Gjørup said 3 years, 5 months ago:

    Shiny Louis, shiny!

  • Profile Photo
    Louis Gardner said 3 years, 5 months ago:

    Tom, @tcinla
    Thank you for the compliments on this Tojo build. I have seen this Ki-44 of yours on M2, and it made the "short list" of different paint schemes I was thinking about using on my build. The only reason it didn't make the final cut, is that I didn't have decals for the 47th Sentai, and I wasn't going to tempt fate with masking the tail off while having foil as the base coat. Your plane looks magnificent, and it's especially striking with the blue markings when combined with the rest of the colors on the plane.

    Foil is tricky to use at first. Like anything else, the more you do it, the easier it becomes. I am looking forward to using it again when I build my 1/32 Hasegawa Ki-61. That is my absolute favorite WW2 Japanese fighter.

    Spiros, @fiveten
    I too have several of the wonderful Tamiya Gekko's, and three of the Ki-46 Dinah kits waiting to be built in the stash. I have been considering building them as part of our EoJ group in the future. There is no need to hurry with your other models, as I will extend the EoJ group as needed. I also liked hearing your thoughts as a pilot, about the flying characteristics of the Ki-44. Sakai is probably the best known of all the Japanese Aces. I have to build one of his Zeros...as of now I don't have one built wearing his markings on display in my cases. Speaking of Zero's, I just realized that Hasegawa offers a model of the original A6M-1 prototype. This kit comes with the different engine and cowling, a two blade propeller, and a new plastic sprue that contains a shorter fuselage. I can see myself getting one of these to round out my Zero colection. The last version of the Zero in my stash is one called A6M-8, made by Fine Molds. I believe it was called the "Reppu" ? (or using the Allied name of "Sam"). This one will look great wearing overall Orange.

    Erik, @airbum
    Yes this one is very shiny ! I hope to complete this one later tonight.

    Thanks gentlemen for the kind words.

    As always, comments are encouraged.

  • Profile Photo
    Louis Gardner said 3 years, 5 months ago:

    Tonight was the first time I have had the chance to get anything done on the Ki-44.
    I covered the canopy frames using bare metal foil. Once this was done, I went over the frame work, using a "Rosie the Riveter" tool to emboss a fake set of rivets on the frames.


    This is how it looked when completed.

    The wing structure surrounding the landing light was painted using Tamiya Clear green, over a silver base to replicate the look of Aotake Blue-Green. The actual reflective background for the lens on the landing light was also covered using Ultra Bright Chrome foil. It was installed, and the clear landing light cover was added next.

    In all actuality, this area could have been left alone as unpainted bare metal. I'm not 100 percent sure if this location was treated with Aotake preservative or not. I simply did this to have a color contrast between the landing light and the surrounding area. This made the light more observable.


    The pitot tube was added, and I used a Molotow chrome pen to accent the tip of the pitot. It's better looking in real life than how it shows in this next photo.

    The seat harness was fixed. One side had fallen off during construction. I added it back on tonight, in a slightly different pose. This was a worthwhile investment, as these aftermarket harness kits are highly detailed, and require assembly prior to installation.

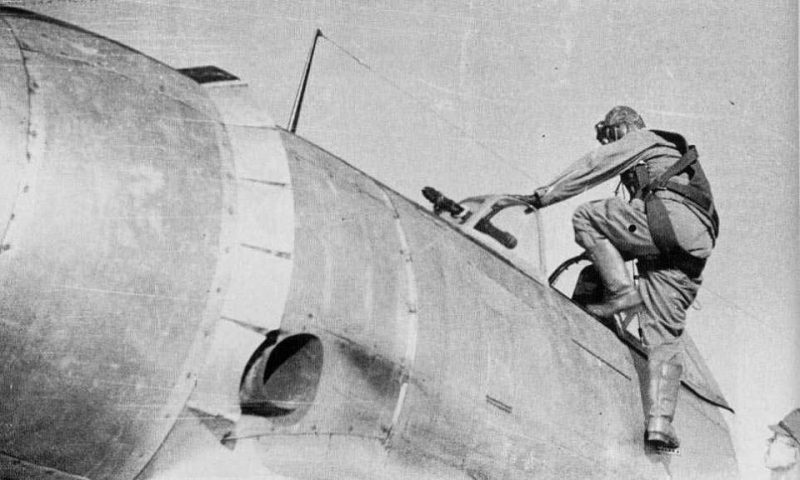
    One word of wisdom I should bring up here about the fold down cockpit side doors. From what I have gathered, these doors were most often left in the "UP" or "CLOSED" position. It appears that the only time these doors were down was to perform maintenance, or if they needed to be opened by the pilot in case of emergency, such as when bailing out. They do however allow one to look into the cockpit more easily, and that was the primary reason why I chose to cut them open on this build. If you look for actual wartime photos that show the doors open, more often than not you will see they are closed. I even found a cool picture showing a Japanese pilot entering the cockpit, and as he was doing this, he was actually standing on the top edge of the door to gain entry.

    I had managed to get some Dark Sea Blue paint over spray on the instrument panel. This happened when I painted the anti glare panels on the fuselage topside. Carefully I soaked a Q-Tip in some paint thinner, then gradually worked away the offending paint deposits until the clarity was restored. This was very tricky, as I was thinking I would destroy the IP decal at any second. I'm leaving it alone now...

    The wing mounted weapons were painted and installed, as were the fuel filler cap ahead of the windscreen, and the antennae mast was added as well.

    It was time to take some pictures after the sliding portion of the canopy was installed.

    Here's another picture using the Monotone filter on the camera on my phone...

    The engine didn't show up very well in the first two pictures, so I repositioned the work light on the hobby desk, and took two more photos. Here's the first one.

    And another photo using the monotone filter...

    This one is almost finished now. I have to add decals to the main gear doors, and paint the navigation lighting. This will be followed by stringing the radio lead from the mast to the tail section. It's so close now...

    I still have to paint the propeller. When I do this, I plan on painting the props for the pair of 1/48 scale Hasegawa Ki-45 Toryu's, one for the 1/32 scale Hasegawa Ki-61...and a 1/32 Raiden prop will also be in the mix. These builds are coming up next, so please stick around for these to happen soon. They will be in their own separate build journals, so as not to cause confusion.

    Stay safe everyone.
    As always, comments are encouraged.

  • Profile Photo
    Spiros Pendedekas said 3 years, 5 months ago:

    Louis @lgardner, this is such a spectacular result!
    So close to the finish line now...
    I loved the metal canopy framing: looks so real!
    The monotone shots add that nice vintage look.
    Looking forward to your finishing and then off to (our) Toryus !

  • Profile Photo
    Louis Gardner said 3 years, 5 months ago:

    Spiros, @fiveten
    Thank you for the compliments, and yes the finish line is now so close ! And after tonight's progress, it's even closer now. I have assembled all of the propellers for the kits I mentioned in my last installment. These are the parts for our Ki-45's.


    I am going to let these parts dry overnight and then I will do some very light sanding on the spinners where the parts join together.
    These parts are for the 1/32 scale Ki-61 Hien. I will start a build journal for it soon.

    This is the propeller for the 1/48 B5N that I have started earlier as a subject for the EoJ. It will get painted on the back side only as an anti glare measure. I'll go back and add these photos to these build journals.

    These parts are for the Mitsubishi Raiden. It has two set of propeller blades in the box. That's why you see a total of 8 individual blades. One set is labeled as "high performance version" and it is a wider blade. You will see I have the wheels assembled for this one and the Hien. The Raiden will also get it's own new build journal.

    This last picture shows all of the props and wheels in one picture. The one with the yellow paint on the spinner is for the Ki-44.

    These parts should get painted in a shade of brown tomorrow, if things go as planned.

    Take care everyone and stay safe. As usual, comments are encouraged.

    1 additional image. Click to enlarge.

  • Profile Photo
    Spiros Pendedekas said 3 years, 5 months ago:

    What a collection, Louis @lgardner!
    I also (try to) do the same, painting as many parts of different projects together as I can and, at once, I have a leap in progress!
    I cannot wait to see them painted.

  • Profile Photo
    Erik Gjørup said 3 years, 5 months ago:

    Great progress Louis. I always enjoy your builds, and the fact that they are just that - in progress and not something that was finished a long time ago. Noone mentioned, none forgotten. (Sorry to bring this up in your journal, hope it is ok, but if not send me a PM to delete my comment and I will)
    Back to the build - I loved the details you assed, liike the rivets in the canopyframe and the aotake behind the glass in the landing light. All those adds up to the usual great builds from you.

    Thank you again for sharing real-life in-progress builds.

  • Profile Photo
    Louis Gardner said 3 years, 5 months ago:

    Spiros, @fiveten
    Yes this is quite a collection of propellers ! I too have found it to be much better to paint multiple parts using the same color. I try to do this as often as I can. Your wait is over, as I have finished the Shoki.

    Erik, @airbum
    There's no need to worry about deleting your comments. I sincerely appreciate the kind words, and I'm happy to hear that you liked the improvements I made to the canopy parts.