Ki-45 Toryu (Nick) ”Mini” group build. ”Build em if ya got em”

Started by Louis Gardner · 200 · 3 years ago
  • Profile Photo
    Spiros Pendedekas said 4 years, 3 months ago:

    Hi everyone!
    Tonight I started working on my Toryu:


    As you can see, cockpit is under preparation
    Glued the wheel well floors at the bottom wing part, then glued the halfwings together.
    Fit is good. Instruction state to attach the landing gear at the well floors and then attach the floors to the wings, which is what I did NOT do...I hope I will be able to attach the legs at the final stages.
    I also assembled the two main wheels

  • Profile Photo
    Erik Gjørup said 4 years, 3 months ago:

    And we have another one in the game! - looking forward to seeing this one progress along the other fine builds in this GBminiGB 🙂

  • Profile Photo
    Spiros Pendedekas said 4 years, 3 months ago:

    Thanks my friend @airbum! I was pretty amazed to see this old Nichimo sporting fully engraved details and riveting, VERY acceptable cockpit, nice engines (as you can peek at the above sprue shot) and super decal sheet with extra fine options not mentioned at the instruction sheet, but quite easilly managed. I have to say that, the more Nichimos I build, the more I respect this company and its achievements back then in time.

  • Profile Photo
    Spiros Pendedekas said 4 years, 3 months ago:

    Hi everyone!


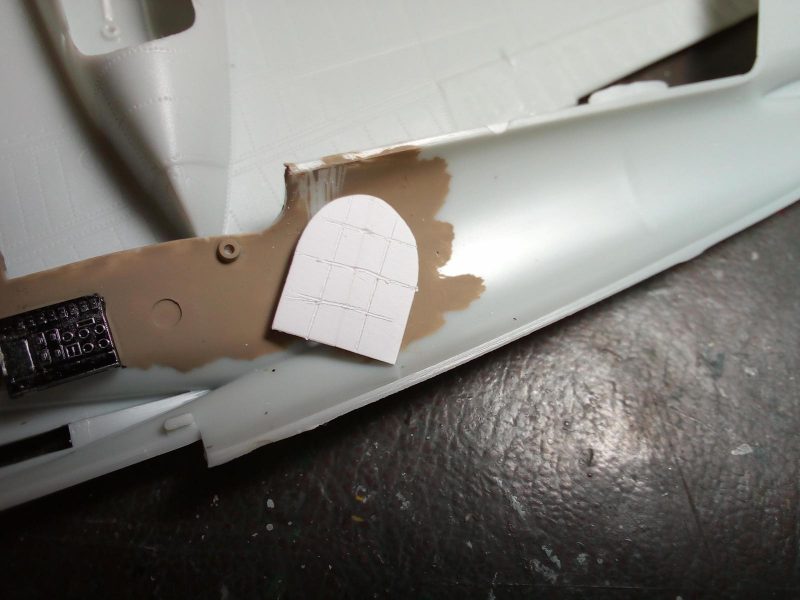
    I didn't like the front and rear wheel well walls omision, so I used my sons' party plates to cut suitable pieces and glued them correspondingly.


    Gaps were filled with liquefied styrene.

    No empty looks any more!
    And an update:

    The beautiful engines were assembled and initially painted black.
    The cowlings and propellers were assembled as well.
    The cockpit consoles and instrument panel were painted black too.
    So far I am very pleased with my Toryu, despite the wheel well wall omission.
    All the best!

  • Profile Photo
    Erik Gjørup said 4 years, 2 months ago:

    Remember to leave a few plates for the son! Splendid work as usual my friend - I shall have to make some liquified styrene one of these days!

  • Profile Photo
    Spiros Pendedekas said 4 years, 2 months ago:

    Thanks my friend @airbum!
    Just found out that the Toryu sported circular copper oil coolers in front of the engines, a-la-Nakajima Nate...not so prominent though...
    Have to scratchbuild them also.
    Liquefied styrene is a nice complimentary companion in cases you need something between glue and filler. Once habituated, chances are that you will remain good friends!

  • Profile Photo
    Spiros Pendedekas said 4 years, 2 months ago:

    Hi everyone!

    Apart from the wheel wells, there was no rear "wall" at the aft of the cockpit, just an emptty space. Also there was some kind of stepped construction behind pilot's seat, not represented as well; just empty spaces. But then, what more could you expect from a 1975 kit? (In fact, to be fair, excluding the aforementioned "understandable" omisions, it is hard to believe that such an extreme quality kit was created back then).

    Taking ideas from the excellent Hasegawa instructions of their equally excellent Ki-45, I fabricated a rear wall for the aft cocpit end, scribing some detail to add some interest.

    Additionally, I installed a piece of sheet styrene behind the pilot's seat (which is actually the base of the upward firing cannon).

    Finally I created some rib enhacing detail to the wheel wells, so they will not look flat (pic to be posted at next post).

    So, all toyish empty spaces are "boxed" and more busy (if not a tad on the ficticious side) now.

    I think I might busy up a bit the gunner's side walls, before closing the fuselage...they look surrealistically empty...

    All the best!

  • Profile Photo
    Erik Gjørup said 4 years, 2 months ago:

    Fine additions my friend! Always nice to see an old kit get a second life by adding some scratchbuilt details.

  • Profile Photo
    Spiros Pendedekas said 4 years, 2 months ago:

    Thanks my friend @airbum!

  • Profile Photo
    Spiros Pendedekas said 4 years, 2 months ago:

    And here she is, main parts assembled:


    I suppose few will object to my statement that she is a beauty!

  • Profile Photo
    Spiros Pendedekas said 4 years, 2 months ago:


    First filling and sanding session (using Humbrol filler)

    At the underside pic you can see the ribbing detail I added to the MLG wells to ease the feeling of blantiness..
    P.S. With this pointy nose and those big engines, is it not a sportyish looking plane? Or is it my enthusiasm speaking?
    All the best, Great EoJ GB!

  • Profile Photo
    George Henderson said 4 years, 2 months ago:

    Good stuff. Just found this thread. Might be just me but I have a problem finding new threads or finding where I left off in threads that I've already visited. I too have a Ki-45 in the stash to be built as a "captured" aircraft. On hold though as I used the tail "TAIC" decals on another aircraft. Looking for someone with the decal sheet who isn't going to do the Ki-45. I've built 2 of 4 on the sheet and am slowly working on the Ki-43

  • Profile Photo
    Erik Gjørup said 4 years, 2 months ago:

    George (@blackadder57), it would indeed be nice with a "whats new since you last logged in" feature, but we have to make do with what we pay for 🙂 I usually try to remember how long it has been and then I use the note at each post saying when it was last used. I have to admit to being here quite often though, and that makes it a lot easier.

    Spiros (@fiveten), it's just your enthusiasm! (but mine as well)

  • Profile Photo
    Jeremy Millan said 4 years, 1 month ago:

    Looks like a nice and very detailed kit. I'll be following along on this build.

  • Profile Photo
    Spiros Pendedekas said 4 years, 1 month ago:

    Thanks Jeremy @jmillan! More to come very soon!