RAF Chinook HC.1 Italeri 1/72nd

Started by Chuck A. Villanueva · 74 · 1 year ago
  • Profile Photo
    Chuck A. Villanueva said 3 years, 4 months ago:

    Bit more in the cockpit. Some detail panels in the footwell area and into the lower view section to enhance this with some PE bits that will be seen through the lower view windows.

    Next some filler around the nacelles attachment points at the rear upper fuselage.

    As these set, next is to start work on the lower fuselage and loading ramp assembly.

    Starting with rear loading ramp. inner panel.

    The ramp outer door shell. Assembled with the inner ramp floor and put aside.

    The center lower fuselage insert is then attached to the main fuselage.

    The fit is not bad. Easy to fix and fill to make the lower surfaces look more even after clean up.

    Next is too install the windshield panel. Very good fit which Italeri can be tricky here when it comes to the cockpit glass on their helos.

    Next is the avionics nose panel .

    Again fit is good here as well. Another good detail to point out is that the glass panels have little bit of distortion, but not bad as you can still see the details with in the flight deck. Just gotta be careful with the sticky fingers not leaving any cement residue on the clear parts. For goodness sake.

    Next up more clean up around that air frame. Add detail bits and the proper configuration details under the fuselage for this variant. More to follow. By the way even in this scale, the Chinook is not a small hello.

  • Profile Photo
    Spiros Pendedekas said 3 years, 4 months ago:

    Looking great as it comes together, my friend @uscusn!
    I like the kit's engineering on the nacelle attachments: looks like those joints are less challenging to fill an sand?
    I have always thought that 1/72 was a lesser scale for the Chinook: I was wrong! Given the rotor sizes, maybe 1/72 is the best scale for a Chinook!

  • Profile Photo
    Colin Gomez said 3 years, 4 months ago:

    Looks fantastic, Chuck. Just catching up on the build. Nice that we have some activity again in this GB . I really like the look of the pit of your Chinook, including the color etch and your improvements. The seats look really nice, in particular So interesting to know the actual name/of the various controls, about which you obviously have first-hand knowledge.

    One has to be so very careful with transparencies on the green house clear parts typical of helos and some bomber models. That fingerprint will easily sand off, though (looks maybe like you already fixed it) It appears you got a really nice fit all around on the transparencies (in spite of the complex shape). I have spent three days carefully gluing my He.111 canopy together. The fit was really bad and I had to use melted stretched sprue in many places to fill gaps and secure it. Nice that the gluing is done, now (careful sanding will be next).

    I have so many unbuilt helo kits, it's getting embarrassing (mostly Italeri, which appear to be very nice in quality). You've given me a lot of inspiration with your build. Actually I do also have the Airfix Lynx which I have partially built as the British Army Afghanistan version.

    Really looking forward to the painting stage on your build. Thanks for sharing your progress in such interesting detail.

  • Profile Photo
    Erik Gjørup said 3 years, 3 months ago:

    Great details - and you even got to make your mark! Sure it will sand/polish nicely.

  • Profile Photo
    Chuck A. Villanueva said 3 years, 1 month ago:

    Thanks Eric, not my preferred way of leaving a watermark on a project.

  • Profile Photo
    Chuck A. Villanueva said 3 years, 1 month ago:

    Time for a little catch up on the Chinook. It has been awhile But now with masks in hand time to mask off the windows. But first to install the intake shock cones.


    The shock cones are not the greatest when assembled. The halves did not fit well at all and required a bit of clean up to remove the seam.

    After a bit of sanding got them to look much better working that seam.

    Next up, using Eduards to mask off the canopy.

    Italeri's canopy is quite clear, the frames well defined as each mask sections are applied. Starting with the overhead windows over each pilot. Clever design for this part of the canopy.

    Next the three front windows are next.

    Then the lower side window panels.

    Then the small windows on each side and lower observation view windows.

    The RAF version have bubble port hole style windows on each of the doors for a total of 4.

    Next a set of 6 flat view port windows are installed, 3 on each side.

    Then they are masked off with the disc type masks provided. Will do the bubble windows in the next session.

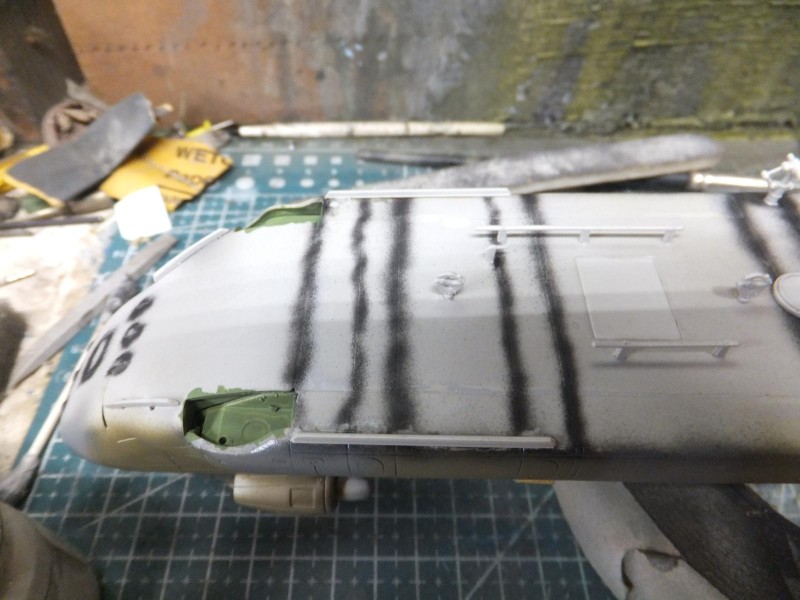
    Next to preshade the fuselage, and cover the bubble windows.

    More to follow.

  • Profile Photo
    Spiros Pendedekas said 3 years, 1 month ago:

    That's great progress, my friend @uscusn!
    Nice work on the transparencies!

  • Profile Photo
    Chuck A. Villanueva said 3 years, 1 month ago:

    Thanks Spiros, now to carefully mask the bubble port holes.

  • Profile Photo
    Chuck A. Villanueva said 3 years, 1 month ago:

    After masking the bubble type port holes. Next is to pre shade the air frame.

    I will use Xtracolour RAF Dark Sea Grey and Gunze RAF Dk Green for the scheme.

    First was to airbrush the Grey pattern first. Very light coats to set the pattern, leaving the exposed areas that will be Dark Green.

    Xtracolour enamel dries slowly and glossy.

    Next is to apply the Gunze Dk Green. Free handing the 2nd color with my Paasche H airbrush, #1 tip.

    Love Gunze, no clogging, and lays a very fine feathered demarcation line separating the 2 colors.

    Let sit overnight. Next day was to go over the Grey with a 2nd coat. Xtracolour flows very well out of the brush, no clogging.

    Fine feathered edge, very little overspray if any. Which allows a very clean finish.

    Glossy finishes tend to take a bit to set and dry,. Will leave this initial paint work over the week. Before masking off the anti glare panel to paint that black and the undersurfaces as well.

    Next up is to paint the black undersurfaces, anti glare panel.

    More to follow...

  • Profile Photo
    Spiros Pendedekas said 3 years, 1 month ago:

    Fantastic painting , my friend @uscusn!
    Your Chinook looks gorgeous!

  • Profile Photo
    Chuck A. Villanueva said 3 years ago:

    Thanks Spiros, I do like the RAF scheme on the Chinooks.

  • Profile Photo
    Chuck A. Villanueva said 3 years ago:

    Before painting the black undersurfaces, I will install the detail parts, hooks, various antennas mounted below.

    Will work from back to front starting with the rear lift hook.

    Next an antenna and lower floor cover.

    A pair of lower towel rack antennas, each side of the door. Also the forward lifting hook.

    What may be a hatch is place forward of the front hook.

    Now an assortment of antennas to be attached. 1st a blade antenna forward of the round hatch/lamp?

    Going to get pretty busy under the front section of the Chinook. Another fin blade antenna.

    3 more smaller antennas, one fin blade, 2 pitot style next up that sit side by side.

    2 more antennas and the nose sensor.

    Going to mount the front gear struts for now. These will be black as well.

    The fit is excellent and sturdy on the struts.

    Will install the rear strut after painting the black lower surfaces. First though is to paint the rear wheel wells Zinc Chromate. Also not shown installed the lower strakes adjacent of the rear wheel well bays.

    Next up to paint the lower black surfaces.

    More to follow

  • Profile Photo
    Spiros Pendedekas said 3 years ago:

    Nice add-ons, my friend @uscusn!

  • Profile Photo
    Chuck A. Villanueva said 3 years ago:

    Thanks Spiros rather busy undersurfaces with all those antennas, sensors and probes/

  • Profile Photo
    Chuck A. Villanueva said 3 years ago:

    With all the details now attached along the bottom of the Chinook. Now to paint the black lower surfaces.

    Using Tamiya Flat Black to all the details and a soft demarcation line to border the tutone upper surfaces..

    The anti glare panel was masked off and this area is painted as well. Then masking removed.

    The black lower surfaces once dry I then install the rear gear struts.

    Next is to apply the Future Clear Coat to start the decal process. Will let this sit overnight.

    Next up is to apply the decals.

    More to follow.