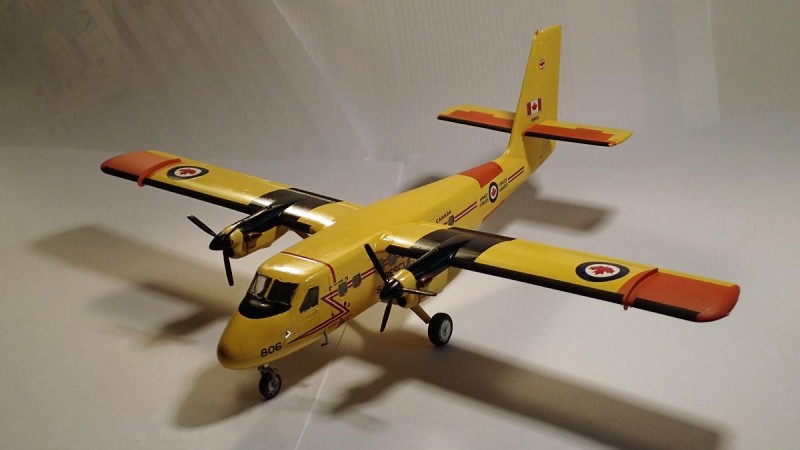
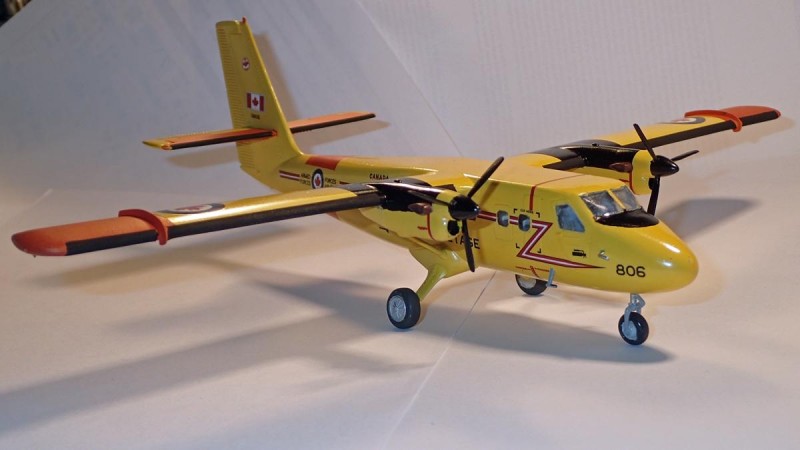
de Havilland Canada DHC6 ”Twin Otter” CAF, Revell 1/72

Started by Erik Gjørup · 32 · 4 years ago · 1/72, airbum, CAF, DHC, DHC6, Revell, twin otter, twinotter
  • Profile Photo
    Erik Gjørup said 5 years, 1 month ago:

    @lgardner, thanks for stopping by - send me a private message if there is any european Revell you need and we may be able to exchange something.

    The interior is no more than small squares of plastic held together by Tamiya thin glue - rather basic, but with the quality of the "glass" no one will know 🙂

    The 109's are a bit grumpy in their boxes, but for now work is calling. Perhaps mid next-week I will have a day off and will be able to post some more modeling.

  • Profile Photo
    Louis Gardner said 5 years, 1 month ago:

    Thanks Erik ! @airbum

    I will definitely keep this in mind... Christmas is not too far away, and that new tool single seat 262 jet and the ICM B-26 Invader have been catching my eye for a while now... The ICM kit I can probably pick up here in the States, but I'll have to see about the 262. That one has been eluding me for about a year now.

    The new tool Tamiya P-38 has been covered. You will probably see a build journal starting on it soon as it arrives, and I'll probably toss in a 1/48 Tamiya G4M "Betty" at the same time with it.

    I understand the work thing... There were many years when I didn't get to do any building at all because of it. I had the money but no spare time. These were the years when I built up my stash for that "some day" which is now.

    Now it's just the opposite. A decent amount of work bench time, but the funding always comes up short... Go figure ! LOL

    I'll bet the 109's are a bit grumpy...

  • Profile Photo
    Erik Gjørup said 5 years ago:

    Nose Heavy

    The instructions state that 20g is needed in the nose to keep all three on the ground

    I “rescued” a locker from my old tower that had contained a PC – back in the early days you needed to stop the electric noise from reaching the radio in the tower, and if you wanted a PC there it had to be placed in a place lined with lead! – I do have lead for a few thousand planes in that super heavy locker.


    The nose got some old lead-foil and a lot of white glue

    That was not sufficient, and a pair of small clippings under the “office” did the rest.


    With November here – and a few days of vacation due in a week, progress has been slow so far – but a bit of progress has been made; fuselage assembled, wings and tail on, and filler all over the place. . .

    And now I have to wait for the sea of glue to dry. I may have to re-visit a 109 or two?

    Still thinking of those tyres – they are not too good, and having to be without spats I need them to be a bit better than OOB?

  • Profile Photo
    Don McIntyre said 5 years ago:

    Wow! A great selection of photos in your earlier post, Erik. When I was flying in P-3s we got to go to Sonderstromsfjord a couple of times and once (RO2N, I think) to Thule as part of an ice patrol. That time we got to fly over the North Pole. IIRC it was around 1400 and it was dark as night at the pole.

    The Twin Otter has always been one of my favorites, and I keep hoping that someone will do one in 1/48. After they did the Otter and Beaver, I kept hoping that Hobbycraft would do one…

    I found this photo in my archives, it's one I got from DHC way back when one still communicated with what we now call "snail mail." This one was from back in the early 70s IIRC.

    Nice work on your Twotter, that interior looks great! Nice to see the work you've done on the props, too. I'm looking forward to seeing more of your progress.

    1 attached image. Click to enlarge.

  • Profile Photo
    George R Blair Jr said 5 years ago:

    Looking forward to this build, also. Have you decided on a paint scheme?

  • Profile Photo
    Erik Gjørup said 4 years, 11 months ago:

    @ddonss3 that is a nice factory-photo! I rather hope for a 1/48 too, or at least e new one in 1/72 as this one is getting rather long in the teeth. . .

    @gblair - it will be the yellow canadian with the short nose for the first one - I am planning some more later, and just stocked up my stash with 5 more, so other twotters will follow at a later date.

  • Profile Photo
    Erik Gjørup said 4 years, 11 months ago:

    Primed and ready

    - well, at least primed and ready for some sanding and more filler

    I masked the windows with Tamiya tape and sprayed it with Tamiya primer in my new airbrush with the large needle.


    Now while that dries it is back to some 109’s. . .

    next the wingfences get a tuneup

  • Profile Photo
    Erik Gjørup said 4 years, 10 months ago:

    Ol’ yello’

    A lot of filler and sanding later. . .

    Finally got around to some yellow base paint


    It got three thin layers over a one-hour session, and as it started to dry, it became clear that two might have sufficed – with proper drying time in between.

    Now, the light plays a trick here, but the windows are a bit raised. That will have to be addressed in the next build(s)

    As you might have guessed this one is to be Canadian with the decals from the box. After all, these birds operated in Greenland, and thus it is in keeping with my unofficial TWOTTER-theme; 6’s from Greenland or Denmark.

    What next – gloss yellow or? I think the decals will have to be replaced by paint in places. Any ideas on the matter out there?

  • Profile Photo
    Allan J Withers said 4 years, 10 months ago:

    My set of decals from the kit only has the red patches for the fuselage so you may as well paint those along with the wing and tail plane panels if needed, looking good in yellow !

  • Profile Photo
    Erik Gjørup said 4 years, 10 months ago:

    Yellow sun

    and with the first layer of gloss yellow on, I felt the need for a photosession

    I know, the paint may not cover all that well, but this is the first layer of gloss, and trying to keep it thin it will need one more go


    Clearly it also need some extrafine abrasive of some kind, but need to fully harden before that will take place.

    @kalamazoo, Thanx for the info – I will go for painted patches.

    this will now rest a bit before next post – just felt a need for a bright plane on a bright day

  • Profile Photo
    George R Blair Jr said 4 years, 10 months ago:

    Looks good. Yellow is a tough color. I usually use Tamiya white primer underneath anything light or bright, or red. The red markings on this version will really make the yellow stand out.

  • Profile Photo
    Erik Gjørup said 4 years, 9 months ago:

    Getting there

    Decals added and minor detailing taking place

    Before the decals were added a final coat of gloss yellow were airbrushed.


    Then it was masked for some insignia red and black.

    And after a few days in the box, decals were added.


    All the small parts added after decals need paint, some areas need touchup, and a light cleaning, then it is time for a clear cote and after that the deicerboots will get painted as well as other parts that need to stay matt or satin.

    And that seems like the last post before it is finished. Thank you all for following this build.

    Next post will be the finished plane

  • Profile Photo
    George R Blair Jr said 4 years, 9 months ago:

    This is coming together nicely! At first I thought the yellow wasn't bright enough, but adding the red makes all the difference. I think this is my favorite paint scheme for this plane.

  • Profile Photo
    Erik Gjørup said 4 years, 9 months ago:

    Thank you @gblair - it is rather a attentiongrabbin' little plane in all its yellow glory! one last post comin' up shortly!

  • Profile Photo
    Erik Gjørup said 4 years, 9 months ago:

    The not-quite-finished plane

    Promises promises – well, you can’t win them all

    But at least I am getting there. This build was, after all, just to test the kit, and more twotters has now been added to the stash for future use.

    And with that, here you have the plane after de-masking and with first round of detailing


    There are many hours left in this one. It is not nearly as good as I had planned, but that only gives a taste for more.

    I am happy with how the interior is visible though, and with the improved windows on OY-POF that is now in progress hopes are high for that one!

    One small detail that really improves the kit is the propellers that has been set at idle, and the wingfences that are made from a piece of evergreen. One thing to remember is the main gear that has to be refined, as it gives it a wrong stance here – the tail is simply too high compared with how a Twin Otter usually looks on the ground.

    Thank you for following this build, I had a lot of lessons for the next build, and this one will be having the last details and then be parked, and so this was the last post on this build