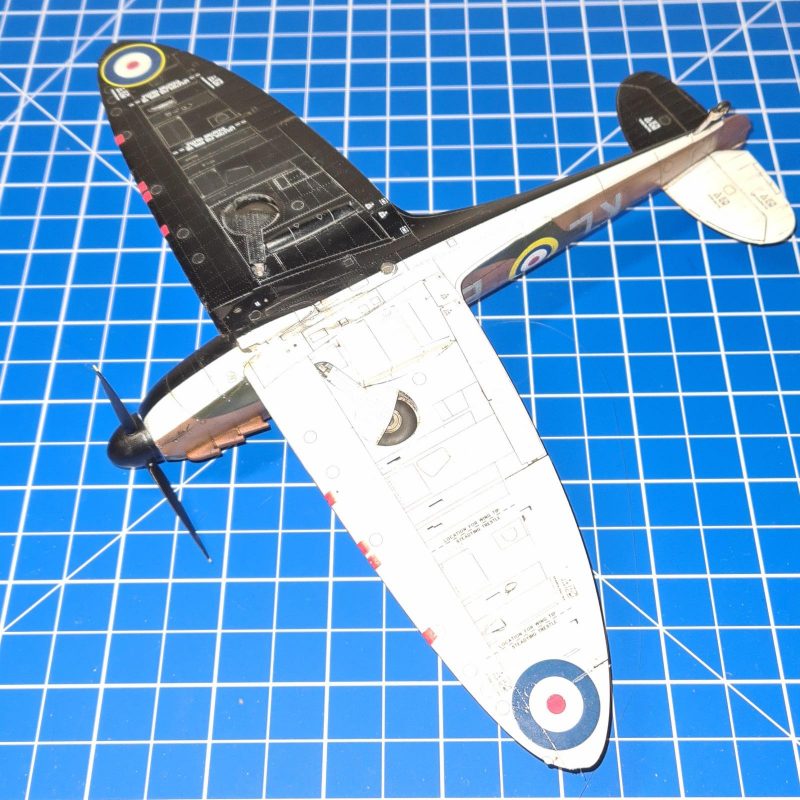
Eduard Spitfire Mk.Ia, 1/48. A Pair of Kiwis.

Started by Harvey R. · 114 · 3 years ago · 1/48, Battle of France, Dual-combo, Dunkirk, Eduard, RAF, Spitfire, WWII
  • Profile Photo
    Harvey R. said 3 years, 7 months ago:

    Thanks for the kind words folks!

    I removed the wash completely now, so here's how it looks. No fancy lightbox photos this time, but do note how different the model looks without it. When I use the lightbox I adjust my camera's settings to try and get it close to the colours of the real model, but without doing that it looks very tan.

    Also I got a new cutting matt, the last one had started to get too much resin, flowers and glitter on it (from my other half, not planning on a glitter Spitfire just yet!). Next up on the Spitfires is a little bit of chipping, followed by oils. But right now I'll be taking a break from that to work on painting the exhausts and also (something I admittedly should have done a while ago) getting around to fixing the undercarriage, which will need some modifcations to fit wheels up, but this will be done in the form of cutting the wheel in half.

  • Profile Photo
    Erik Gjørup said 3 years, 7 months ago:

    They still look stunning, even without lightbox and glitter 🙂

  • Profile Photo
    Spiros Pendedekas said 3 years, 7 months ago:

    Yep, they do indeed look stunning, my friend @scalerambush!

  • Profile Photo
    John vd Biggelaar said 3 years, 7 months ago:

    They are just awesome, no matter the light conditions.

  • Profile Photo
    Harvey R. said 3 years, 7 months ago:

    A couple of additions over the last couple of days:


    Firstly the wheels have been added, it took a bit of sanding but they fit okay with some superglue and tamiya cement, much easier than most aircraft to make wheels up. The major issue was the wheels which took a while to sand in half so they'd fit.

    Secondly the exhausts got added, normally I mix up a paint of red/brown/metal and eyeball what looks okay but this time I tried X-10 gunmetal with tamiya makeup/weathering powder 'burnt orange'. The effect looks a little too bronze to my eyes, what do y'all think?

    Finally that prop got glued in, I forgot to weather it though but luckily I wasn't planning on doing much so that can come later.

    Next is to do some simple basic chipping and give a clear coat over the exhausts and the undercarriage, then a bit of wash in these areas. I also need to get round to repainting the tailwheel.


    Overall, these pair of Spits are pretty much looking like 'factory fresh', shiny, clean. I won't go too much with weathering as I previously said but some slight chipping on the panels and some oil stains from that leaky Merlin can go a long way.

    2 additional images. Click to enlarge.

  • Profile Photo
    John vd Biggelaar said 3 years, 7 months ago:

    Some nice progress, Harvey.
    Personally I would go for a slightly darker/reddish exhaust color.

  • Profile Photo
    Spiros Pendedekas said 3 years, 7 months ago:

    Looking great, my friend @scalerambush!
    I, too, find the exhausts a little too bronze!

  • Profile Photo
    Harvey R. said 3 years, 7 months ago:


    Workbench update today, firstly I repainted those exhausts to give them a bit more colour. It may still be too shiny at the moment but this can be toned down later somewhat with exhaust stains.

    Secondly I repainted that tailwheel. Just a quick spray on KL-N from both sides. I decided to go for a half white/half black scheme as it looks a bit more interesting than the aluminium I was originally going to paint it.

    A note to anyone planning on building this kit, the ailerons don't have the best join to the wing. In fact, it's probably one of the weakest I've come across. I think KL-N is currently sitting at a total of 5 times I've broke the ailerons off of it.

    Next up is a clear coat over the repainted areas/landing gear tomorrow, then I'll begin the oil work. I'm planning on going down to the local model shop and getting some oil paints as I saw a model that had decent chipping results with a silver oil paint applied with a round brush and am curious to see how this would look on a test kit and then maybe on the Spitfires. Sadly there is only 1 model shop around here nowadays, which is one that focuses mainly on model trains which is great if that's your interest but sadly not quite enough tamiya kits in there for my liking.

    In other news my intended plan of starting a Tomcat after this is being jeopardised by going to Duxford next week, in which I'll undoubtedly see their Corsair and want to build more Corsairs. Also a scary looking resin set for the Tamiya Corsair arrived. But I really should get that Tomcat done and add a jet to the shelf.

  • Profile Photo
    Spiros Pendedekas said 3 years, 7 months ago:

    The exhausts look great, Harvey. I loved your black/white tail wheel: small details that stand out of the norm, adding interest for sure!

    In my town, Chalcis, only one, very small, hobby shop is sadly left. It's so small, you cannot even wander around the shelves, admiring the boxes...

    A very few nice hobby shops still remain in Athens; whenever I am there, I try to visit my two beloved ones in the city center, looking at the kits, teasing the owners, who are good friends, the usual stuff!

    I hope hobby shops will not disappear...

  • Profile Photo
    John vd Biggelaar said 3 years, 7 months ago:

    The exhausts improved a lot, Harvey.
    Even at this extreme close-ups your build looks perfect.

  • Profile Photo
    George R Blair Jr said 3 years, 7 months ago:

    This has been a great journey, Harvey (@scalerambush). The results have been spectacular. Ditto on the hobby shops here. I live in a city with over a million people, and we have two hobby stores, but one (like yours) is 90% trains. Both are small stores. We once had 5 or 6 hobby stores. I am moving this summer into another town about 100 miles away, and they have only one hobby store. I don't think the pandemic has done any of them any good.

  • Profile Photo
    Harvey R. said 3 years, 7 months ago:

    How's your weekend been folks? Me? Well after painted the exhausts, I managed to break off the rudder on the Spitfire and spent 33 minutes looking around for it, but luckily I got it before the carpet monster did. I'm not quite sure how one loses a fully painted 1/48 Spitfire rudder, but for a while I did.

    Anyways, let's talk updates. Most notably is likely the exhaust stain. I've tried a few different methods throughout my builds but generally I find spraying a heavily diluted mix of paint on a low pressure to be the best, I used XF-9 Hull Red mixed with XF-2 Black for the colour. I also sprayed this as carefully as possible on the exhausts, darkening them further.

    I also applied a wash to the undercarriage, as well as that part on the tail I resprayed.

    Finally I started oils. I really don't like using oils to be honest, I think a large part of this is a lack of practice as I tend to only use them quickly at the end of a model and then forget how to use them when it comes to doing it again 2 months later. I generally subscribe to a method of either putting oils on and brushing them in a direction with a brush, and then also thinning down the oils quite a lot so I can then proceed to blow with an empty airbrush to create some oil leaks. I'm not 100% happy with the Spitfire undersides, particularly on KL-N. But I think the stains on the fuselage are okay.

    Speaking of oils, I tried a different method of doing chipping this time. I tried applying a silver oil paint to the wing roots, and then wiping it off with a brush with thinner and some kitchen roll with thinner. This seems to create an effect that I'd describe as being more natural looking than I could achieve with a brush. To complete it, I did use a brush with Vallejo Model Air Aluminum (generally not a huge fan of Vallejo Air, but their Aluminium in the dropper bottle is a 10/10 paint for brush painting) and did a few small chips on the corner of some panels and access doors, I also painted over some of the silver oil wing root chipping which turned into a browner colour due to the use of brown oils on the wing root to try and darken it to make it look a little muddy.

    2 additional images. Click to enlarge.

  • Profile Photo
    Spiros Pendedekas said 3 years, 7 months ago:

    Both look great, Harvey! Your weathering methods are very effective!
    Have a nice week!

  • Profile Photo
    John vd Biggelaar said 3 years, 7 months ago:

    Great results, Harvey.
    Those stains are very realistic.

  • Profile Photo
    Harvey R. said 3 years, 7 months ago:

    The end is near!

    The first of two clear coats have been applied, this is MRP Semi-matt. In general I find a semi-matt/satin to be the best suited for 90% of aircraft. Matt itself is just too dull, and you'll often find that even though these aircraft had a matt coat that on a sunny day photograph there's a tiny bit of shine. Generally my rule is Matt = Extremely well used aircraft, semi-gloss = Factory fresh, bare metal or otherwise very clean aircraft, gloss = restoration aircraft with super shiny protective modern paint, and finally semi-matt for anything else.

    Next up is coat number 2, followed by painting the lights and rigging the antenna wire. It looks like KL-B took a fall the other day and received a bent wingtip, this chipped the paint so a quick spray will fix it.