Eduard Spitfire Mk.Ia, 1/48. A Pair of Kiwis.

Started by Harvey R. · 114 · 3 years ago · 1/48, Battle of France, Dual-combo, Dunkirk, Eduard, RAF, Spitfire, WWII
  • Profile Photo
    Harvey R. said 3 years, 1 month ago:

    Greetings! I've recently started posting on imodeler and have come across the W.I.P group so thought I'd join in, as you can see I'm a little ways into the build having started them about 2 weeks back, I'm quite active on Instagram so I've been taking photos along the way anyways so here is what's happened so far.

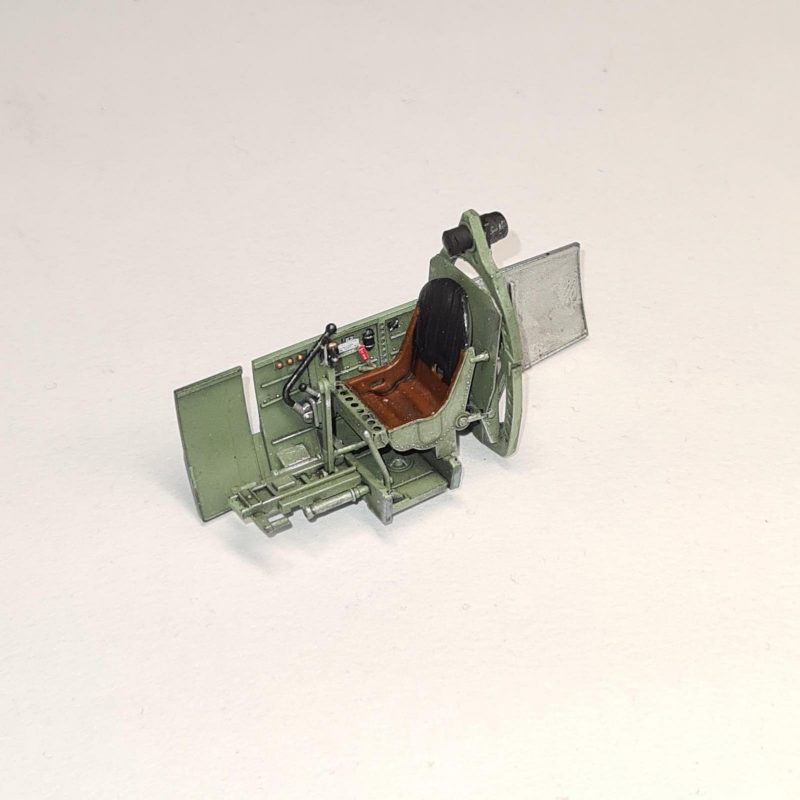
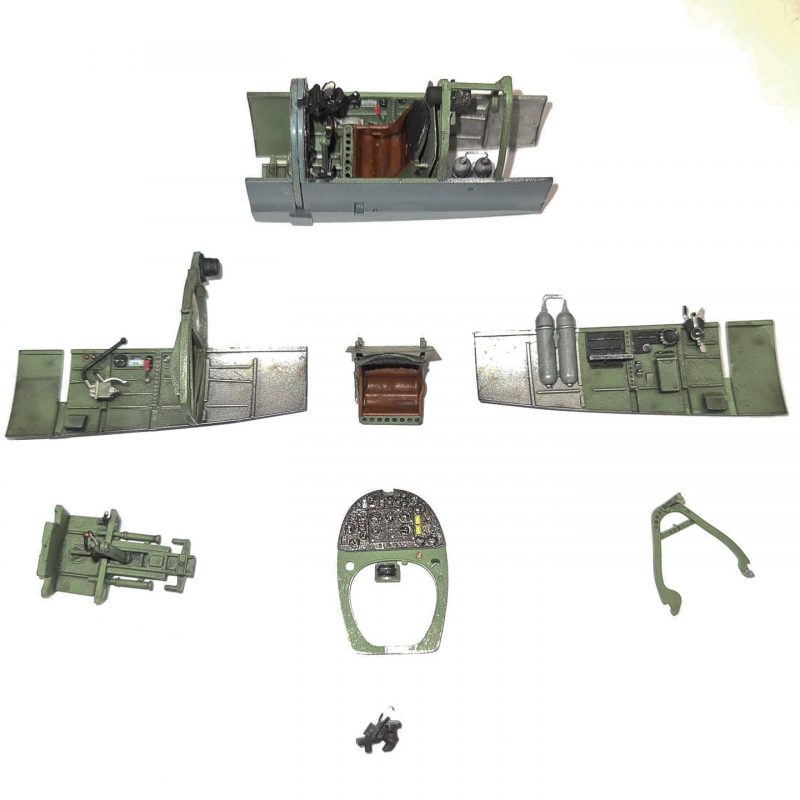
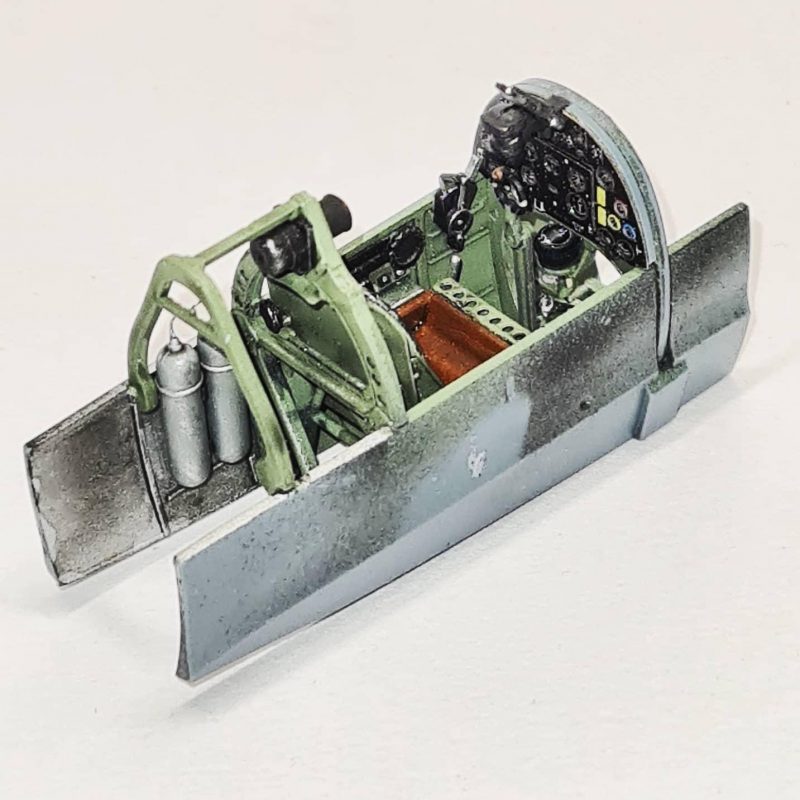
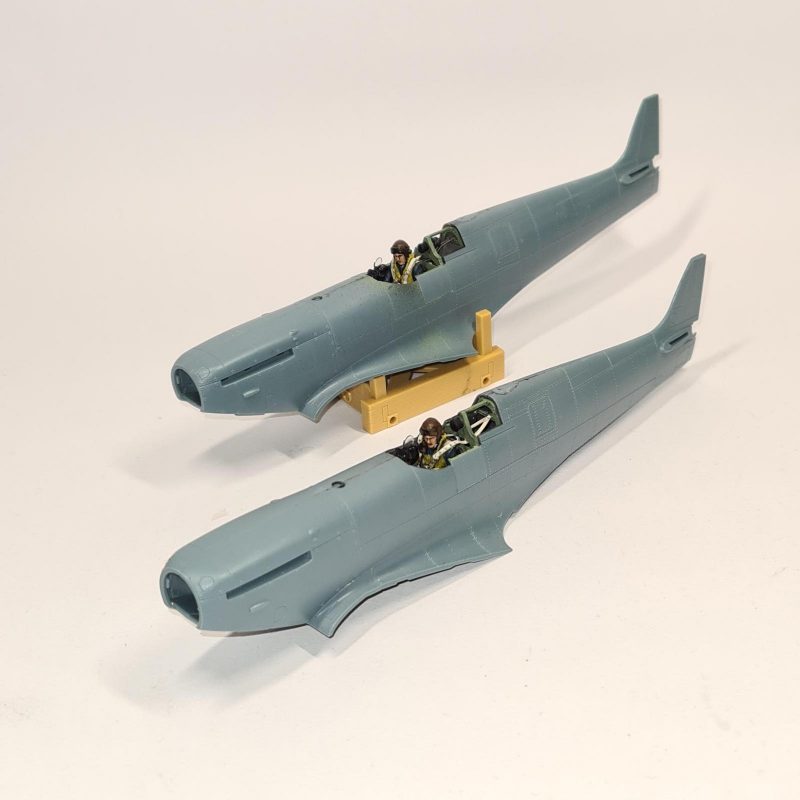
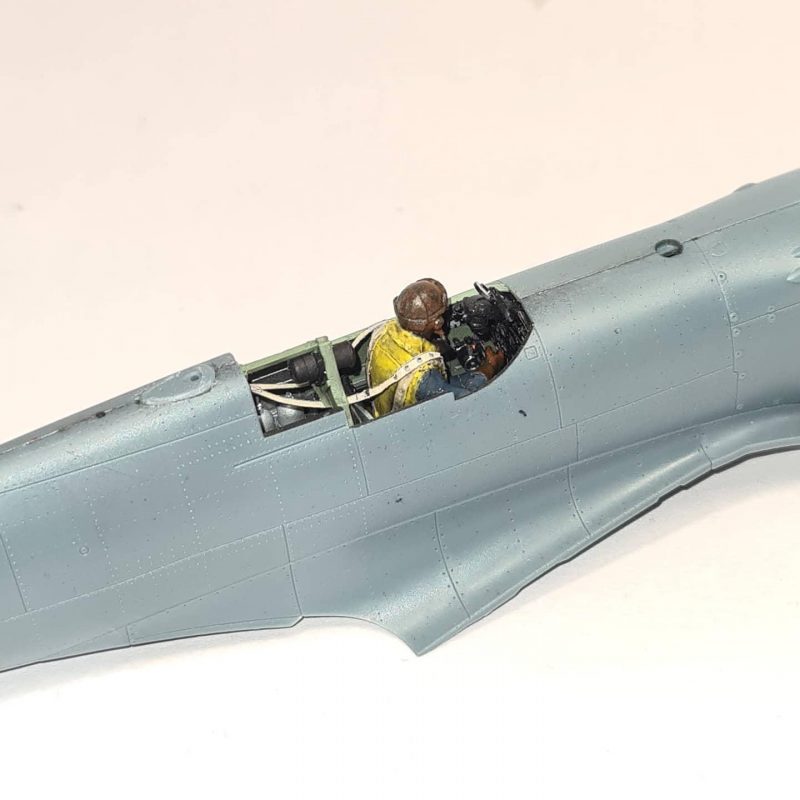
    Firstly the cockpit was assembled, an unexpected beginning for any aircraft really. I used the full photoetch included in this 'The Few' box set, one may argue its an absolute waste due to shoving a PJ models resin pilot in it but as well all know its worth it as I know its there. In terms of hours spent on the build so far unsurprisingly the cockpit has taken most of the time. The fuselages were then mated together which will need some filling, then the wings build and glued on.


    One interesting (and annoying) note for the Eduard 'The Few' set is that it comes with two different fuselages, one for a Mk.I and one for a Mk.Ia. The main difference is the different antenna base. Interestingly the Mk.Ia type fuselage intended for a separate part to build the base can be built with the original style antenna if decided, but the one fuselage for the early antenna can only be built as the early one. This boggles my mind why they decided to do it this way, as it essentially means your choice for a model is 1x pre-war Spit and 1x wartime Spit, or 2x Pre-war Spits. I'll be building N3173 and N3183, KL-N and KL-B, used by Kiwi aces Gray and Deere by using the KL-B decals included and then making custom masks for the KL-N. To facilitate the later style antenna I drilled a rough hole in the early fuselage and inserted the part needed, filler will be needed here to cover up the damage.


    On other details, the radiators have got their photoetch applied as of today. I also built one gear leg to test how well it works in a wheels up configuration and it seems like this will be a much easier modification than most kits are to make it in flight.

    Now onto one massive gripe I have with Eduard kits; the propeller doesn't spin. No matter what age I'll be whether that's 8 or 88 I will always think a propeller on a model can spin, or at the very least be posable. By modifying the part that the propeller inserts into I am able to glue a bearing with a 2mm inner diameter to the base, and then glue the propeller onto it. This allows it to spin fairly well, and also has the bonus of still being able to be painted separately.


    Anyways, so far it's been a smooth and fun build. I don't often use photoetch but I'm going for the full experience this time and am enjoying the change of pace to normal.

    Edit from the future: For anyone in the future doing this model from Eduards 'The Few', do note that the internal cockpit decals are wrongly numbered. They are one too along in sequence, just double check your references though a lot of it is common sense (i.e the compass part needs the compass decal, not a warning label)

  • Profile Photo
    Spiros Pendedekas said 3 years, 1 month ago:

    Wow, what a nice double entry, Harvey @scalerambush!
    Those cocpits are marvellous (of course, a pity that not a lot can be seen...). The Eduard kits look great!
    You put a bearing in order to spin the props! You are the man!
    Looking forward to your progress!

  • Profile Photo
    Erik Gjørup said 3 years, 1 month ago:

    Welcome to WIP-aircraft Harvey. Good job bringing us up to speed. I shall be strapped in to follow the rest of the journey.

  • Profile Photo
    Harvey R. said 3 years, 1 month ago:

    Thanks! Things are coming along surprisingly quickly, hopefully next up is filling the gaps and then some primer can be applied

    The joyful process of filling has begun. This is one of my most disliked process but over recent builds I'm beginning to tolerate it a bit more.

    Eduard models as we all know have incredible detail, arguably too much detail for the scale, to try and preserve as much of this as possible I use plenty of tamiya tape.

    For filler I'm using 'Sprue glue', this is a half full bottle of tamiya extra thin (regular extra thin, not the quick setting kind) with chunks of sprue added and dissolved into it. The advantage of this is that not only will it fill, but it'll also make a strong plastic bond. I may go over this again later with Tamiya putty if I feel it hasn't filled the gaps enough as it does tend to sink in the gaps. The Spitfire with the modified antenna base has more gaps than the other, largely around the antenna (not surprisingly) and also the wing root didn't fit as well for some reason indicating I likely built the interior wheel well slightly wrong, probably as I'm not too fussed about that area as it's going to be wheels up.

  • Profile Photo
    Pedro L. Rocha said 3 years, 1 month ago:

    A great double WIP for an entrance Harvey. Sweet work so far, don’t doubt both Spits will be fantastic models. Now I may have missed something along the text (I do a lot of diagonal reading to be honest) but are those figures in the box?

  • Profile Photo
    David D. said 3 years, 1 month ago:

    Double the fun. Nice looking build thus far. Like the figure work.

  • Profile Photo
    David Mills said 3 years, 1 month ago:

    Wonderful job Harvey - I have this kit, these kits, so looking forward to this one!

  • Profile Photo
    John vd Biggelaar said 3 years, 1 month ago:

    A fantastic entry, Harvey.
    Those cockpits are looking fantastic.
    Will follow your thread for sure.

  • Profile Photo
    Harvey R. said 3 years, 1 month ago:

    Thanks for the support folks! One final update for today, I applied the 'Sprue glue' and also applied the Tamiya putty where needed, I find tamiya putty works best if given a full 24 hours to dry so not much left to do but wait. The radiators are being built but the interiors will be painted quickly so that I don't have to deal with trying to get some spray in there. I'll also likely dip the clear parts in pledge clear floor polish to give them some shine as they'll also need a full 24 hours to dry.

    @holzhamer The figures are from PJ Models, Eduard sadly don't include pilot figures with their models except from the odd limited edition kit here and there. The figures from PJ Models are quite nice and a good price, however they seem to be harder to get a hold of and I wonder if they're out of production. I couldn't find any in my country (UK) so but found two from Germany.

  • Profile Photo
    John vd Biggelaar said 3 years, 1 month ago:

    You're making fast progress, Harvey.
    Looking nice.

  • Profile Photo
    Adrian Starling said 3 years, 1 month ago:

    Really looking good Harvey, your cockpit and pilot detail is very impressive. The prop bearing is a very nice touch, great idea!

  • Profile Photo
    Spiros Pendedekas said 3 years, 1 month ago:

    That's some great progress, indeed, Harvey @scalerambush!
    Nice, meticulous filling!

  • Profile Photo
    Harvey R. said 3 years, 1 month ago:


    Another day another update, this time the Spits had mostly boring work done to them. Firstly on the the radiators were built, and the interiors quickly sprayed with white or black for the underside colour, this isn't meant to be a careful process just a 'slap some paint in areas that won't get it by the airbrush later'. Fun fact: the Eduard box gives KL-B an all black underside, so when you forget what side needs black and which needs white it's better to take the extra 10 seconds and open the instructions rather than spray it on the wrong side... Oh wells, all it did was make a 5 minute job take 10 minutes.

    Beyond that the models got sanded down when needed, naturally this lost some rivet details but it wasn't actually too much. I previously built Eduard's Tempest at about this time this year and found I lost a lot more detail mainly by being less careful with puttying. One issue I do have is that the wings seem to have a slight raised 'lip' when joining to the fuselage, I'll get some primer on this and judge if it needs further sanding or not.

    In other news, the early Spitfire fuselage rant continues as I've noticed the early fuselage has a different join to the front glass as the early Spitfire didn't have the armoured glass, fingers crossed that the front glass I'll be using fits well!

    I do not really understand why they made a seperate fuselage for the early and later style Spitfire Mk.I, especially when both fuselages have a panel line you have to fill in (I presume the Mk.II or Mk.V has that line, but the Mk.I doesn't?). Regardless, considering that the later version can be turned into an early one why didn't they give you two of them? Rather than one that can't be turned into a later one without modification beyond the instructuions. I like Eduard, their detail is second to none. But I feel like their decisions are a bit... Questionable.. Sometimes.

    Also, credit where credit is due I got the idea for the bearing for the prop from 'yureru35show2017' on Instagram, a Japanese modeller who does something similar. He goes a step further a puts a metal rod that can push fit in and then the propeller really spins

    2 additional images. Click to enlarge.

  • Profile Photo
    Spiros Pendedekas said 3 years, 1 month ago:

    Nice and steady steps, my friend @scalerambush!

  • Profile Photo
    Harvey R. said 3 years, 1 month ago:

    Work has come to a slow on Spitfire, our Kiwi pilots may be causing issues.

    Or not! Asking around some people have said they've had similar issues with the canopy fit when closed even without pilots, furthermore when test fitting the included Mk.V canopy which is a 'Malcolm Hood' style with extra space, there still is gaps. The canopy just doesn't want to fit on.

    Firstly I tried adding styrene, and was happy with the result but after spraying the interior green I could still see plenty of gaps. I tried brute forcing it on with some stronger glue and tape, I then removed one of the pilots heads to try and reposition it so it was at better angle.. No joy there. I tried the Mk.V canopy and despite definitely not touching the pilots head it still had a noticeable gap, I then tried using the seperate cockpit pieces for an open build but the main sliding canopy glass must be oversized to fit when open as it just looks out of scale.

    Right now I tried some sanding and am gluing one in with brute force extra thin cement and tape, the other is currently waiting a good solution. I may just have to try and putty up the gap but I'm not sure I have any acrylic filler, my 'Sprue Glue' I reckon will fog up the glass in a way that extra thin generally doesn't, and Krystal Klear is a pain to use in a controlled way. So I'm between a rock and 3 hard places at the moment, just deciding which hard place I prefer.

    The issue is, how much of this trouble is Eduard being Eduard, and how much is caused by our Kiwi pilots..