Messerschmitt Bf109 G-4 Italian Air Force, Eduard, 1/48 FINISHED

Started by Erik Gjørup · 108 · 3 years ago · 1/48, Bf109, Eduard, WWII
  • Profile Photo
    John vd Biggelaar said 4 years ago:

    Fully understand you like the small steps, Erik.
    The smaller the detail, the more realistic the build will be.
    Those hatches do look wonderfull.

  • Profile Photo
    Spiros Pendedekas said 4 years ago:

    Looks really great, my friend @airbum! I can clearly assume and state that your model is also excellent "up, close and personal" too!
    Those decals look wonderful!

  • Profile Photo
    George R Blair Jr said 4 years ago:

    Paint looks great, Erik (@airbum). Masking fluid can be tough. I once was pushing so hard on a toothpick I was using to remove the dry liquid masking that I broke the canopy. I always try to get it off within a day or two of putting it on. The hatches look fine. I have probably tried everything to glue photoetch in place: superglue, white glue, Future, regular glue, etc. It all works sometimes, and sometimes none of it works. :o)

  • Profile Photo
    Louis Gardner said 4 years ago:

    Erik, @airbum
    I fully understand your desire to expand your skill set with each new model. I commend you on your underwing gondolas... the metal barrels put your "GunBoot" to an even higher standard. However for me, the open PE hatches are the bee's knees, and the best of your latest additions. They look great, and all those little details rock ! I also am very impressed with your mottling paint work on the fuselage. You have it down to a science, and this is something not easily done on your first attempt... I can tell you from personal experience with that.

    I have also experienced a problem with liquid masking and it was most likely caused by leaving it on for too long. I think that our friend George is on to something there, and not leaving it on too long... all these models to build and so little time. 🙂

    This one is really looking great my friend !

  • Profile Photo
    Erik Gjørup said 4 years ago:

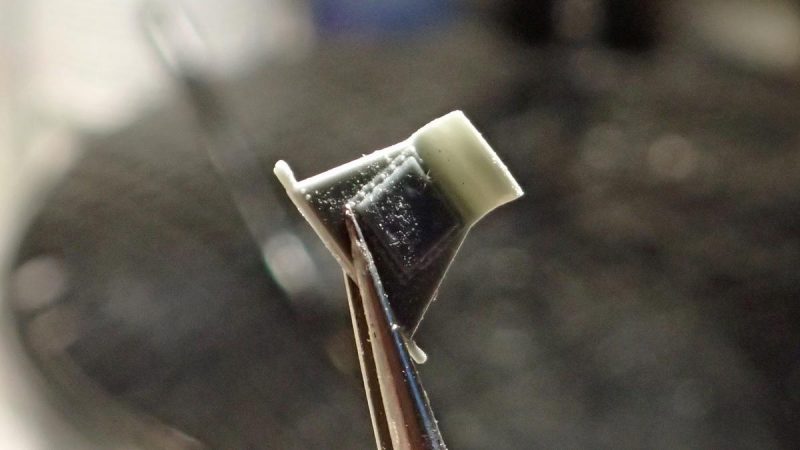
    Thining armour

    Another small adjustment is the thinning of the head-armour

    Of course I could use some of the PE headarmour I have laying around (and that may yet happen), but I try to thin down the styrene part


    It took very little time to come to this, a bit more work is needed, some paint, and I shall decide if it will be used.

    Thanks for all the kind words and additional tips and tricks gentlemen. I appreciate them all!
    John @JohnB, very true indeed – and will be trying my best.
    Spiros @fiveten, very nice decals indeed, as I have come to expect from Eduard
    George @gblair, the masking fluid was a real setback – and the result of my little grey cells forgetting all about it being there. The small hatches have been added by some thin superglue, and of course one of them now needs re-installing after heavyhanded brushpaint, but they actually take some abuse, all things considered.
    Louis @lgardner. It is indeed what drives the whole hobby for me – getting better at building, better at research and all in all hanging out with friends here and discussing methods and ways of improving this and that.

    and thus a very small update ended – I shall be trying to finish this build soon, stay tuned!

  • Profile Photo
    John vd Biggelaar said 4 years ago:

    Another nice detail, Erik.
    Take care not to thin it too much, it will be very fragile.

  • Profile Photo
    Spiros Pendedekas said 4 years ago:

    "All those small nice details that add up to the final result", my friend @airbum!

  • Profile Photo
    George R Blair Jr said 4 years ago:

    Thinning kit plastic can sometimes yield a big difference, as you have demonstrated, Erik (@airbum). Great job.

  • Profile Photo
    Erik Gjørup said 4 years ago:

    Thank you John (@JohnB), it will be fragile - and I seem to have stopped in time, as it is now painted and still intact!
    Spiros (@fiveten) a few more of these coming right up!
    George (@gblair), can't it just. Thank you.

    And another update to follow here in a second or two!

  • Profile Photo
    Erik Gjørup said 4 years ago:

    One step further . . .

    Every little step counts – right?

    The brakelines were installed the other day, and the wheelwells and legs got some matt RLM02. Then the wheels were assembled and glued in place, and with that it is now on its own feet


    I will have to remember to take care with the tailend, as it is a bit fragile.

    The gloss undercarriage doors got a coat of xtracolor matt varnish – and it is very nice I think.


    Not like the other matt clears I have tried so far, but very non-shiny indeed. I like it a lot.

    Now some more detailing will take place, and it creeps closer to the finishline – stay tuned

  • Profile Photo
    George R Blair Jr said 4 years ago:

    Looks good, Erik (@airbum). You wouldn't think it would be hard to find a really good matt/flat clear, but sometimes it is. You have truly broken the code on finding something that is non-shiny.

  • Profile Photo
    Erik Gjørup said 4 years ago:

    Thanks George. I have been rather satisfied with the xtracolor products, and even though I had my fears as their varnish was hard to shake (big lump inside the bottle) it has turned out to be fully up to my expectations.

    Another update is due in a minute @gblair.

  • Profile Photo
    Erik Gjørup said 4 years ago:

    Checquered flag in sight

    With more details in place it is closer to the finishline than ever before

    I got a few of the last items in place today, but had to strip the wing cannons, so not quite there yet..


    But close enough to call this close to finished. I will have to source some chemicals to make the brass barrels black, and then get the last tidying up done, and it is off to a photoshoot in the sun soon.

    I think maybe just a last post on how the guns goes before hitting the headlines with this one – come January it will be two years since the box was opened, so about time too

  • Profile Photo
    Spiros Pendedekas said 4 years ago:

    That's a wonderful progress, my friend Erik @airbum!

    The wheels posture is spot on (but then I wouldn't expect anything less than 109 perfection from you 🙂 )

    I love the brake lines: they make "our" linesless gear legs look toy-ish!

    Glad to see Xtracolor working for you. And you mentioned good stirring beforehand: I had glossiness issues with matt varnishes, only to realize that in some cases it was due to not having stirred well the bottle beforehand, the matt pigment (which actually created the matt look) remaining solidified at the bottom...

    Looking superb

  • Profile Photo
    John vd Biggelaar said 4 years ago:

    Nearing completion, Erik.
    A build to be really proud of.