Here are a few photos of a new project, the 1/32 Revell Hawk T1A.
Additional items for this build are the Eduard Big Ed set, which incudes interior and exterior etch, RBF tags, and masks. Other additions are Alley Cat’s decal set ACD-32003 for 19, 100, and 208 Squadrons, a Master pitot tube, and an Archer’s resin rivet set.
My principal reference was SAM Publications’ “BAe Systems HAWK, Air Data 1″, by Andy Evans, and naturally various Internet walkarounds, etc.
Here is the completed cockpit. I thought I’d better take a few shots before it was buttoned-up
On either side of the rear fuselage there are plain holes, three port and four starboard. On the rear-most hole either side is a small exhaust port, but they should have a tube set-in at an angle, and appear flush with the fuselage skin. I used a piece of ali tubing, filed, glued, and filled. I could have used a piece of plastic tube but I didn’t have any to hand that was to-size.
Just above these exhaust ports are NACA ducts, on the model set as a simple surface impression, but I opened them up and lined them with thin plasticard for the triangular shape.
On the starboard side, moving forward, are two holes which are filled with clear-part kit pieces as if they were tiny windows. In a sense, they are, but are actually sight gauges; on the port side there’s only one gauge.
For more realism, on the port side I painted the back of the clear part red, and then to create a centre-line marker I painted a little white either side and following that a coat of black, so it looked a little like a gauge-face. It looked OK, but on the two starboard gauges I used decals (spares cut from a Ki-61 control panel face), which gave a sharper result.
There are on both sides, again moving forward, two holes as hot air vents, but they are HUGE. I took a piece of plastic rod, heated it with a match flame and then pressed it into the holes, and then cut away the excess and sanded the surface area smooth, after with I drilled out the centres with a smaller diameter bit.
Lastly, on the starboard side, to the right of a sight gauge and above the hot air vent, there should be a ramjet air vent, but it’s missing from the kit. It appears to be a small angular tube slightly protruding rearward, with a reinforced plate around it on the fuselage skin. I used a piece of copper tube, again, filed and set in at an angle but this time not flush with the surface. I then used a few of the Archer rivets (tiny resin dots on clear decal paper), and set them round the vent to replicate a reinforced plate.
The jet tube is pretty simple, but looks nice. Here it is prepared for placement.
The forward wheel well consists of three reinforcing plates, finely detailed, but alas not seen after closing the fuselage. Adjacent to these is the well itself, with four etch pieces added for additional detail, and a two-piece, lever-type assemby that nestles into the whole section, presumably something to assist in retracting the front wheel mechanism.
Here’s a shot just before closing the fuselage halves. The intake tubes are also in place.
On the top of the fuselage. centred a little in front of the fin, is a round vent. Again, presented in the kit as a hole, through which you can look into the interior. I guess you could simply paint the interior black before closing the fuselage halves, but I had an idea. I would have thought that there would be some kind of ducting leading from the hole into the fuselage. I took a straw from a juicebox (courtesy of one of my grandsons), which has an 'accordian crimp' allowing the straw to bend on the curve, cut the straw to leave a crimp section with a straight section adjacent, and inserted it into the hole, and hey-ho, instant ducting!
The edge still needs to be tidied up, but there's a piece of etch that lays over the nearby panel and around the hole as well, so the ragged edge won't be seen. A little silver paint brushed into the 'ducting' should bring out the detail nicely.
Here's a small improvement to a dorsal vent-pairing. Frankly, the area is virtually invisible after fitting, but glueing two small cylinders of tinfoil behind the openings give the effect of something behind the rectangular openings. Painted black, the effect is seamless.
At this point, nearly all fuselage pieces have been completed, with the rear planes, with the exception of clear lenses. I did notice that there are still three forward ventral aerials to be fitted, which I'd do at a later stage in any case, but there's only one aperture showing on the model! Looks like I'll have to drill out a couple of spots for these later.
I should add that the main intakes were OK, but needed a little filling, fettling, and rescribing, but nothing horrendous. I used a flex-file to lose the internal seams, and liquid poly to 'melt' the joins. I may have to tidy them up a little after I see them in primer, but they should be fine.
There's a rear ventral piece that I think is a fuel dump, which in the instructions is indicated as fitted to the opposite side, but the aperture for it is in the correct place, and I checked my references as well. The blank end face of it has been reamed out with a sharp blade to mimic a 'tube' end.
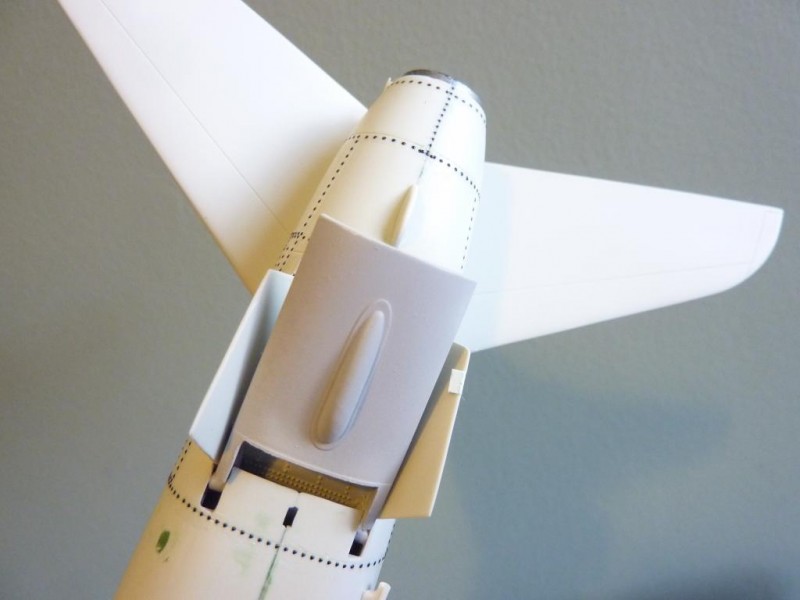
Also in view here is the dorsal work around two etch vent covers. The kit is moulded with one in place (port), and I cut this out to depth so that the brass section bedded in flush with the fuselage skin; starboard side ditto, but from scratch. The filler looks a little extensive but in fact is only a tidy-up of surface scratches.
Photoetch sills have been added around the edge of the cockpit too. Smaller etch pieces for these will be added later, to avoid damage when masking the cockpit for painting the airframe.
Here's a shot of the main wheel wells inserted into the upper wing halves and then fixed to the single lower wing. The Eduard set includes half a dozen small pieces of etch for these areas, but the improvement to detail is so minimal I chose not to use them. The real Hawk has a great deal of cables and pipes into the well from the wing root/fuselage area, but I don't see the need to spend an inordinate amount of time cabling what never will been seen. Most modern jets have complex retraction systems and often multiple doors, which obscure the well areas from view, and the Hawk is not dissimilar in that respect.
Note the heavy actuators. They've got to be removed. I realised that Hawks on the ground have dropped flaps and the airbrake door just open a little because hydraulic pressures are down. With the kit, the flaps are moulded neutral. I found a resin set from CMK so will have to detach the actuator pieces, cut out the kit flaps and install the resin. I think it's still the case that the wings needed to be fitted as a unit, to make cutting and fitting easier, and to make sure the well areas are seated correctly prior to aftermarket work.
I've also opened up two NACA vents here, but not lined them.
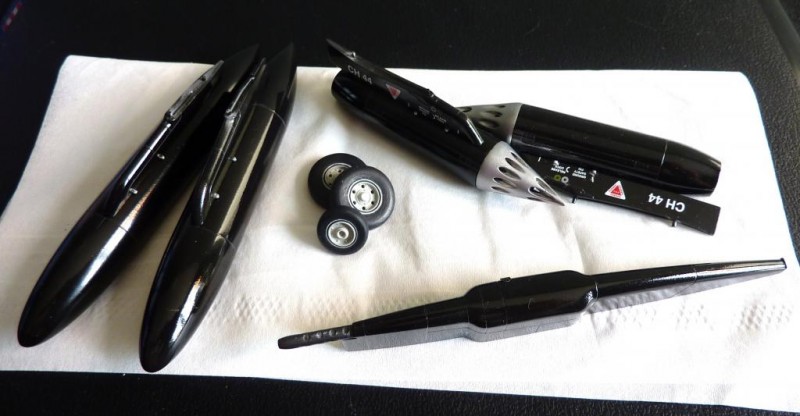
While awaiting the arrival of the CMK flap set, I moved on with a few areas of the build. The stores consist of two SNEB rocket pods and two fuel tanks, with pylons, and a centreline 30mm ADEN cannon pod. The pylons for the SNEBs have decals, but not the other items. There are a couple of tiny etch pieces for the ADEN.
The three wheels, two main and a nose wheel, each are of two parts. Eduard supply a circular etch detail for the inboard main wheel hubs. Wheel details themselves are OK. There is a double lip of hub where it meets the tyre, and I would recommend taking a No.11 blade and running it around the area where the outer lip meets the tyre to create greater definition and make painting easier.
-
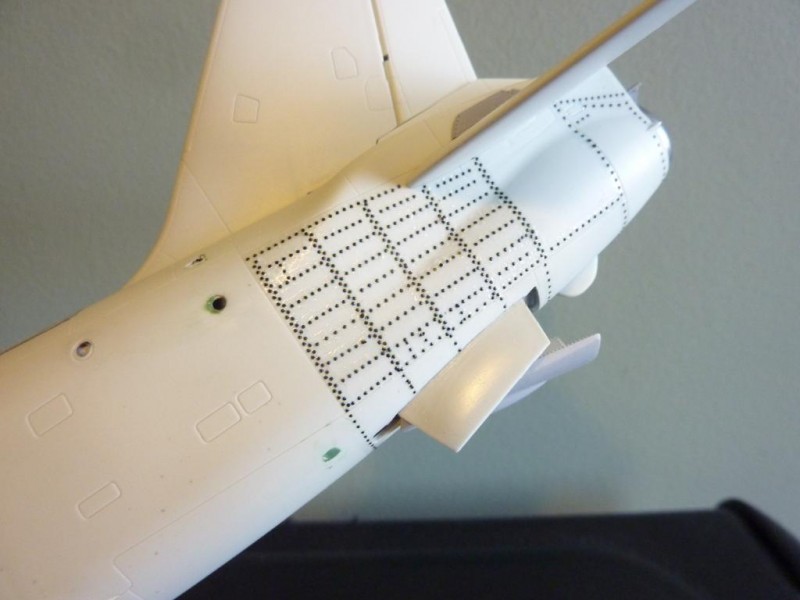
The Air Data publication mentioned previously was to-hand before I began the build. I noticed on a couple of close-up images of the tail fin and tail planes area, that there was a considerable array of rivet work port and starboard, and extending beneath the fuselage near the airbrake door. This was the reason I purchased the Archer's resin rivet set; the kit as supplied was smooth-faced here. I can't say that I applied every last rivet, mainly because I couldn't see everything in the photos, but we now have a fair representation I think. Certainly, under primer and paint the detail should be fine. The areas as photographed here look shiny because I'd just dabbed a little Micro Sol on them to settle them in. I'll also do the same with a little Klear to seal them. One thing to note if you've never used these resin rivets. They're set on a continuous sheet of clear decal carrier film, and you have to cut closely on all sides of the rivet section you need, otherwise you get sections of film as well as rivets.
-
-
-
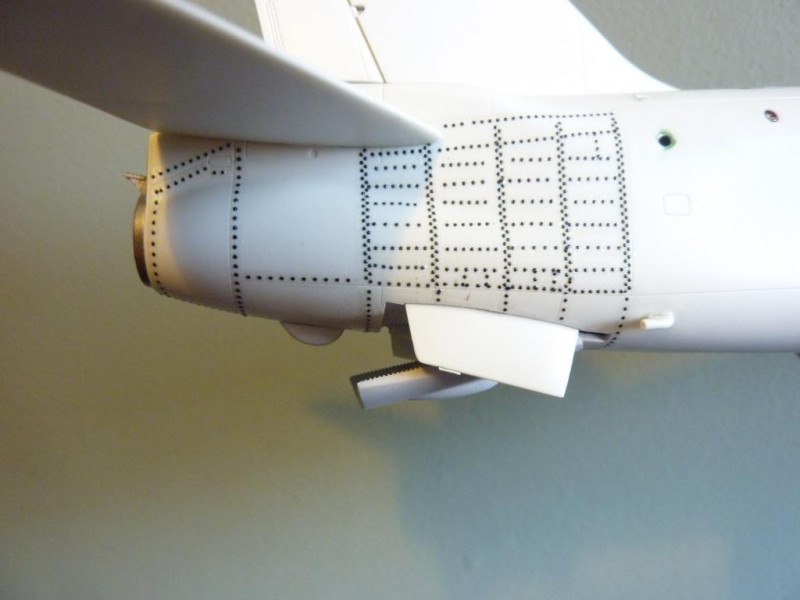
Also included here is a photo from an air show Hawk walkaround, to convey the rivet detail, as the images I originally saw in Air Data are under copyright.
The kit's flaps have now been removed, and the CMK resin parts have been prepared.
Here are a couple of photos of the installed flaps. CMK provided resin actuators, each with a recess in which the flap contact tips are fitted - a nice detail. For some reason though, only two of the three on each side fitted correctly, and the errant actuator was in the same location each side. I had to use a little plastic stock to build these to a better base height. Not perfect, but the effect is worthwhile, and working with a 4x optivisor lens tends to make small errors appear worse than they are; I think they're fine.
It can also be seen that with the flaps in place the ailerons have been fitted.
The Hawk looking suitably hawkish. The main wing has now been mated to the fuselage, with only a little minor adjustment. Where the kit's flaps were removed there was a small trangular-shaped gap either side in those areas, but only a little repair, and the wingroots themselves had only a very small gap to correct.
Here are a couple of shots of the kit's pitot, set next to the Master version, and then with the latter installed.
The undercarraige is complete, the photos here taken before adding the part-door sections. I've added a little hydraulic detail.
If you've looked at the detail work that's gone into this build so far, you'll appreciate the number of hours I've put into it. I painted the model with Humbrol Gloss Black (two coats) and let it dry two days before applying decals. A few of the decals showed small bits of carrier film when in place, and so today I sprayed it with a rattle can of Humbrol ACRYLIC Gloss Varnish that I'd bought recently, and after a couple of passes, this is what happened! Methinks the acrylic varnish has a 'hot' propellant; nothing else would craze enamel paint this way, as acrylics are supposed to be 'solvent neutral'. Sadly, there's too much detailed work to strip all the paint and start over.
I've used Revell rattle cans of varnish for various things without any problems, and only used the Humbrol product because the supplier was out of Revell stock, so I've emailed Humbrol to see what they say is in the product that would produce such a result.
At least I had the satisfaction of seeing the additional detailing under paint, and everything looked fine.
End of build...