VW Pick Up, Tamiya / CMK 1/48 FINISHED!

Started by Erik Gjørup · 65 · 1 year ago · 1/48, airbum, beetle, CMK, conversion, halfworks, quarterscale, Tamiya, Type 82E, VW
  • Profile Photo
    Erik Gjørup said 3 years, 3 months ago:

    An unfortunate smelting accident . . .

    While building the VW Type 82E I was stupid enough to damage the body of it

    I had some problems with my paint, and had decided to remove the paint. Sadly I used a lot of thinner and did not stop it etching away. It dried up in a very wrinkled fashion. I then successfully removed the paint with IPA (alcohol)


    It was not at all a pretty sight.

    Well, I sourced another body from the stack, removed the wood-burner equipment and used the majority of the hatch for the new body.


    That left me with a crippled body that looked like it was ready to throw away.

    But then I realized that I might be able to fill and sand it smooth, and use it in another build I had planned

    • namely a Pick-up truck based on a Type 82E. Could just work – and half the body has to be sawn off anyway, saving me a lot of filling and sanding.

    next up the body will have been cut in half – stay tuned!

  • Profile Photo
    Spiros Pendedekas said 3 years, 3 months ago:

    We modelers do not throw anything away...
    Really great concept, my friend @airbum!
    Strapped in for this, too!

  • Profile Photo
    Eric Berg said 3 years, 3 months ago:

    Great idea! I will be watching as well.

  • Profile Photo
    Erik Gjørup said 3 years, 3 months ago:

    Thank you my friends. I did think of an Ambulance or a Reichspost car, but they both keep a lot more of the original kit, so a Pick Up it was. I had started to work on it last night, but a total powerfailure prevented any picture upload (and light to build anything useful) I have a few days off later and progress will continue as this seems like a very easy conversion.
    Welcome aboard this hopefully short and swift journey.

  • Profile Photo
    Erik Gjørup said 3 years, 3 months ago:

    Spiros (@fiveten) and Eric (@eb801), another short update in a minute.

  • Profile Photo
    Erik Gjørup said 3 years, 3 months ago:

    HalfWorks fashioned VW

    The VW was cut in half

    And soon after it had lost its rear half, the Pick Up moved into position


    OK, it was just to check the fit, and not a lot of work is needed to make it fit. Some adjusting will be needed to the transition area, and sadly as it is resin, LqS cannot be used.

    I got the front sanded down, and made a testfit on the original lower part just to check that I had not gotten it all out of “square”


    Looks like it will be smooth sailing – there will need to be some material removed but that should not be too hard to get done.

    next up some work on the frame I think. Stay tuned and do feel free to comment.

  • Profile Photo
    Eric Berg said 3 years, 3 months ago:

    Does indeed look like smooth sailing from here on out! What a great “save”.

  • Profile Photo
    Spiros Pendedekas said 3 years, 3 months ago:

    Looking great indeed, my friend @airbum!

  • Profile Photo
    Erik Gjørup said 3 years, 3 months ago:

    Thank you gents - weather has changed with higher temperatures, so it will be possible to work in the airbrushshop soon, AND I will be off duty for a few days! Stay tuned 🙂

  • Profile Photo
    Erik Gjørup said 3 years, 3 months ago:

    Fitting the plastic to the resin

    I have spent some time cutting, filing and sanding away

    Aint’ it nice to rough-fit the parts, then pondering over the progress with a nice cuppa’


    Oh well, drink the coffee and get on with it.

    After a relatively short time where I started with some cutting, then some filing and rough sanding I dry fitted the thing.


    There seems to be a rather large gap from the outside of the plastic to the outside of the resin that needs filing (check the picture of their 1/35 kit in the first picture)

    I think I am reasonably close to final fitting


    With the exception og the transition of the sidepanels from plastic to resin. Perhaps some card superglued and some filler?

    next up might be the interior or the fillet. Stay tuned and feel free to leave a comment

  • Profile Photo
    Erik Gjørup said 3 years, 3 months ago:

    Wall!

    As the casting of the resin left a thick wall, I sawed that off

    I started by trying to sand it down on some very rough paper in water. That did take incredibly long time, and out came the resin-saw


    I succeded in sawing without snapping the entire wall off, but nonetheless did saw through it. Not that big a problem as I had planned to make a new rearcabin wall in the car anyway.

    With the card superglued in place it will also give me the opportunity to use contacta and, if needed, LqS on the front end of the wall.


    The rear part will have to be built up by superglued card and filler to make the transition look right.

    I also did install the two-part luggage hatch (the front one on a VW you know)


    It was “parked” upside down for the LqS to move towards the top where it is needed.

    It is a great change to make a 1/48 vehicle now and then inbetween the planes I usually build – and I will have some cars etc to park along my planes that are usually 1/48 too

  • Profile Photo
    Erik Gjørup said 3 years, 3 months ago:

    Interior basics

    More LqS to the crack in the hatch and some work on the IP and interior

    The bits and pieces that got some attention


    The figure is only used to “measure” the interior – I do not think he is going to be included in the build, but you never know.

    To start with second and third (and final?) layer of LqS has been added to the front


    I think the rest will be taken care of by paintfiller or perhaps a touch of thinned filler.

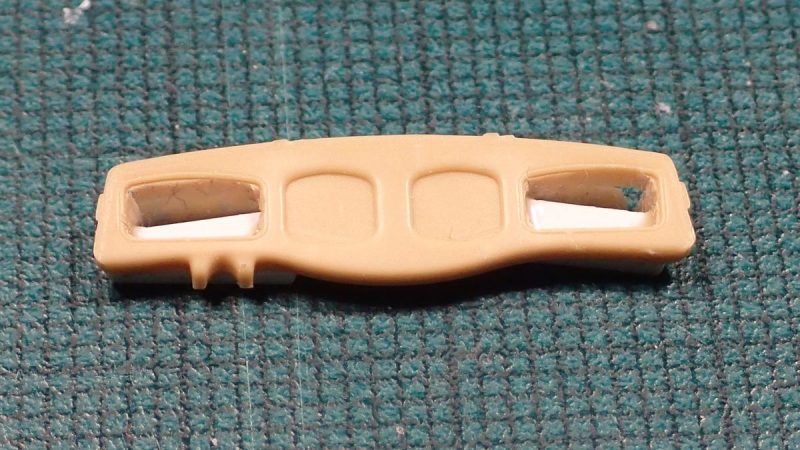
    The instrument panel on these were rather basic, with speedometer in the center, the other center blanked off, and an open glove compartment in each side.


    I drilled out the openings, added evergreen, drilled and carved again and then an endplate. It will be smoothened by some extra thin glue/thinner later on when the Contacta has set.

    The front end is very open and a huge support for the steering column is intruding.


    I removed some material and has started to build a more realistic footwell in card. (I am thinking of one or two open windows and that will give an unobstructed view of the interior)

    next up – well, I do not have a clue. It seems like “automotive” is not agroup that catches people, so perhaps just the finished car? Should you by accident have passed by, do feel free to leave a comment

  • Profile Photo
    James B Robinson said 3 years, 3 months ago:

    Erik @airbum, please do keep posting your progress as time permits. Having attempted a few surgeries on 1/48th vehicles in the past, I understand the patience required. Lot's of work required before any semblance of intended results develop. This is looking very promising!

  • Profile Photo
    Spiros Pendedekas said 3 years, 3 months ago:

    It seems strange, but your three updates were "visible" to me just now, my friend @airbum! I cannot understand why they were not visible before... I cannot say how popular the "automotive" thread is, but I am very interested in it. In fact, it is a nice course variation from our usual aviation area. I have a Tamiya 1/24 New Beetle to build and will enter this GB here at first chance.

    Your progress is amazing: I just love all those improvisations you put into your build.

    This Beetle minitruck is a gem already!

    Oh yes! LqS is here!

    P.S. Love your coffee companion: I have the same "arrangements", only I use the "Greek" coffee equivalent...

  • Profile Photo
    Erik Gjørup said 3 years, 2 months ago:

    OK my friends - another update in a minute.

    James (@jamesb), thank you for the encouragement. Actually the finetuning has turned out to be relaxing.

    Spiros (@fiveten), with the recent surgery to the site, it seems like the mails are flowing freely again and that is making things flow a lot faster. I shall be looking forward to the space on the PFP workbench makes some automotive build possible. The coffee was just there for the pictures - I do retreat to the armchair ever so often to have a sip and a read inbetween sessions.