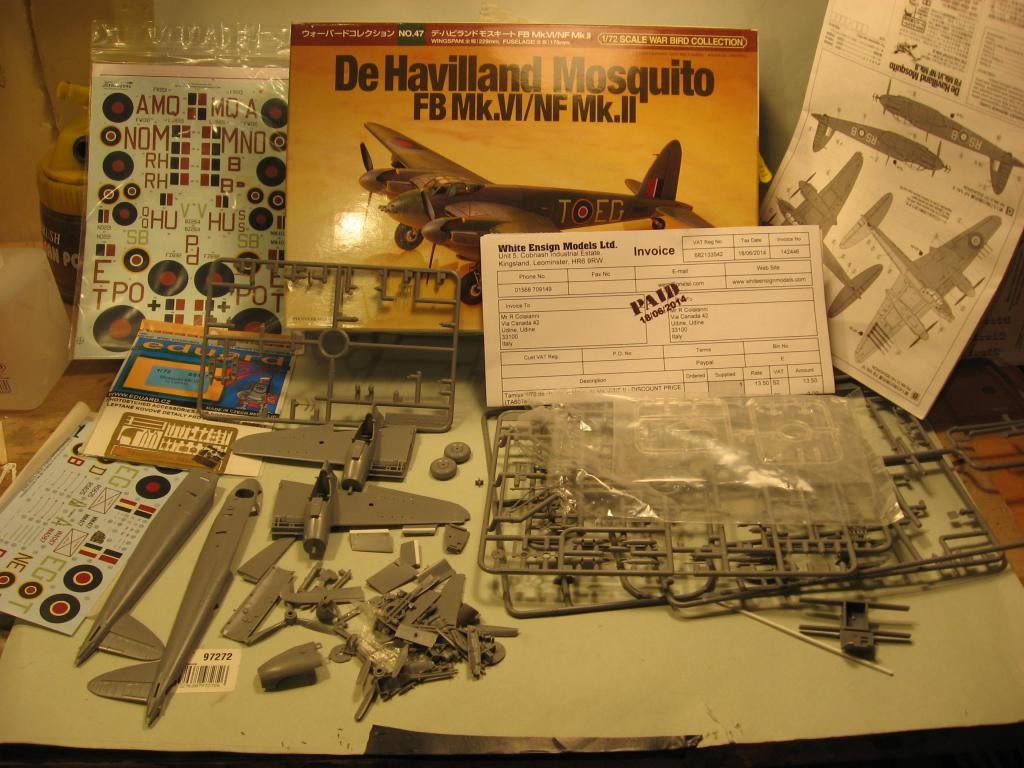
Mosquito Mk XVIII and VI. Tamiya 1/72 Scale.
This project came to life almost by chance, started in autum 2014, when my friend Pierluigi's brother, has decided to commission me a Mosquito 1/72, as a gift for his birthday. Mosquito Tamiya Mk. VI fighter with hard nose and Eduard PE set, was an immediate choice.
Shopping list was not that long:
.-Mosquito Mk. VI Tamiya
.-Interior PE set Eduard.
.-Decal Sheet extra decal
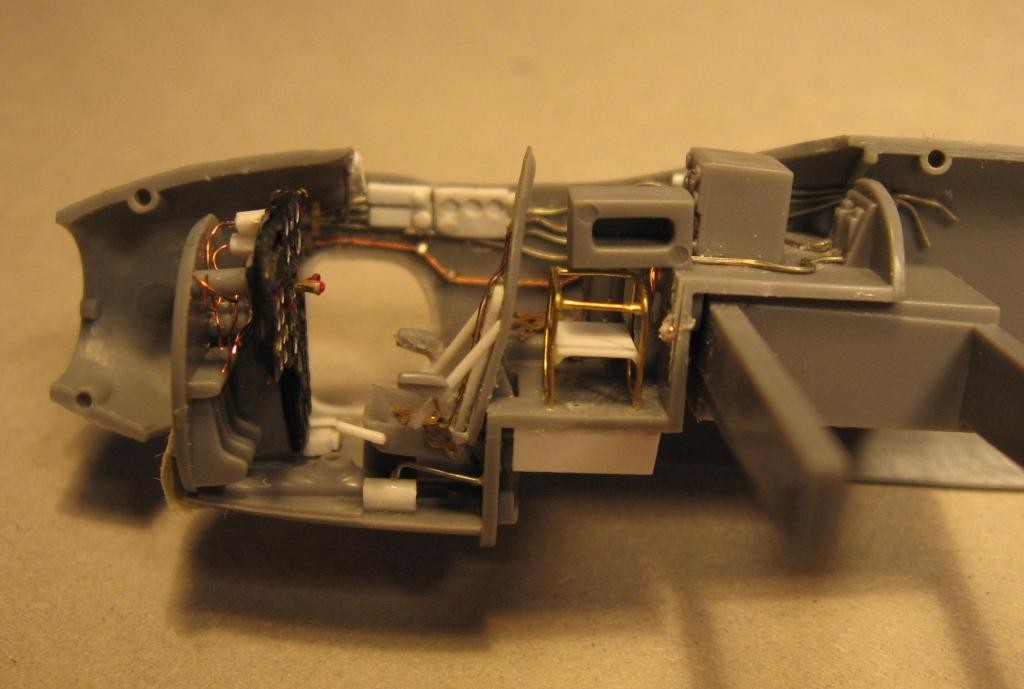
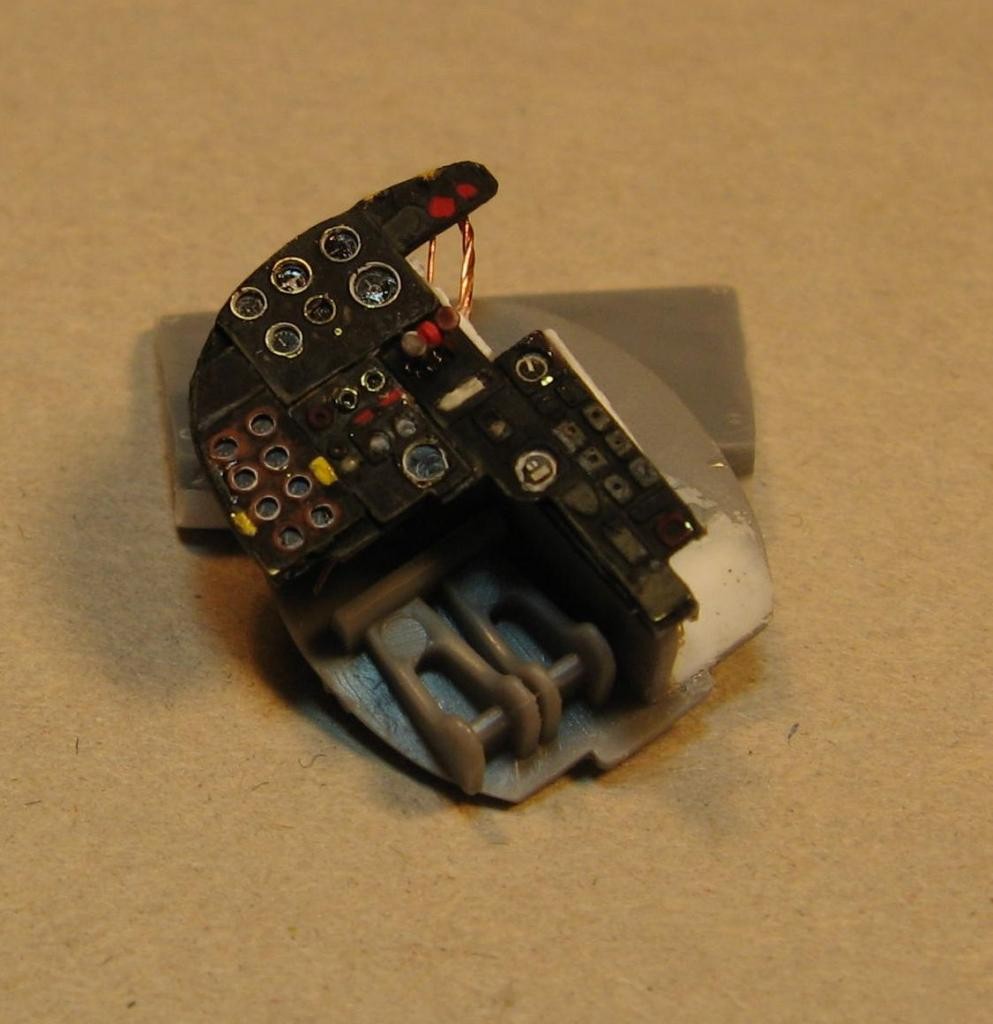
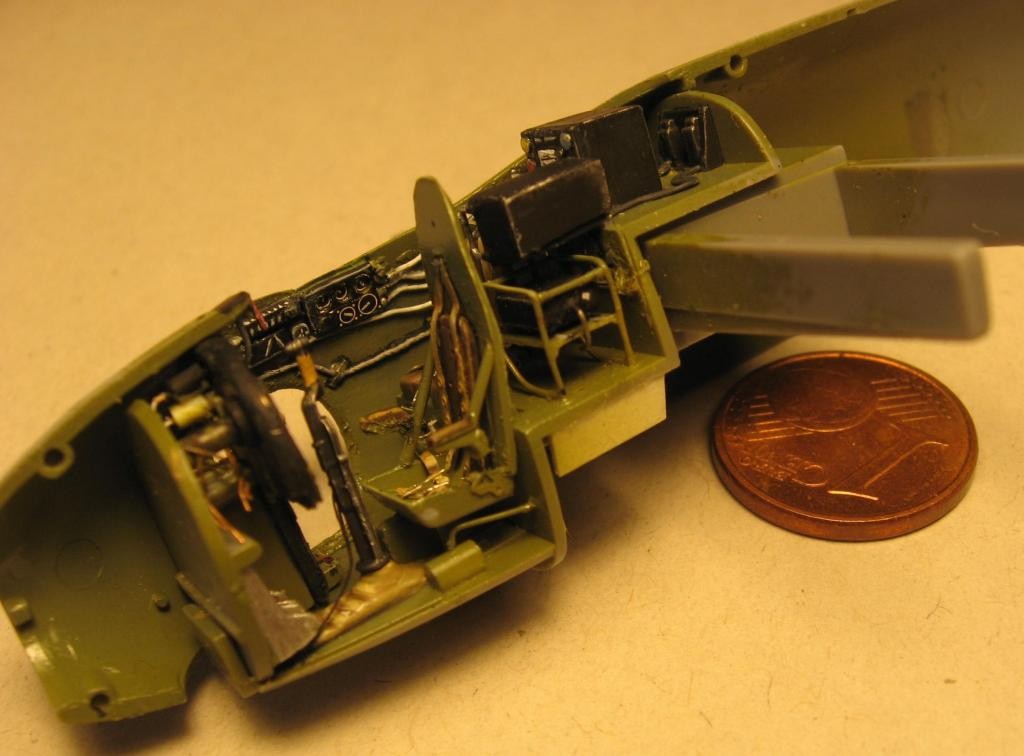
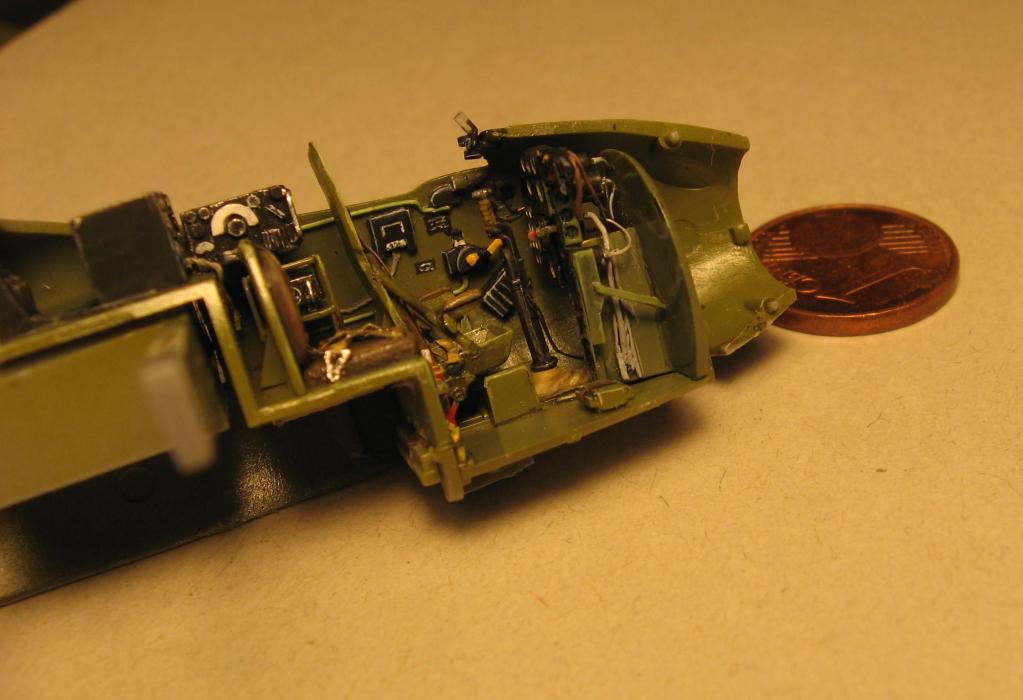
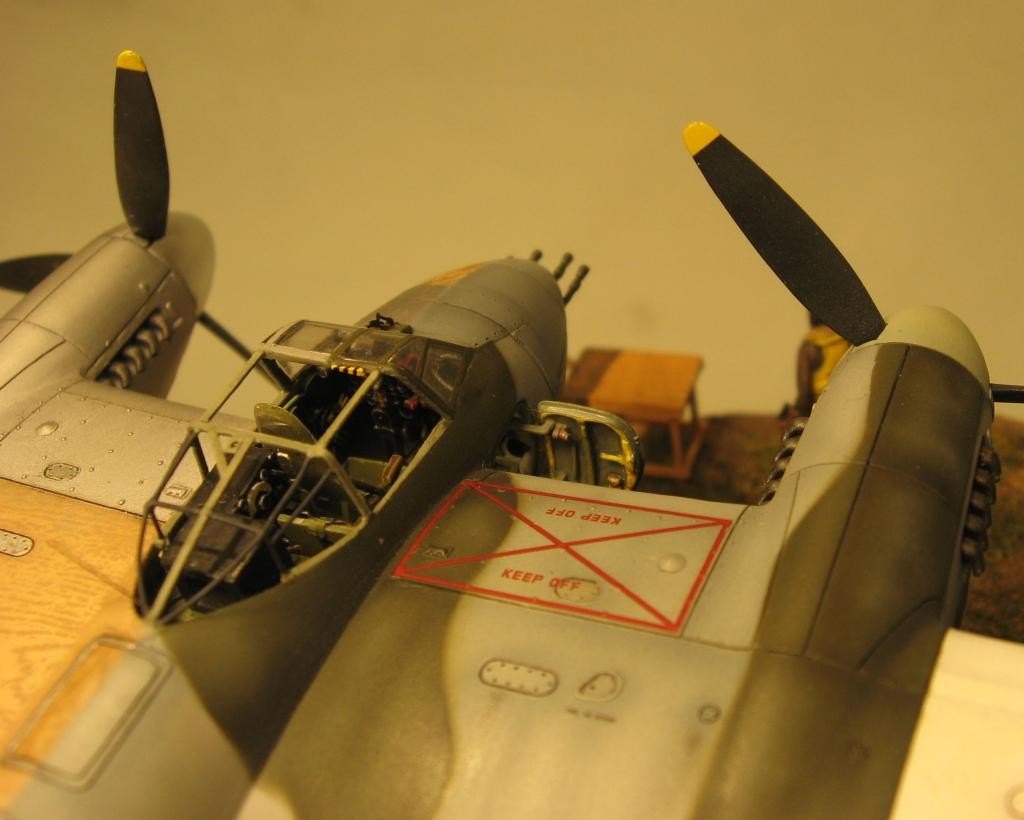
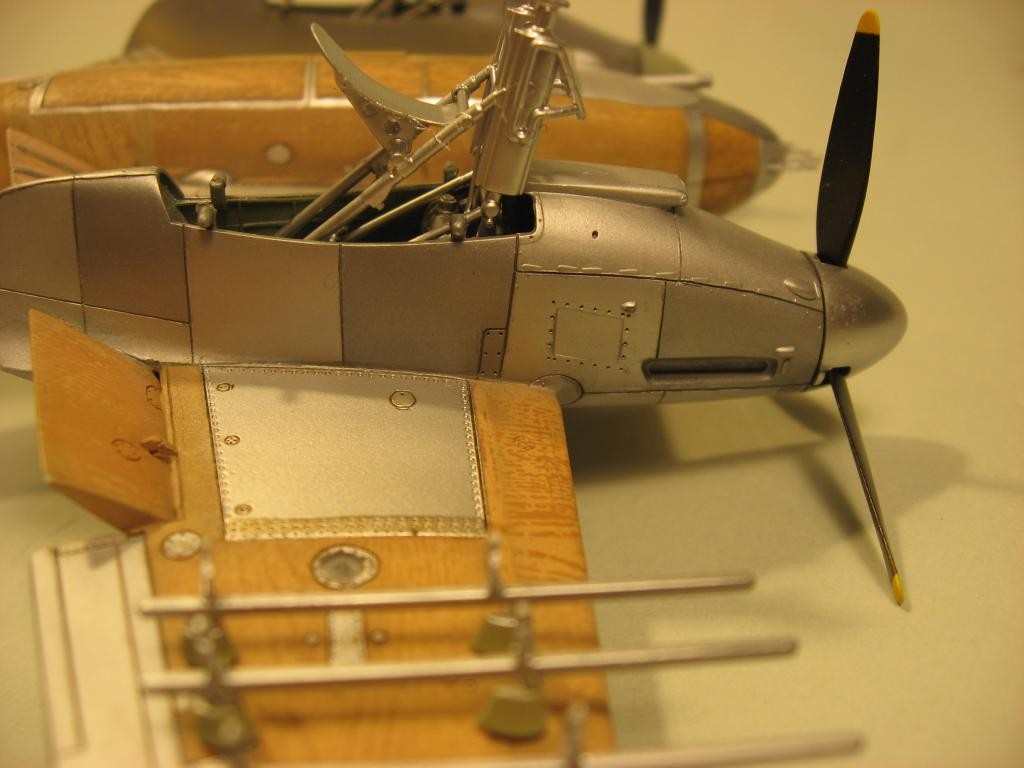
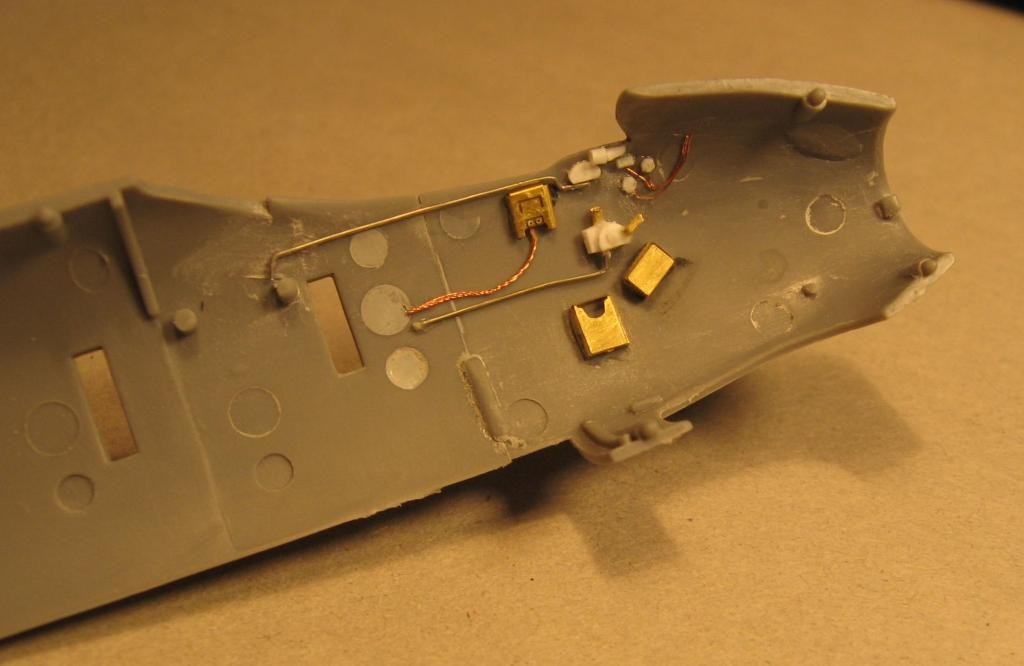
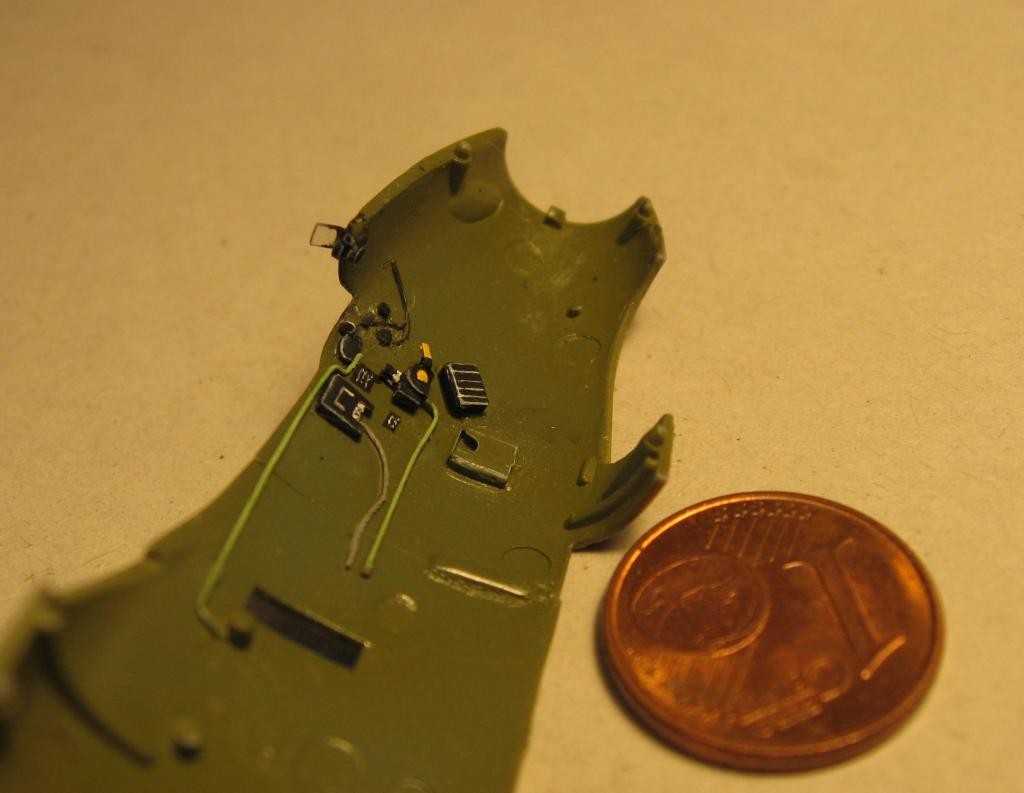
As usual I started from the cockpit, enhanced by the Eduard’s set and scratch build detail, the photos speak for themselves.
Fill the cockpit for good, even with some approximation or off-scale, greatly enhances the realism.
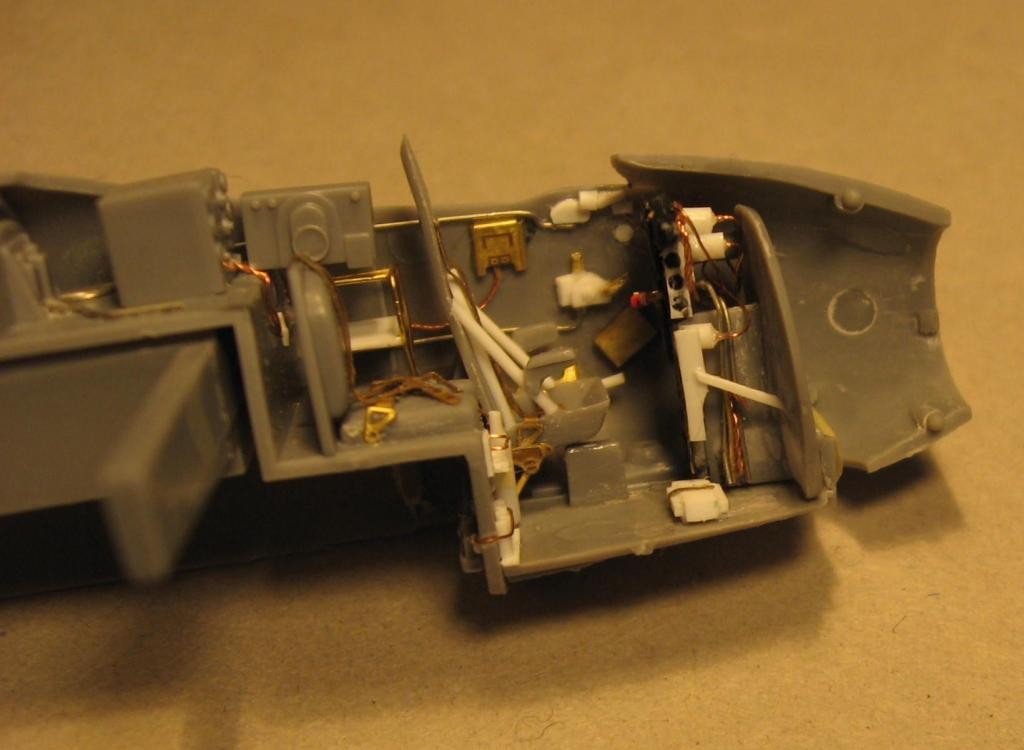
The pedals are truly horrendous, but considering the scale and their position, virtually invisible with the fuselage assembled, I decide to leave them in place.
I opened I the crew access door, by means of a needle used as a scriber, rebuilding the fuselage internal door frame in evergreen 0,5x025, and the rest of the detail in scratch.
Cockpit has been airbrushed with the base color ( Gunze ), all detail brushed on with Valleio.
A high-contrast color, even at the expense of realism, will allows you to see something, in this small scale, once the model will be finished. If you look carefully, you will notice that all the interior details edges painted in interior green, have been lightened with yellow Valleio, the various black boxes have undergone the same treatment with a light gray. While, the white wires on the sides of the fuselage, were highlighted with black, on their side.
Some instruments, not present in the Eduard PE sheet, have been made, cutting them from the original decal sheet, with the punch and die.
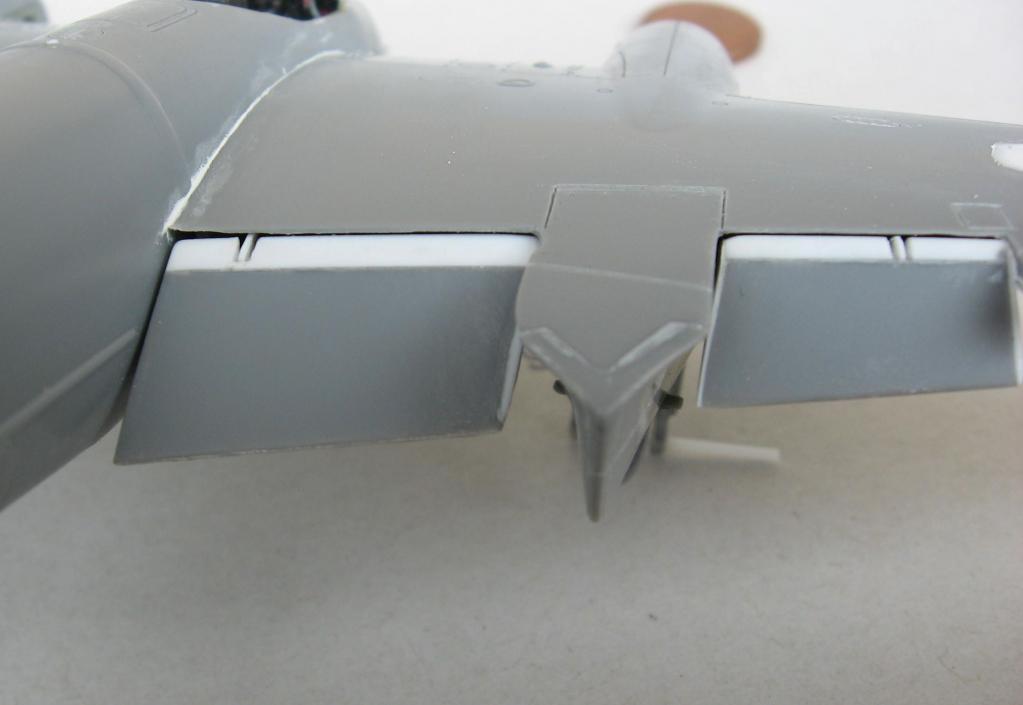
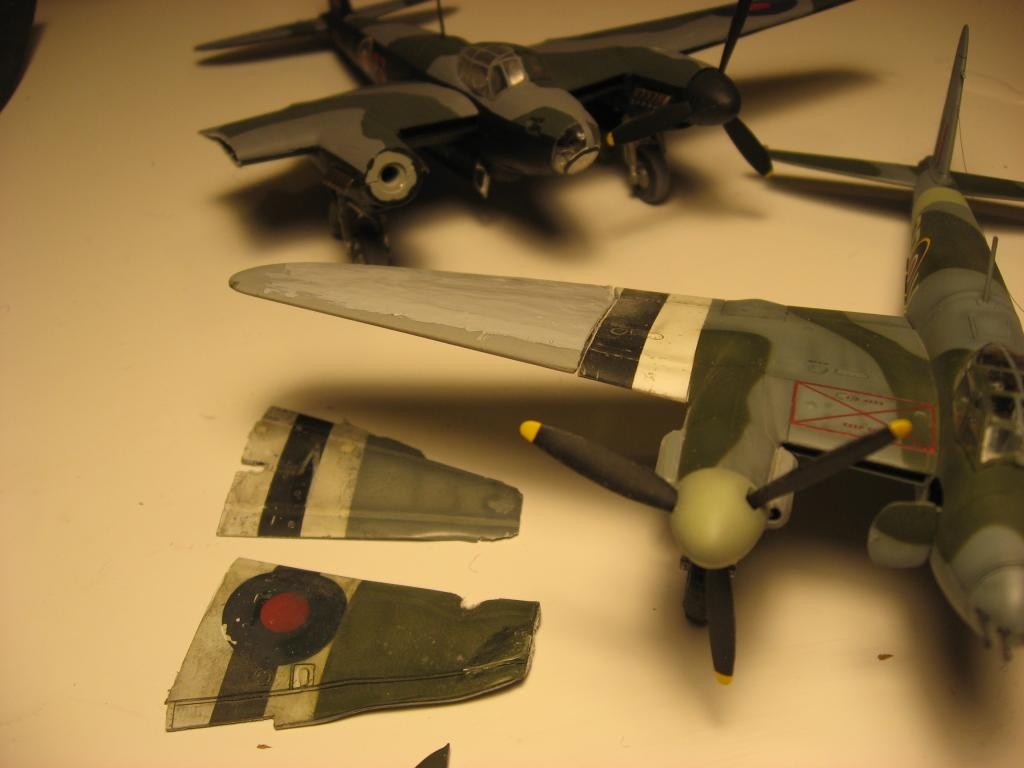
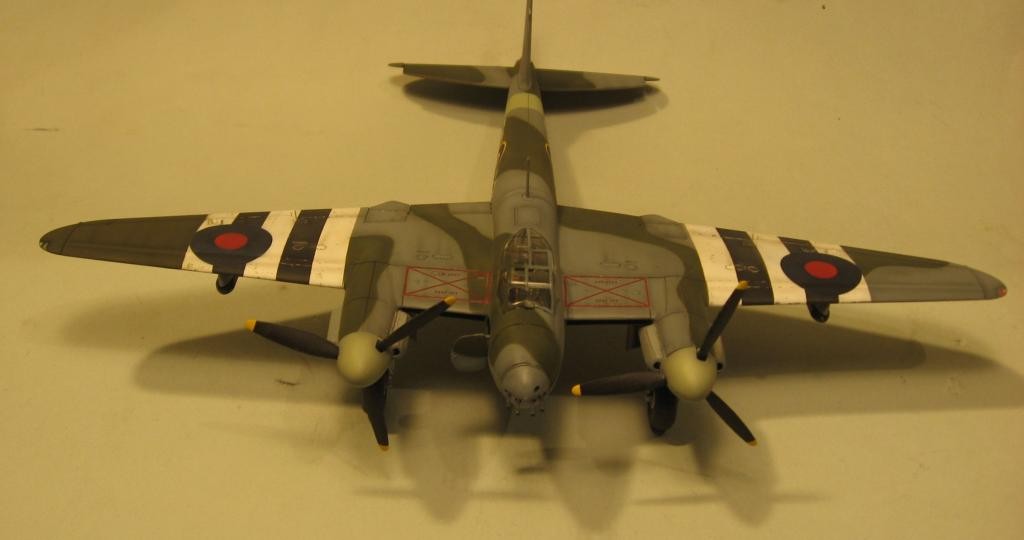
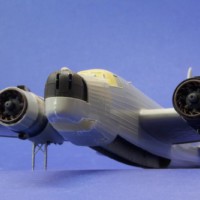
Assembly of the main parts as fuselage valves, wings and engine nacelles was easy an trouble free. The model does not require major modification, I decide to cut the flap and elevator to be repositioned in the lowered position, bad idea, only after the modification was completed, I realize that, in most photo, Mosquitoes has got no lowered flap on the ground.
Inevitable sacrifice to the floor’s monster, this time he eat a mud fender.
Please note the appropriate whethering of the 1cent coin.

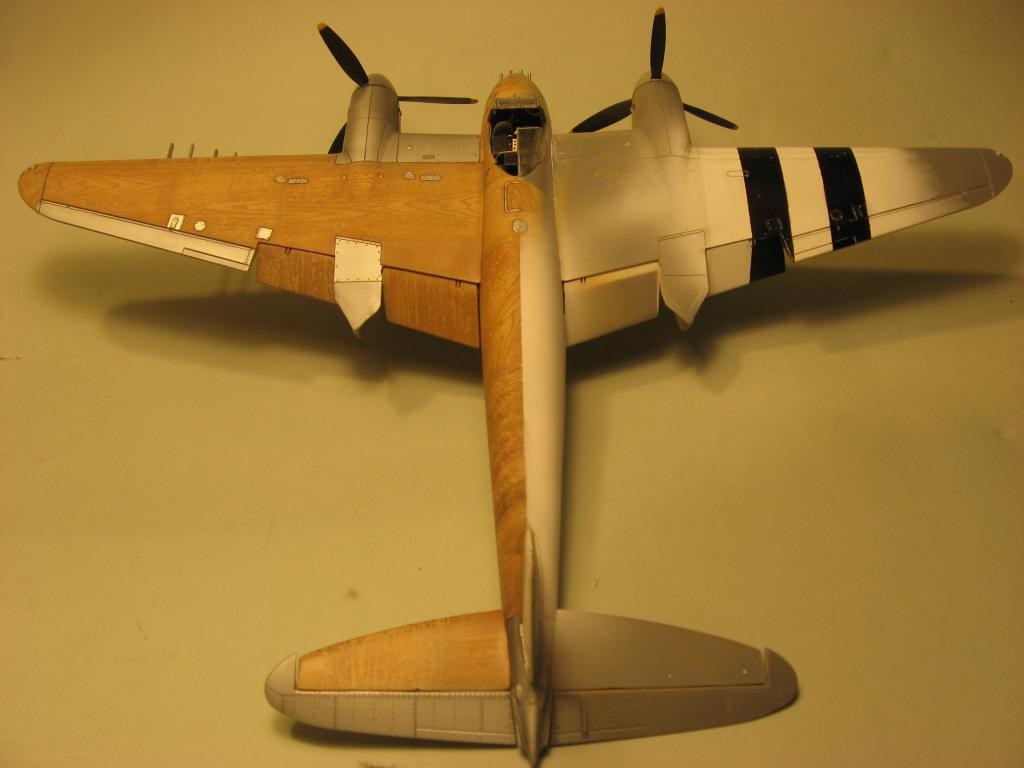
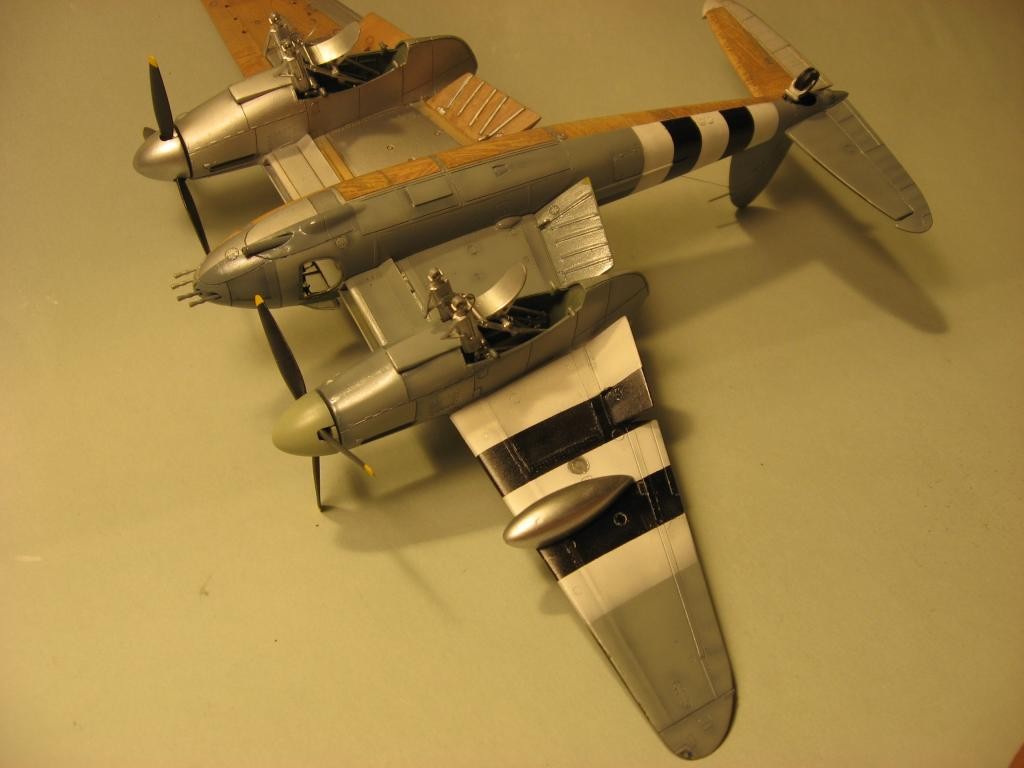
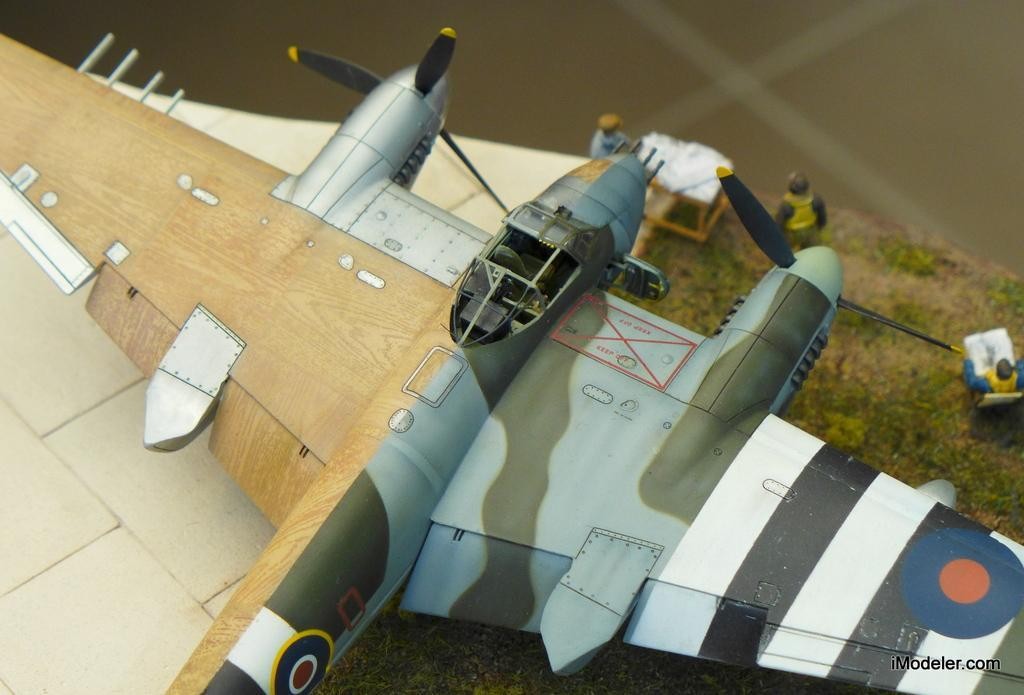
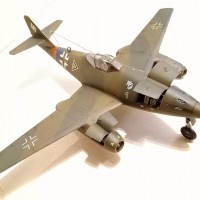
Just to make something a little different, I decide to convert the original Mk.VI into Mk XVIII, the intended anti-submarine version, armed with a Quick-firing 57 mm gun. Less than 30 Mk.XVIII were built, modifying as many MK VI, directly on the assembly line. More or less what I have done, it may be possible that the Guys in De Haviland copied my idea!
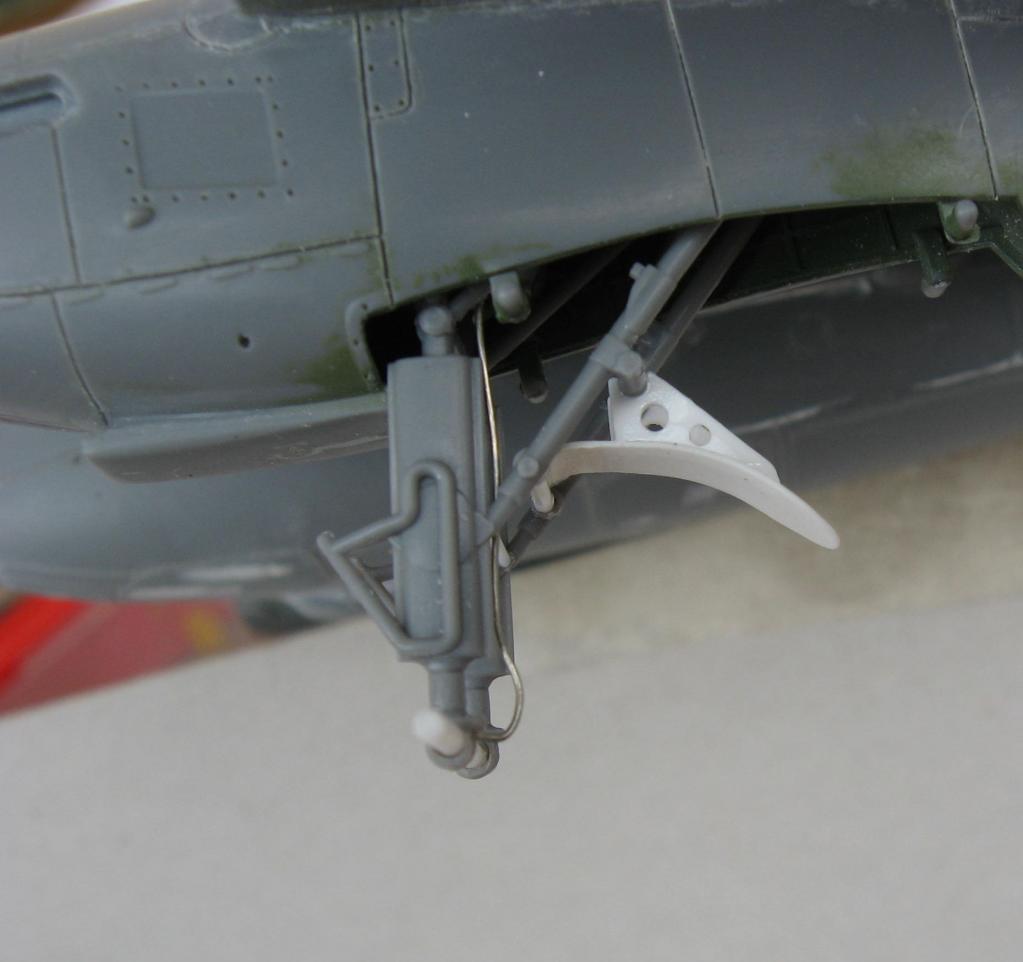
The changes are not too many: the barrel of the gun has been made using copper tube, the bulge of the breach by a piece of Evergreen, reinforcement panels on the sides of the fuselage by adhesive aluminum tape , few panels has been re-engraved and reinforcements on inner flap’s lower surface, again made with Evergreen strip. Rescribing panels under the nose was ea thedious job, thin styrene obliged me to fill holes several time with superglue.
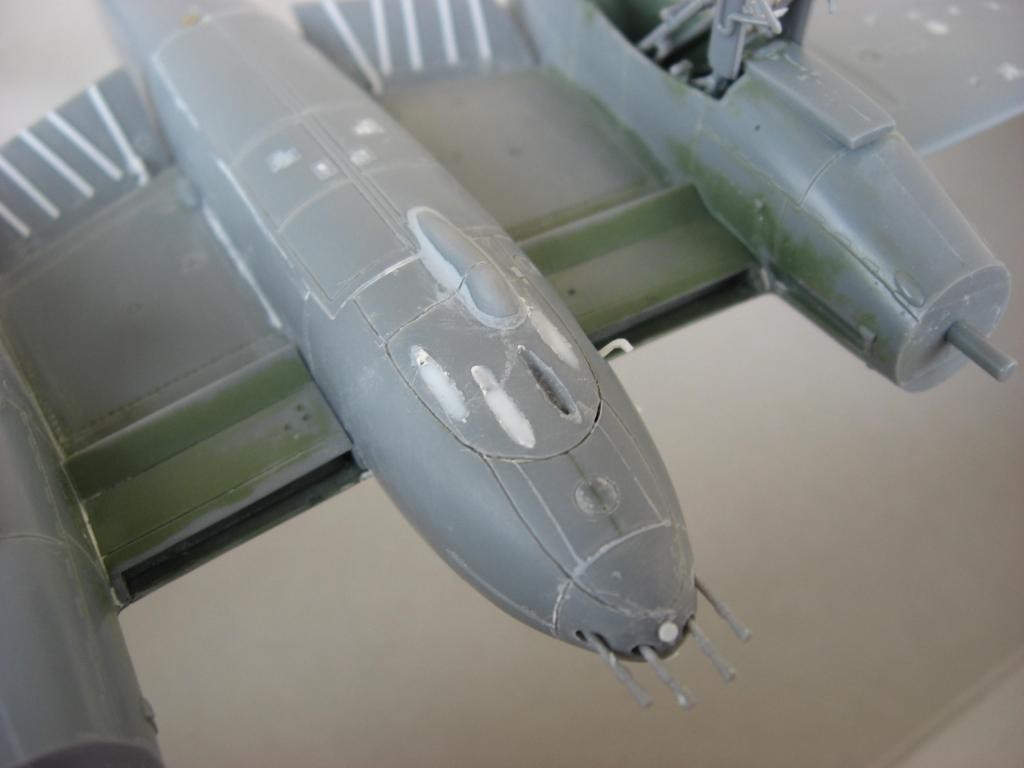
The rocket retaining ring has been made rolling an Evergreen strip around a drill. To cut them all same length, I scratch build a jig. It would have been better to use some parts from old PE sheet, to obtain thinner rings, but it was summer, I was for vacation at the see, and I brought only a reduced modelling set.
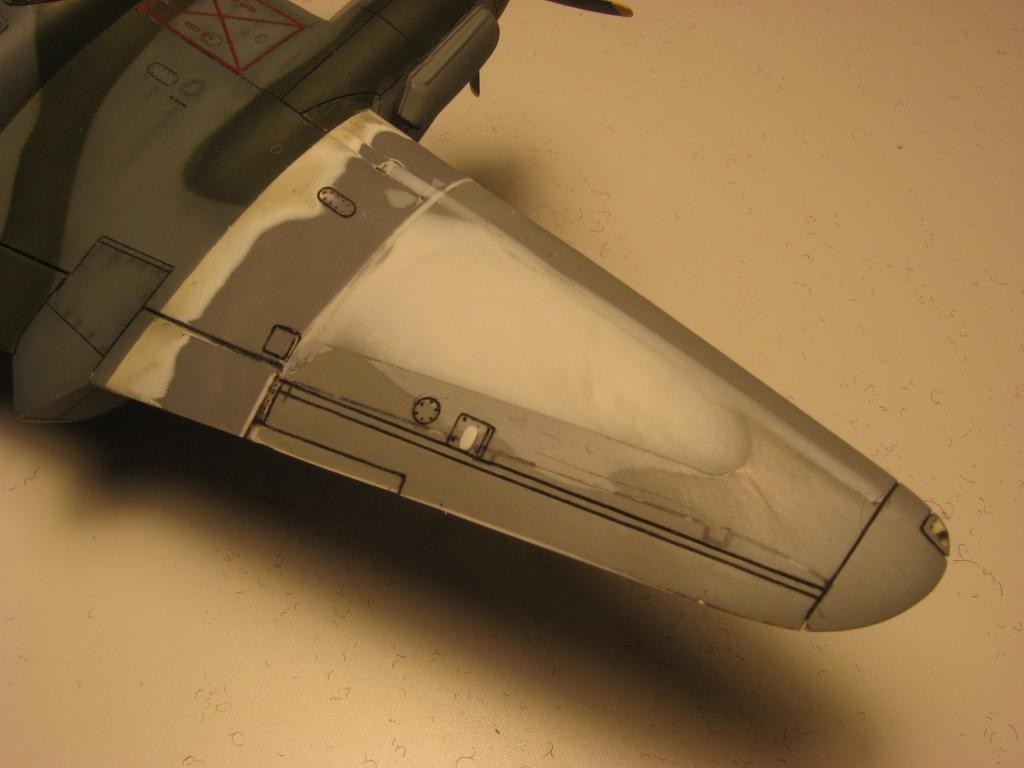
Not to lose the job done on the interiors, I decide to eliminate most of the canopy, rebuilding the frames only.
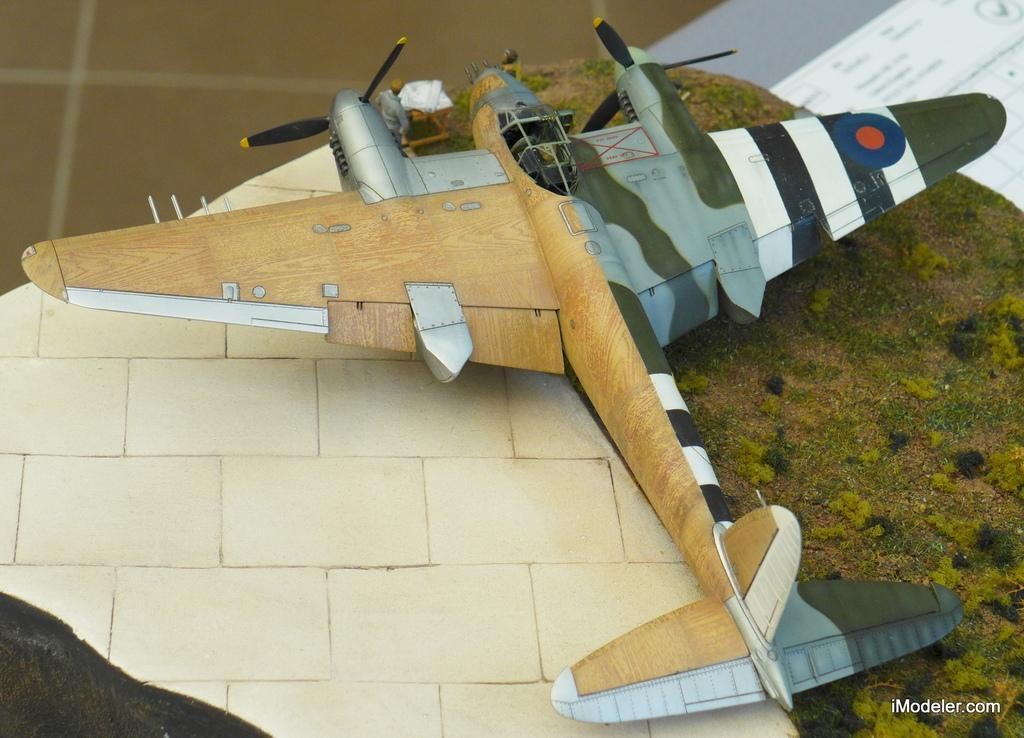
The real turning point in the project occurred when, surfing the net, I saw a 1:48 Mosquito, made by Julio Fuente Diaz, I suppose a Spanish modeler, half regularly painted, half-colored natural wood! I could not resist, I decided to run the risk of disappoint the customer, but I had to do that.
I immediately ordered the PE RB Production masks, there are available two different textures, I bought them both.
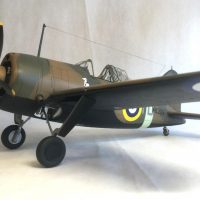
The "natural wood and metal" side, has been painted first. I thought, it would have been better to end the difficult one first, see the result, and then to proceed with the more conventional camouflage. In case of disaster, always possible, trying new technique, it would have been possible to revert to a more conventional project, removing the Tamiya wood color with alcohol.
To tell the truth, the orientation and the number of wood panels, in particular those of the wings and the nose, it does not reflect the real ones, but just Tamiya interpretation. Also the fuselage, before being joined to the wings, was coated with a waterproofing fabric, painted with a protective aluminum color. Therefore, this model has to be consider a mere painting exercise, more than an accurate reproduction of the real thing.
The photoetched masks are a bit hard to use on this scale, the texture is fragile. Moreover many parts, relatively small, such as the flaps, that could have been easily painted separate, had already been glued in place, forcing to cut the masks to reach all surfaces.
The wooden side has been airbrush with Tamiya acrylics, thinned with Lacquer thinner, slightly differentiating the individual panels, darkening slightly the edges.
Then were masked one by one, and RB mask applied. The wood texture has been paint with slightly darker brown shade.
The work itself, is not particularly difficult, most of the time has been spend to try blends colors that pair well chromatically on a model wreck.
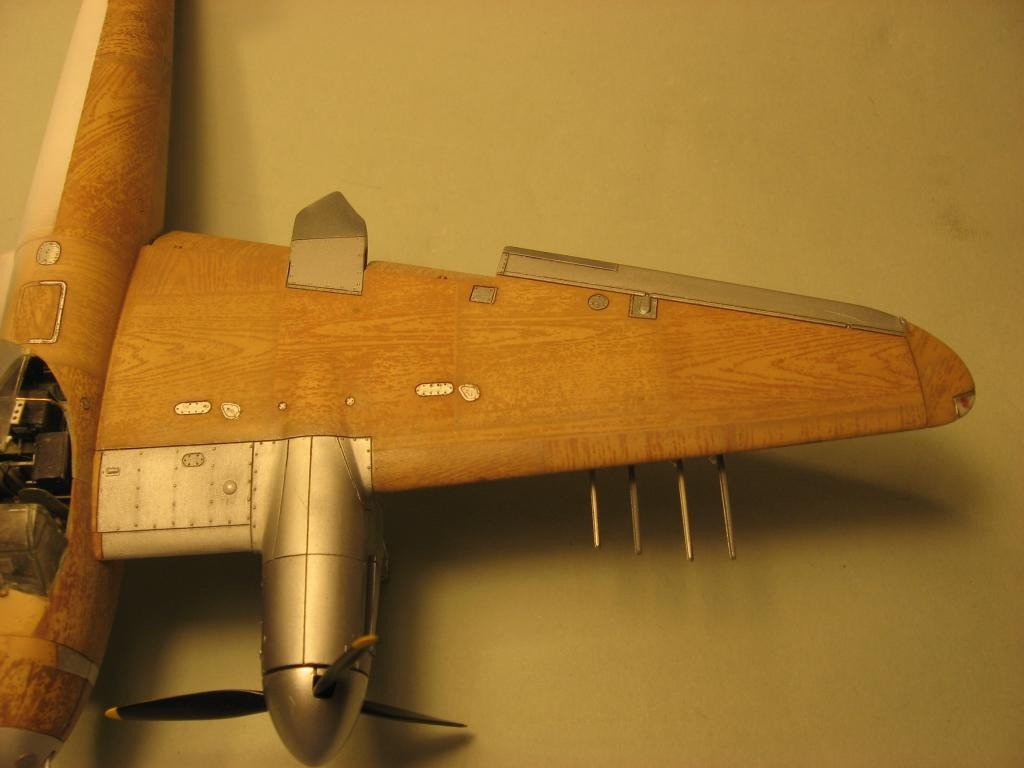
I continued with the metal parts, using different shade of Model Master metallizer, applied directly on the nude plastic. A great suggestion has been found on Model Master Site: masking with wet photocopier paper. The paper perfect adhere due to capillarity to the shiny surfaces, without the needs to be secure with tape. The only care is not to direct the airbrush blow, under the paper edge.
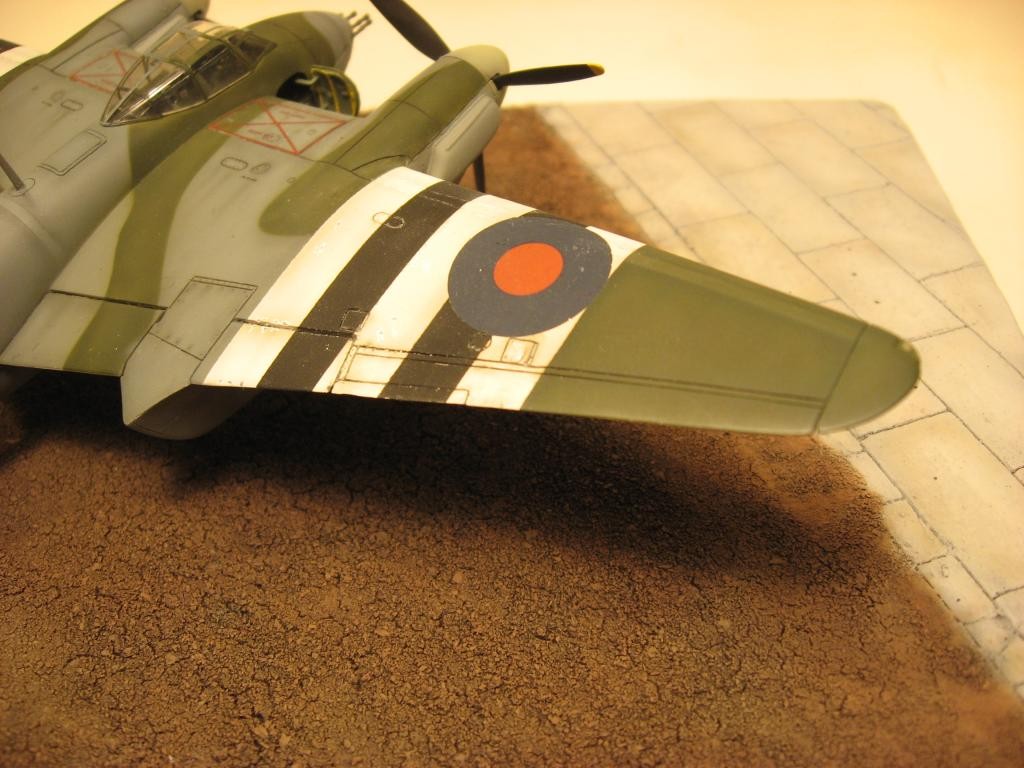
For the camouflaged part, I proceed in a more conventional manner, masking has been made with the old, but always good method, of the Blue Tak ( or Patafix ) rolls and Tamiya masking tape,
Invasion stripe first.
Camouflage after.

Tamiya gloss cote, decals, again gloss cote, matt finish ….. mission accomplished, I thought.
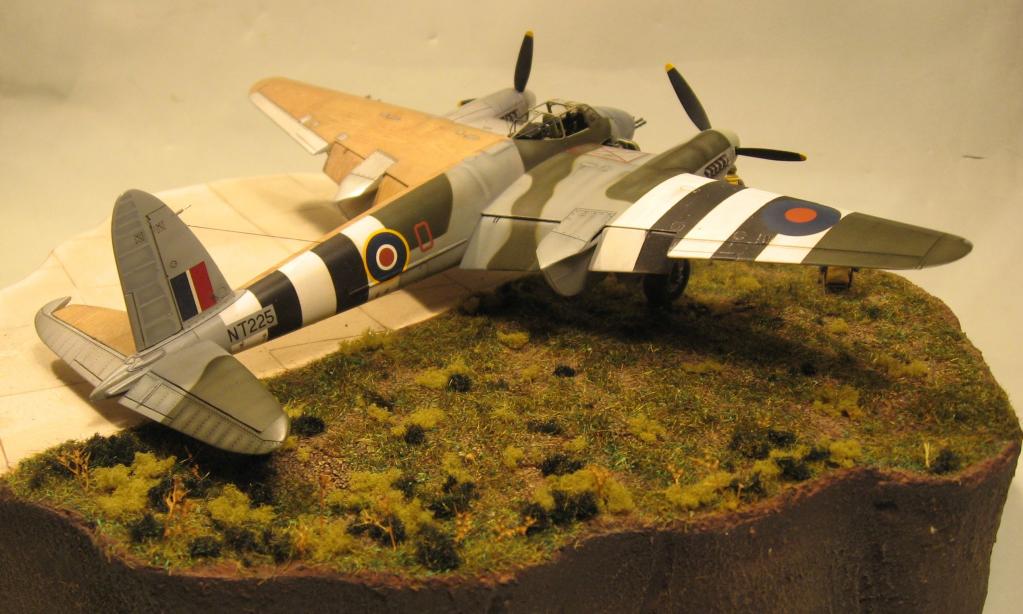
In the end, however, Mission failed! The customer politely reject the subject, nice, but too unconventional for his taste, and not suited to join the other subject of his collection.
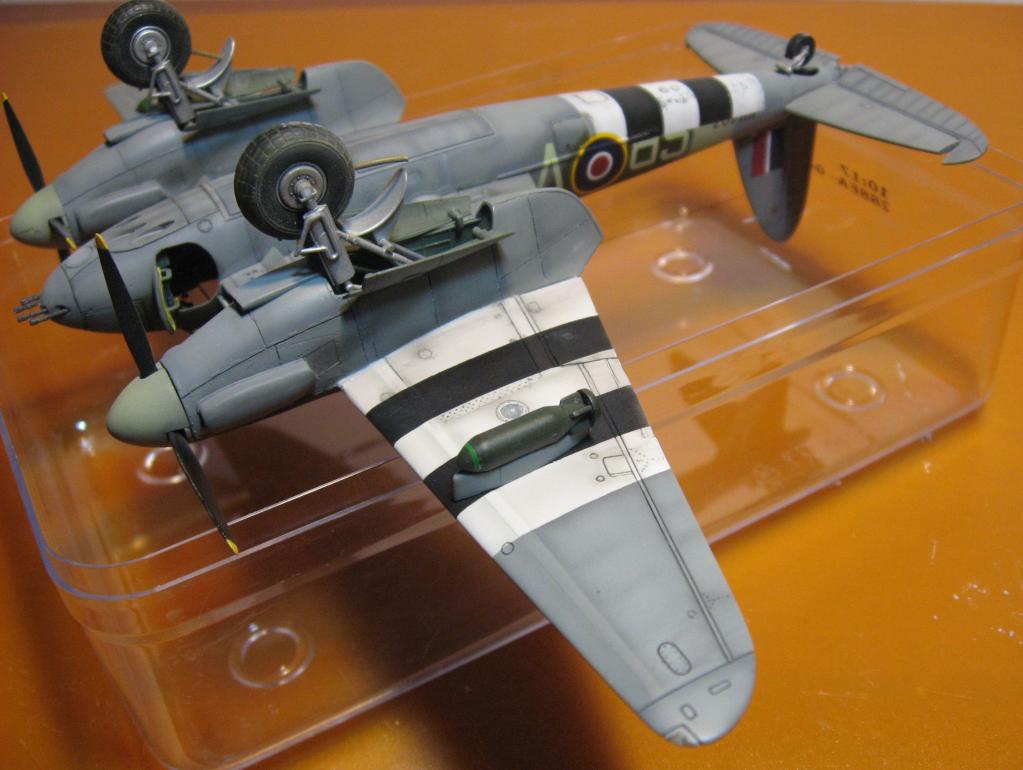
To tell the truth, I wasn’t too disappointed, and the idea to keep it for myself, even if this involved the commissioning of a second Mosquito, this time a classic fighter-bomber MK VI, with a conventional finish.
Same shopping list, same interior detailing, almost finished in just over a month, despite a major incident. After I correct a minor painting scratch on the right wing, to shorten the color’s drying time, I approached the model to the halogen lamp that illuminates the lab. Let's see if you can guess how the styrene of the wing, reacted to the warmth of the lamp?
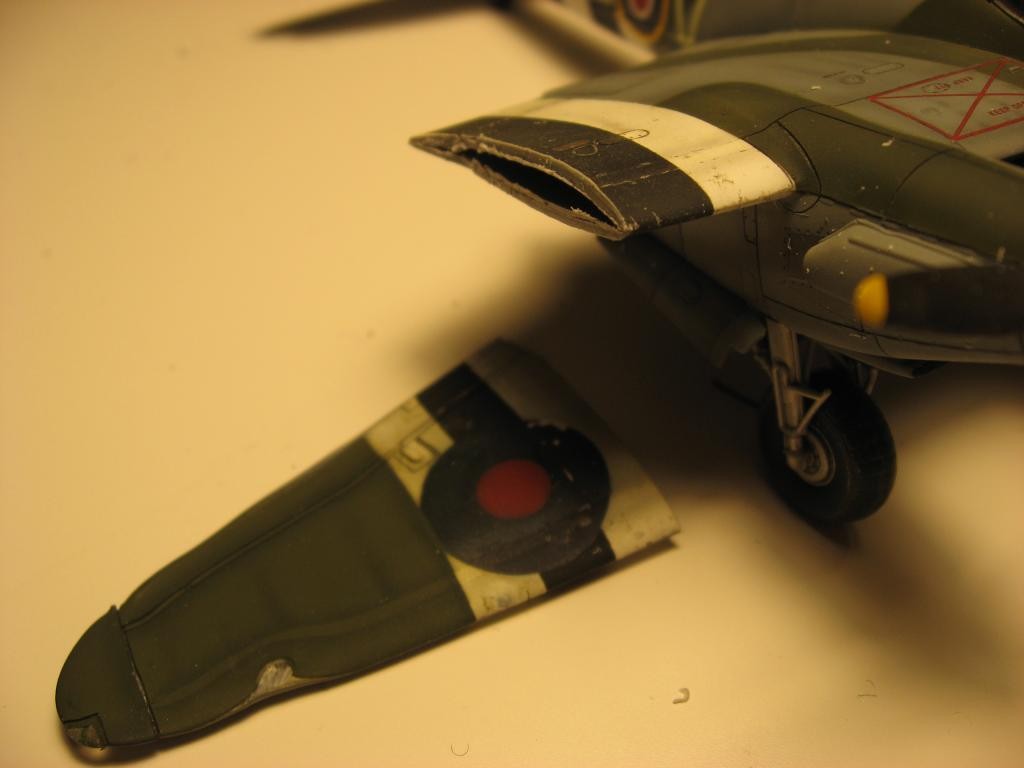
It was hard not to follow the instinct to launch the small Mosquito against my garage wall. At his point I had two choice: to start a third ones, really boring to to so, or improvise Dr. Barnard? Believe me or not, I decide to carry out the transplant, of the wing. The donor was an old Airfix, kindly donated by a colleague.
Shape was perfectly matching the burned wing, thickness has to be slightly increased by some Evergreen sheets and Gunze Mr. Surfacer. All panel and aileron has been re-scribed.
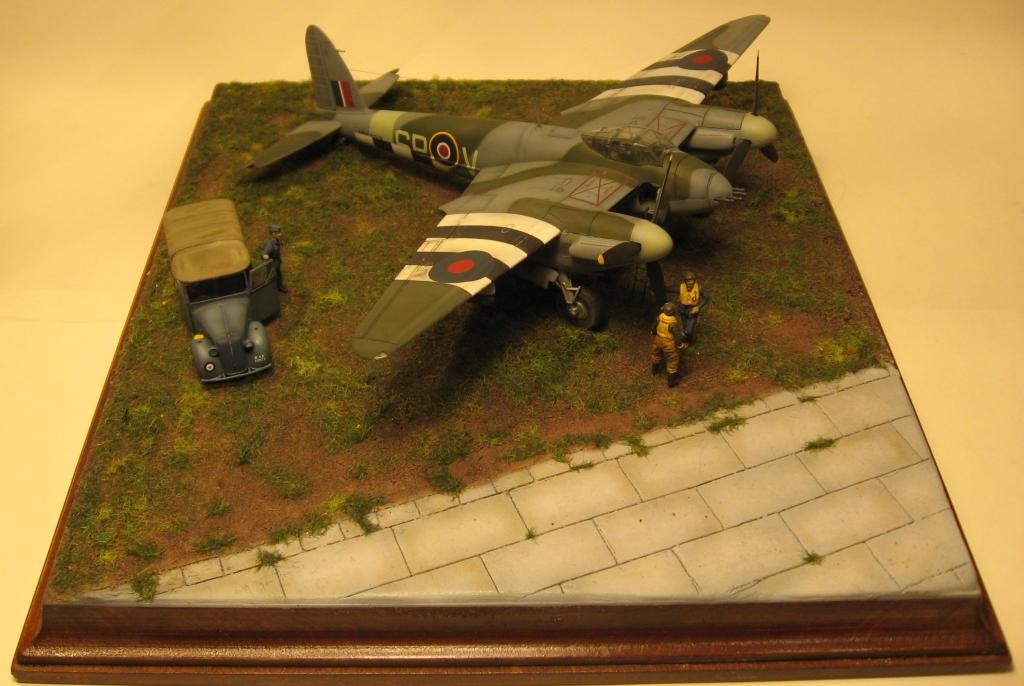
Sigh of relief and completion of work, model maker and the buyer, both satisfied.

Lesson learned: heat melt styrene, in case somebody did not believe that, I prove it!
Please thanks myself for my contribute to scientific community knowledge 🙂
Thanks for watching, good night iModeler!
Roberto.


Turned out to be quite the project, huh...? BUT...the "project" DID turn out well indeed...all of them. Can't understand why your 'client' didn't like the wood grain version...I certainly would have thought it a great addition to MY collection! Beautiful work (as always), Roberto. Glad you're an iModeler member...looking forward to drawing some inspiration from you in the coming months/years.
Hi Craig, thanks for your kind comment. As I wrote above, I did not feel sorry at all, the customer rejected, even if 1/72 is not my favourite scale, I' m glad I can display the Mossie in my collection. It has also partecipate at the recent Moson Model Show.
Roberto
NOW I know where I saw it...I wondered if it was the same one.
Congratulations Roberto! I was in the jury at Moson this year in Your cathegory and I liked Your Mossy very much and praised high for the details You put in. I quessed how You can achieved the wood effect so thak You for the explanation and for the great modeling story also! The saving with the Airfix part is truly fabolous 🙂
Thanks, 2016 was my first time in Moson, despite I participate at several contest in Italy with good result, was a great emotion to have the chance to compete with so many experienced modeler coming from all Europe. Nice experience, highly recommended and to be repeated!
... the saving with the Airfix a nightmare, absolutly NOT to repeate!
I really like both of these. I'm reminded of a model Roy Sutherland did back in around 2005 of a "toasted" Mosquito night fighter that flew through the explosion of the bomber it shot down, with the result most of the paint was burned off as well as the fabric on the rudder. A very impressive model. You can see photos of it in the Osprey book about building Mosquito models. Yours looks equally good.
Tom, I have never seen Roy Mosquito, but now you mention it, I get curious. Despite I have several Ospreys in my library, the one about modelling the Mossie is missing, try to se if I can catch one by my friends.
Hi Roberto,
Your modeling skills really shine with your Mossie builds! Below is a link to the Mossie built by Roy Sutherland built that Tom Mentioned . I was at the 2005 Silicone Valley Classic model show when I first saw this model-Very Cool.
Enjoy, Erich
http://www.svsm.org/gallery/svsm2005/DSC08090
I've seen Roy Mossie, excellent work. I' m impressed by some de the detail. nice job painting the remaining of the roundel on the fuselage. Nice also the right propeller with the blade at 0°pitch, as if the right engine stops in flight.
I can’t imagine the shock of the crew passing thought such an experience.
Thanks for the link.
Roberto.
Trials and tribulations, Excellent builds, I love the wood effect.
OK, the Fokker D VII and now this... You may destroy the entire hobby by making everyone else want to give up! 😉 WOW! Super build & finish. Please keep on inspiring us mere mortals.
Not really my intention to make anybody to give up. I' m a hobbiest fisherman too, and fisherman shows first the picture of the big fish they catch, sardins will come later on, don't worry 🙂
Roberto, this is excellent work, especially on a fan favorite (the mosquito). Interesting that I have a F3 Meteor that has the same melted hole in the wing you had. On the wood grain one, I'm equally impressed with your NMF area's as with the wood grain. The canopy frames and interior are also great. Thanks for sharing !
Let say that I have been lucky for 3 reason:
.-I did nod damage the engine nacelle, it would have been impossible to reproduce that one too.
.-the Airfix wing, at least in plant, is has exatly the same shape of the Tamiya.
.- The invasion stripe did not obbliged myself to repaint the all top camouflage.
Good luck with your Meteor, is you intend to do the same job.
Roberto.
Fantastic, Roberto, and, I too remember seeing the pictures of your Mosquito at Moson. As fabulous as your models are, I almost enjoyed reading your write-up as much as looking at the Mosquitoes.
Roberto, the cockpit is really nice, but the wood is phenominal! And in 1/72! Egad!
Wow - let me just echo everyone else's accolades before I add my additional comments!
I only build 72 scale, and LOVED what I saw of how you detailed out the cockpit area, as many (most) 72 scale models have a dearth of detail (especially the old kits I have a habit of buying off ebay). I've just tried using wire for the first time in my group build Phantom (in process) but I'm really curious what you used for those small strips (on your second mossie) that hold the "cables" together. Was that small pieces of cut foil (like from a wine bottle) or something else? I've also just tried using bits of styrene to create gear cranks, throttles, etc., and you're given me inspiration to make mine look more realistic. One big question I have is what do you use to hold onto such small pieces as you work on them? My normal tweezers are hardly up to the task, and I lose about 50% of my effort to the carpet!
I also liked the way you discussed the "artificial" highlights you put on the interior elements to make them more visually interesting. I've experimented with that a little, but seeing your work, I'll get more bold in my approach. Once you pop a canopy on such detail work, I think you have to use some artistic license to ensure it is still visible!
Hi Greg,
it was very funny, to remember what I have used to build the clamps holds cable together, I had to look at the Photo! They were small scratch parts of an old Photo Etched sheet. But I think several materials could be used, from the metal foil cover the cup of the wine bottle (don’t drink the all bottle with this excuse 🙂 ) to the adhesive aluminum tape. I'm a much better modeler than you, since I loose "only" 45% of the small detail that fly away and are regularly eat by the Monster of the floor, a kind on animal very similar to the monster of the carpet you have. Except joke, I use a good pair of tweezer; unfortunately, I don’t remember the brand. I have realized some time ago, is better to spend money for good tools in stand to purchase hundred of kits we may never build. Finally I' m not a fanatic to realism at all cost, sometimes an artistic approach will lead to better result than realism at all cost. The smaller is the scale the higher the contrast should be, in order to apreciate small detail. Of course this is my personal opinion, many other follow differrent approach. Do as you like and do not feel conditioned by a particular way of thinking. Hope you forgive me if I use some kind of funny word, I like to make joke, and for me modeling has to be a way to relax, not a second job.
Cheers, Roberto.
I'm like you - modeling is stress relief and fun - I don't get too serious about results or "accuracy" as long as I end up with a pleasant looking representation of the subject, and have fun doing it!
I guess when you work with parts (especially scatchbuilt) that small, you just plan on loosing a certain percentage of your effort when they pop out of the tweezers! Oh well...
Sometimes, if it's not too much time consuming I build small detail a little in excess of what is needed. For exemple: the rocket retaining clamp, 8 needed, built 10.
Of course, due to the Murphy law, I lost only what is build in the right quantity, But this is another story...
PS. I have a Tamiya Mosquito in my stash (one of the few Tamiya kits I own), and I'll pull up your build especially to review the cockpit detailing when I get started!
🙂 ... Greetings ... 🙂 :
Outstanding work on them Roberto, a full joy to see, thank you for sharing the images.
Great work im LIKE!
Hard to believe those are 1/72 and not 1/48. Excellent work all around, I particularly like the "half-and'half" model.
Roy Sutherland did a "toasted" Mosquito night fighter that flew through the explosion of the bomber it shot dow, with paint burned off the Mosquito. You can see it in the Osprey book about modeling the Mosquito. You look to be the only guy who could also do that one.