Fogged Clear Sprue = any fix?

Just bought this old kit, would have been proper if the seller had mentioned the clear sprue, but some homeless sapiens have honor deficiencies:) Ordered the Squadron Vac set but is there any way I can save this sprue and bring it back to clear? Dream on? UV damage ?
Thanks
Hello chap
As I look at this sprue, it seems that the four flat parts at the left are used to build some cradle to settle a ship hull; am I right ? If so, these can easily be reproduced on plasticard. I'll concentrate on the three "bulbs" on the left and the kind of box on the right. You can try very thin sanding (600 and higher, Tamiya sells assortments) then toothpaste then coffee paper filters, then polishing paste, then polishing wax; you can use the flat parts to experiment.
As for the tiniest parts, the little "windows" on the right can be copied, the four blisters at the top and the four at the bottom could be molded:
Find either RTV or a mix of bathroom silicone and baking soda, mold them (or you can use Composimold as an alternative) then build a kind of case around the mold with aluminium sheet (a discarded beverage can could do) then you'll find some tranparent beads in craft stores; put a small amount on the moulds, into an oven with reasonable heat and watching how it goes (no microwave, and better put the molds on a plate)
Hope this will help you but I bet some folks here will add most valuable advices
This looks really strange, Clarence. Normally clear sprue stays clear if kept in the kit box. Could be due to sun or fluorescent lamp exposure, or the previous owner might have dipped the clear sprue in som sort of "agent".
Assuming that fogginess has occured only at the surface, you might try carefully polish each part with some polishing agent and a cloth.
Besides light, I cannot think of another process that caused this fogginess, Clarence @jagmkx
To get them transparant, ploshing as described before might be the best option.
Any kind of polishing pasta should be able to help you to do the trick.
Looks like you bought yourself an old Italeri Dornier Do-24? No idea what caused it to fog. Normally it would only be some sort of solvent doing that ...unless it was like that from the factory for some reason? You could try dip it in floor polish to see if it clears. Other than that: buy a new kit.
Hey Clarence. No clue or guess of how it happened but given the "simplicity" of the non-flat pieces you may be able to give vacu-forming a try. The flat pieces should be easily cut from clear styrene.
Looking at the sprue, it appears the fogging (a molding flaw?) is all the way through the plastic. If that's the case, there's nothing you can do to fix the parts. Replacement would be your only option (another kit or scratch building).
You can use sections of the fogged sprue to test techniques like polishing, dipping in Pledge floor finish, etc.
One possibility-ask me how I know- is that that this could have been dipped in varnish thinner by accident. I s the surface a little rough? If so, you possibly can’t polish it out. Again ask me how I know!
Clarence, I think you'd go crazy trying to polish out this many pieces, especially the rounded ones, and would loose the frame lines as well. If clear (Klear) or gloss coats (aqua acrylic) don't work - and use only the flat stand parts and those frame bits in the center either side of the real "sprue" remnant for testing - then vacu-forming is the best way to go if that is an option for you. Otherwise, "squash" molding - pushing the part into a heated sheet of clear plastic - might work but I fear that most of the important parts have too much depth for that to work well. The least authentic alternative is to paint the exterior gloss black, add the frame color(s), and do your best to make the entire kit a worthy, satisfying effort - it really won't look so different from 18" (46cm).
Toothpaste.
G'day Clarence! Which kit is it? You mentioned it was 'an old' kit but that could mean anything. I've seen kits from the 90's described as old but my definition is anything pre 1970!
So whilst this is probably not your first choice, if it was a popular model someone here may have an unbuilt example they'd be willing to part with or maybe even a wrecked one. Otherwise try posting a 'want' over on Hyperscale. It's a busy site and who knows, you might strike it lucky!
Just a thought and I'd endorse all the above suggestions.
I agree, toothpaste might work. On the other hand, Novus polish is designed to remove minor scratches from plastic. It comes in several grits. With careful polishing it will also smooth paint very nicely, so much so that Future won't stick to it. Hobby shops and Home Depot stock this wonderful polish.
Thanks for ALL the manysuggestions and support! Since I'm not sure to the cause or remedy:
For whatever reason, I suggest this is a chemical change of the material, I think the
slight opacity is embedded in the material, not a surface condition that can mechanically be removed. I ordered a Squadron vac set and placed a clear sprue order request @ Italeri?
This is what I define as a 10 minute and/or three email problem at best. My timer is now at 12 minutes on this so I've now set the path for the solution to come to me and my allotted time on this is now spent. (yes, I ran over a bit on the emails quota as well, but we try..:)
Thanks
Clarence
I have never seen this before, Clarence (@jagmkx). You might try a dip in either Future or Looks Like Glass. Both of these have worked wonders on some of my less-than-memorable canopy problems.
This solution restores plastic to its original color and may restore yours to clear. It's a simple chemical process that requires a container for the parts an enough hydrogen peroxide to cover the plastic.
1.) Place the plastic in the container
2.) Weight them down so they don't float
3.) Pour Hydrogen Peroxide over the plastic so they are completely covered with at least 1/2" above.
4.) Cover the container with clear plastic so the Peroxide doesn't evaporate
5.) Place outside so that they receive direct sunlight most of the day
6.) Ignore for one to two weeks but replace any hydrogen peroxide that evaporates
I've never tried this with clear plastic, but it does restore solid colors and returns yellowed vacuformed canopies to clear
Good luck
Clarence, these transparent parts seem like old friends to me, from an Italeri Do24 as someone else mentioned earlier. I don't have an answer to your problem, but with the greatest of respect, I would put your Squadron canopies in the box and offer it for sale on e-bay or some similar platform, advising that you have invested in replacement transpariences which may help to sell it.
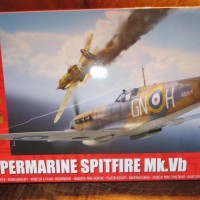
The buyer gets an immediate improvement, and then you can use the funds you receive to put towards buying the 2013 update of this model by Italeri. Canopies are crystal clear and more accurate, and there is just so much more in the kit. The update does include raised rivet detail, but that could be easily sanded off if you don't like it. If the subject matter is an important project for you to complete, invest in the updated kit. You will be much happier in the long run. Below is the one you want to look for. It can still be found on offer on some platforms from time to time... ;-).
1 attached image. Click to enlarge.
Paul,
I appreciate your sensible suggestion. I have been unable to find that kit anywhere?
Kit # 1323
Thanks
I am not sure you can do anything to get the clarity back but have you considered vacuforming the parts? It is a handy skill to have in your "toolbox". I use a dental vacuforming machine that works like a champ.