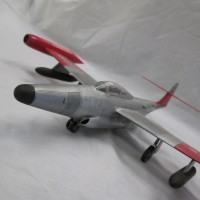
Spitfire PR.VII

Here is another of my Spitfire PR Types. It is a PR.VII, a PR.IG which was upgraded to Mk. V specs. The PR.VII/PR.IG was armed with 8 X .303 Browning machine guns and retained its armor. It was thought the PR.VII/PR.IG would be able to defend itself during dicer or other low-level TacR Ops. The aircraft were painted in PRU Pink, early Day Fighter, and late Day Fighter schemes.
I ran out of Airfix Spitfire Mk. I kits, so I used an Eduard Mk.IIa kit. I have to admit I prefer using the Airfix Mk.I/Mk.V kits over the Eduard kits as the Airfix kits are simpler, and therefore easier to build. With any Eduard kit, you need to follow the instructions ( to make sure you use the correct parts), trim any excess plastic and paint from any mating surface, and finally allow each step to dry. The Airwaves kit gives you the rear fuselage tank, the oblique camera port, the underside camera ports, and a bulged canopy with side blisters. I assembled the fuselage using the rear tank and oblique camera port. I needed to trim the underside of the wing to fit the resin part with the camera ports, so I measured it 4 times, double-checked it again, and made the cut. I made the best, most accurate cut I have ever made. This should have warned me. I attached the wing and allowed it to dry. I then tried to fit the resin part. It was not even close. it was too wide from the front of it to the rear. Then it hit me. The resin bits were cast to fit the Tamiya early mold Spitfire I. The one with the bloated fuselage and wrongly shaped wings. There were lots of purple thunderheads around the bench. So I walked away to calm down ( Jack Danials helped a bit).
What was I thinking? How could I make such a stupid mistake? Not enough Jack I expect. It would have been much easier to drill out the camera ports and just use acrylic rods for the cameras. Live and learn. Anyway, the resin part required a lot of grinding, filing, and sanding and I got it really close. With enough 3M Acryl-White filler, it was blended in. After the seams were to my liking, I wiped the model with Isopropyl Alcohol to clean it and allow the paint to adhere better. Vallejo and Hataka paints were used. After the paint dried I applied the Model Alliance Decals ( No. MA4813) over a coat of Future. Future was applied again to seal the decals. Finally, a flat clear was applied.
After the final bits were applied ( props, canopy, etc.) the model was done. The model represents a Supermarine Spitfire PR.VII ( a PR.IG upgraded to Mk. V specs) Serial No. R7028, coded "DP" of No. 1416 (Army Cooperation) Flight) based at RAF Hendon, 1942.
I prefer to modify the Airfix kits as they are simpler and easier to build. The Eduard Spitfire kits are more detailed but also more complicated builds. Either make nice models.
Bruce

A mini adventure with the resin, but the final result is really excellent, Bruce!
Well done!
All the extra work on this PR Spitfire did pay off, Bruce @rbrucearcher
Great result.
Nice looking Spitfire, Bruce, any chance of some more pictures?
Nice work on this! Thanks for sharing
Came out looking nice in the end! Well done.