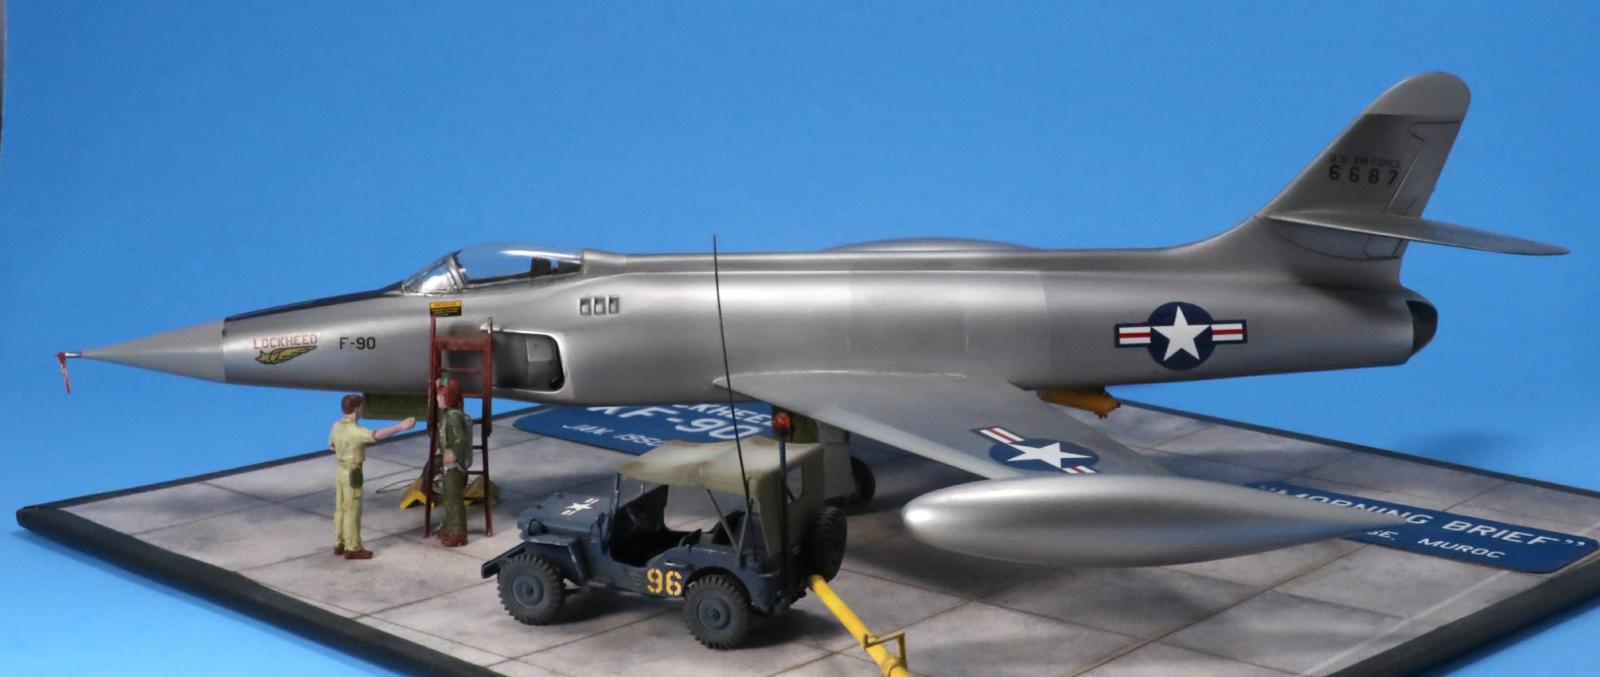
Lockheed XF-90 in 1/48 by Aurora
Kit#: 33A-98
Price: $0.98 originally; $7.50 as a collectable in 1978
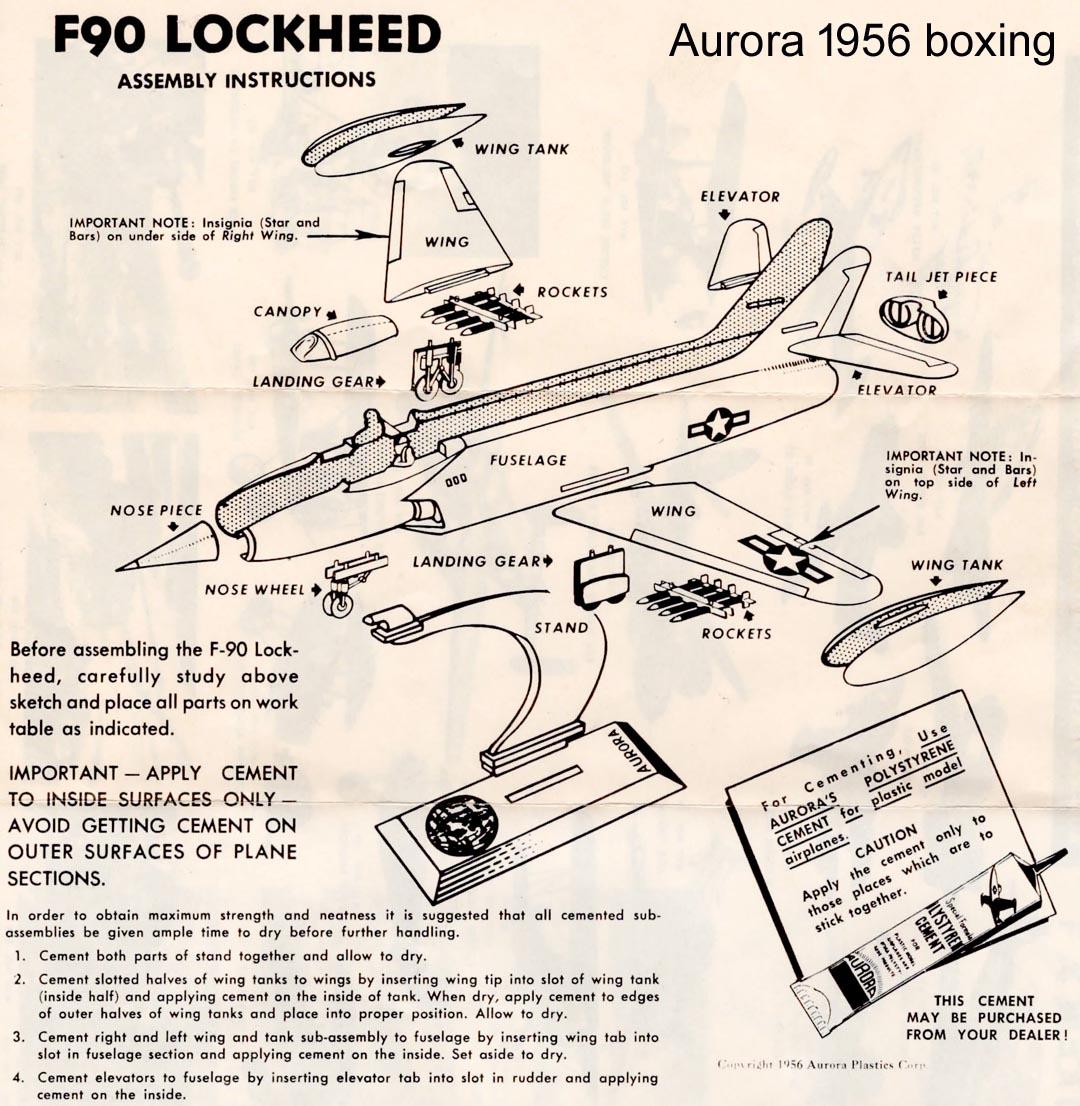
Notes: This is an original 1956 boxing of this kit but the molds date back to 1952.
Introduction:
One never knows where a new project will lead you. The Lockheed XF-90, although a somewhat obscure design and having a short history, spread its influence across many areas.
It all started for me, some months ago, when I added as an afterthought, the Ginter publication of Lockheed XF-90, by William J. Simone, to a book order. I knew of the plane and remembered building a model of it as a kid, but didn't know any real details. I certainly didn't expect to turn it into a model project.
History:
The XF-90 was Lockheed's second jet fighter design after the F-80. In 1946, the Air Force wanted a new jet penetration fighter, that being defined as a long-range fighter that would fly ahead of the bomber force and clear the skies of opposition.
The XF-90 first flew on 1 June, 1949 and two prototypes were built. It immediately ran into issues. The plane had been designed around a pair of the new Westinghouse J34 engines and like so many jet engines of that period, it never produced the advertised thrust. This left the XF-90 under powered, to the extent that take-offs were only made on the expanse of the dry lake at Muroc (later Edwards) rather than the runway and quite often used JATO to get off the ground. Once in the air, it flew well and was capable of Mach 1 in a slight dive.
Testing continued until the summer of 1951 when Kelly Johnson, Lockheed's chief designer, recommended cancellation. He knew that to redesign the airplane with larger engines, to meet the original specs, would add 12 – 18 months of development, at which time the plane would be obsolete. The Air Force complied and canceled the program in August, 1951. The first prototype was scraped but the second found a new mission.
It was transported to the Nevada desert, north of Las Vegas, where early atomic bomb testing was taking place. A series of three tests were planned to assess bomb damage to parked aircraft. The XF-90 was placed at the 2200-foot mark with other aircraft types at other distances. While pointed towards ground zero, it survived two blasts with minor damage. However, on the third blast, while turned sideways to ground zero, it was destroyed. The remains were left in the desert.
In the late 90's, the remains were decontaminated and brought to the Air Force Museum, in Dayton, OH. During my August, 2022 visit to the museum, I found that the unrestored air frame shell is now part of an exhibit in the Cold War Building, telling the story of the desert A-Bomb testing.

So the story seems to end, one of many prototype designs that had a mostly forgettable history. The plane never even received a name, unlike almost all other Lockheed aircraft. But it turns out to have had much more influence in other, seemingly unrelated, areas.
All through the late 1940's, as it was being developed, and then through the testing period, Lockheed and Westinghouse had done a great deal of publicity claiming it to be the “next great Air Force Fighter!” To the general public of 1950, the XF-90 was the ultimate in futuristic design with its long sleek fuselage, thin swept wings and duel exhausts, almost rocket ship in nature.
Blackhawk comics (1940-1972) picked up the design in 1950 for their primary fighter plane. Blackhawk was a private air force that fought enemy aircraft, villains and monsters in each month's issue. It “flew” with them until 1964 when it was replaced by the F-105.
Detroit began to adopt styling cues from the fighter. Sweptback tail fins, faux jet intakes, bulbous “bullet” fairings and twin exhaust began appearing on cars starting in the early 1950's. The 1956 Oldsmobile's hood ornament was most definitely a stylized F-90 with a long pointy fuselage, thin swept-back wings and large wing-tip pods.
Our hobby was influence as well. In 1952, Hawk Models produced the first all-styrene plastic models in the U.S. (other types of plastic had been used previously for the few plastic models released up to that time). They picked the F-90 as part of their first set and it sold very well. Aurora also started producing plastic kits in 1952. They copied the Hawk F-90 kit, with minor changes. Both companies re-boxed their kits several times into the 1960's. It was a later boxing of the Aurora kit that I first built as a 9-year old. I still remember thinking it was the coolest plane I had ever seen!
The Kit:
After reading Simone's book on the F-90, I recalled that I had cherry-picked a collection in 1978 and came away with, among other things, the 1956 boxing of the Aurora F-90. Digging deep into my stash, I now had it in my hands.
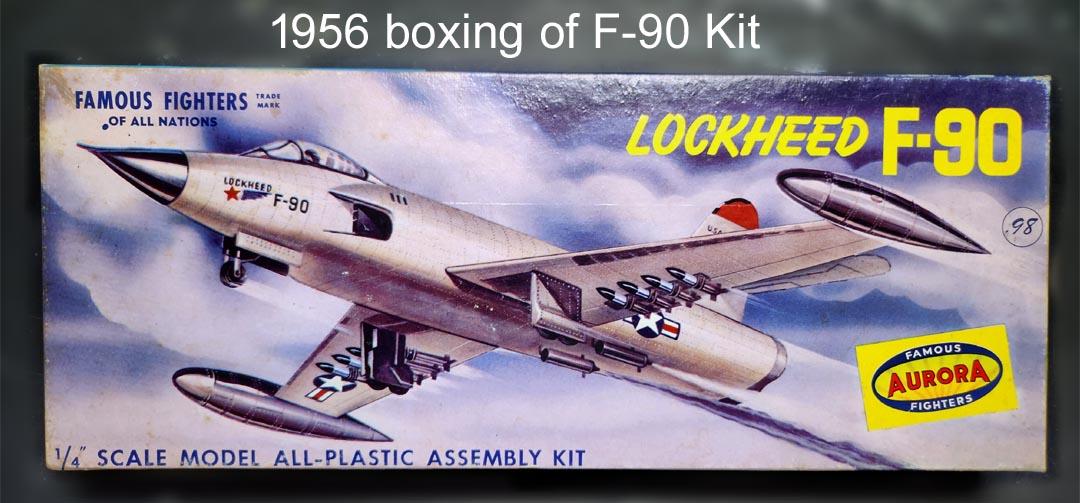
The kit is molded in silver plastic and consists of twelve pieces for the air frame plus six more for bogus landing gear and rockets that Aurora added to the kit. Aurora freely admitted that they wanted to be first to the market at a cheap price and if the kit was accurate, well, that was a bonus. Hawk, on the other hand produced simple, but mostly accurate kits. Luckily, Aurora's copy of the Hawk kit kept the accuracy of the air frame.
The kit has no wheel wells or cockpit, just a pilot's head under the canopy. There is no interior and one can see through the intakes and out the exhaust. The bogus landing gear and rockets just glued to the bottom of the model. As was typical of the time, the markings were raised engravings right into the plastic. The nearly 70-year-old decals looked amazingly good.
Construction:
At this point, let me offer an apology to those die-hard kit collectors for ruining a perfectly good collectable by … well… building it.
I originally did not intend to build it.
Now, with the book full of detail pictures in one hand and a model screaming for attention in the other, what was a poor modeler to do?
I started by sanding down the entire model to get rid of the raised makings. This old-style silver plastic is very strange. It seems to have a clear depth to it. Even though my finger said it was smooth, the markings were clearly visible and even appeared to have a shadow! I sprayed the model, inside and out, with primer black and sure enough, the model was really smooth and the markings were gone.
Next was the cockpit. I cut out the area under the canopy and went to my spares box. I found an old Squadron resin cockpit set for a T-33 -- same era – 1950's, same company – Lockheed. With very little modification other than cutting off the rear T-33 cockpit and adding some sheet plastic, I had a cockpit tub, ejection seat, stick and instrument panel that fit very well into the F-90 fuselage. I painted everything black and highlighted the dials and switches. This really didn't make much difference as almost no detail accept the seat can be seen through the green-tinted, “coke bottle” canopy and opening it was not an option for me.
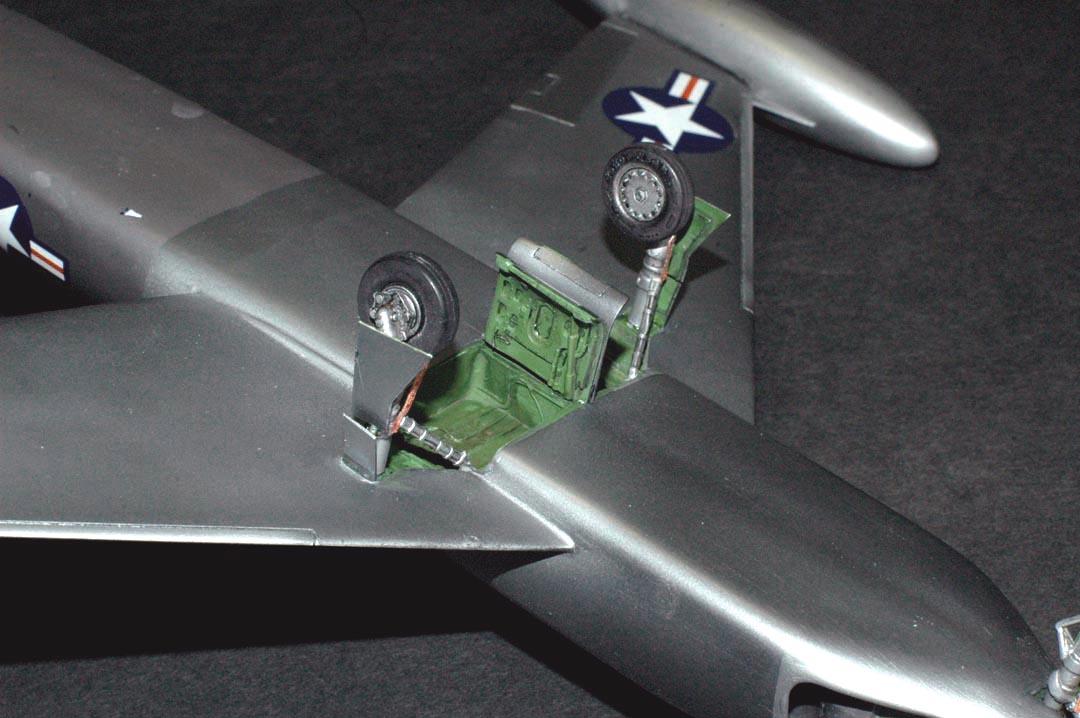
Now it was time for the landing gear. Although Aurora's was completely imaginary, the correct door outlines were on the model, probably from the original Hawk version. The large wheel-well bays in the fuselage were cut out along with the nose bay and boxes were constructed from sheet plastic. Thin plastic strips and wire were added for detail. The main gear bays that extending into the wings were more of a problem. The kit's wings are solid plastic. I tried using a Dremel to dig out the bays but quickly realized that I could not get an even depth or straight edges. I resorted to using a razor-saw to cut from the butt-end of the wing outwards and simply had a hole in the shape of the gear bay. I laid sheet plastic on the top and with some filler and sanding recreated the top surface of the wing and the top of the wheel well. I added some detailing and a plastic mounting block for the gear itself.
The main landing gear struts and wheels are from the Monogram F-106 kit. The F-90 struts have the bottom third angled backwards. I cut the F-106 struts, re-glued them at the correct angle, added some filler and was done. I added .025 wire pins to the top of the gear for mounting to the model.

The front gear came from the spares box but I don't know from what model or even what plane it comes from, it just looks right. I did have to cut the lower part off and rotate it 180 degrees so that the nose wheel faced to the left. The wheel itself is resin and may be from the T-33 set.
The gear doors are thin sheet plastic with added pieces on the inside for details. The main center gear doors are from the Monogram F-100D kit with slight modifications.
I next blocked off the see-through air intakes with a few pieces of sheet plastic for depth and capped the ends. I painted these a dark silver.
For the exhausts, I found some large diameter, brass tubing at my local hobby store. This fit the kit's open exhaust holes perfectly. I cut a couple of short lengths, painted the interior exhaust-silver, capped the ends and glued them into the kit exhaust holes.
An added consequence of this was that considerable weight was added to the very back end of a kit that was already only marginally nose heavy. I almost didn't catch this before closing up the fuselage, but did remember to added weight to the nose to compensate.
With all of the detailing done, it was time for the final assembly – all twelve pieces! Many of today's detail models have instructions that are small books, with many steps. The Aurora instructions are one page, one panel with an exploded view of the kit. There are some added written instructions and some cautions for the young modeler of 1950's, such as, “only apply glue to the inside edges of the parts to be glued together.”
In the earlier 1952 and 1954 boxings, Aurora included a tube of glue since styrene plastic glue was hard to find in those years. By the 1956 boxing there is only an advertisement to buy “Aurora Polystyrene Cement for plastic model airplanes at your local dealer”.
The fit of the kit was surprisingly good. I only had to do a little filling around the exhaust end cap, a little bit at the wing roots and some clear filling around the canopy.
The XF-90 went through several tip-tank configurations with and without fins. What was settled on was a smooth tank with a small vane on the fuselage-facing side of the tank, just ahead of the leading edge of the wing. I duplicated this with some sheet plastic.
The tanks just slip onto the wing tips with no alignment marks or pins. I didn't trust just eye-balling it to get them straight, so I traced the wing onto paper and created parallel lines between the fuselage and the tips. I then use those guides to align the tip tanks.
As almost an after-thought, I added the JATO pack under the fuselage. This came from the Revell F-84E kit and was slightly modified to fit the F-90 flat underside.
Paint and markings:
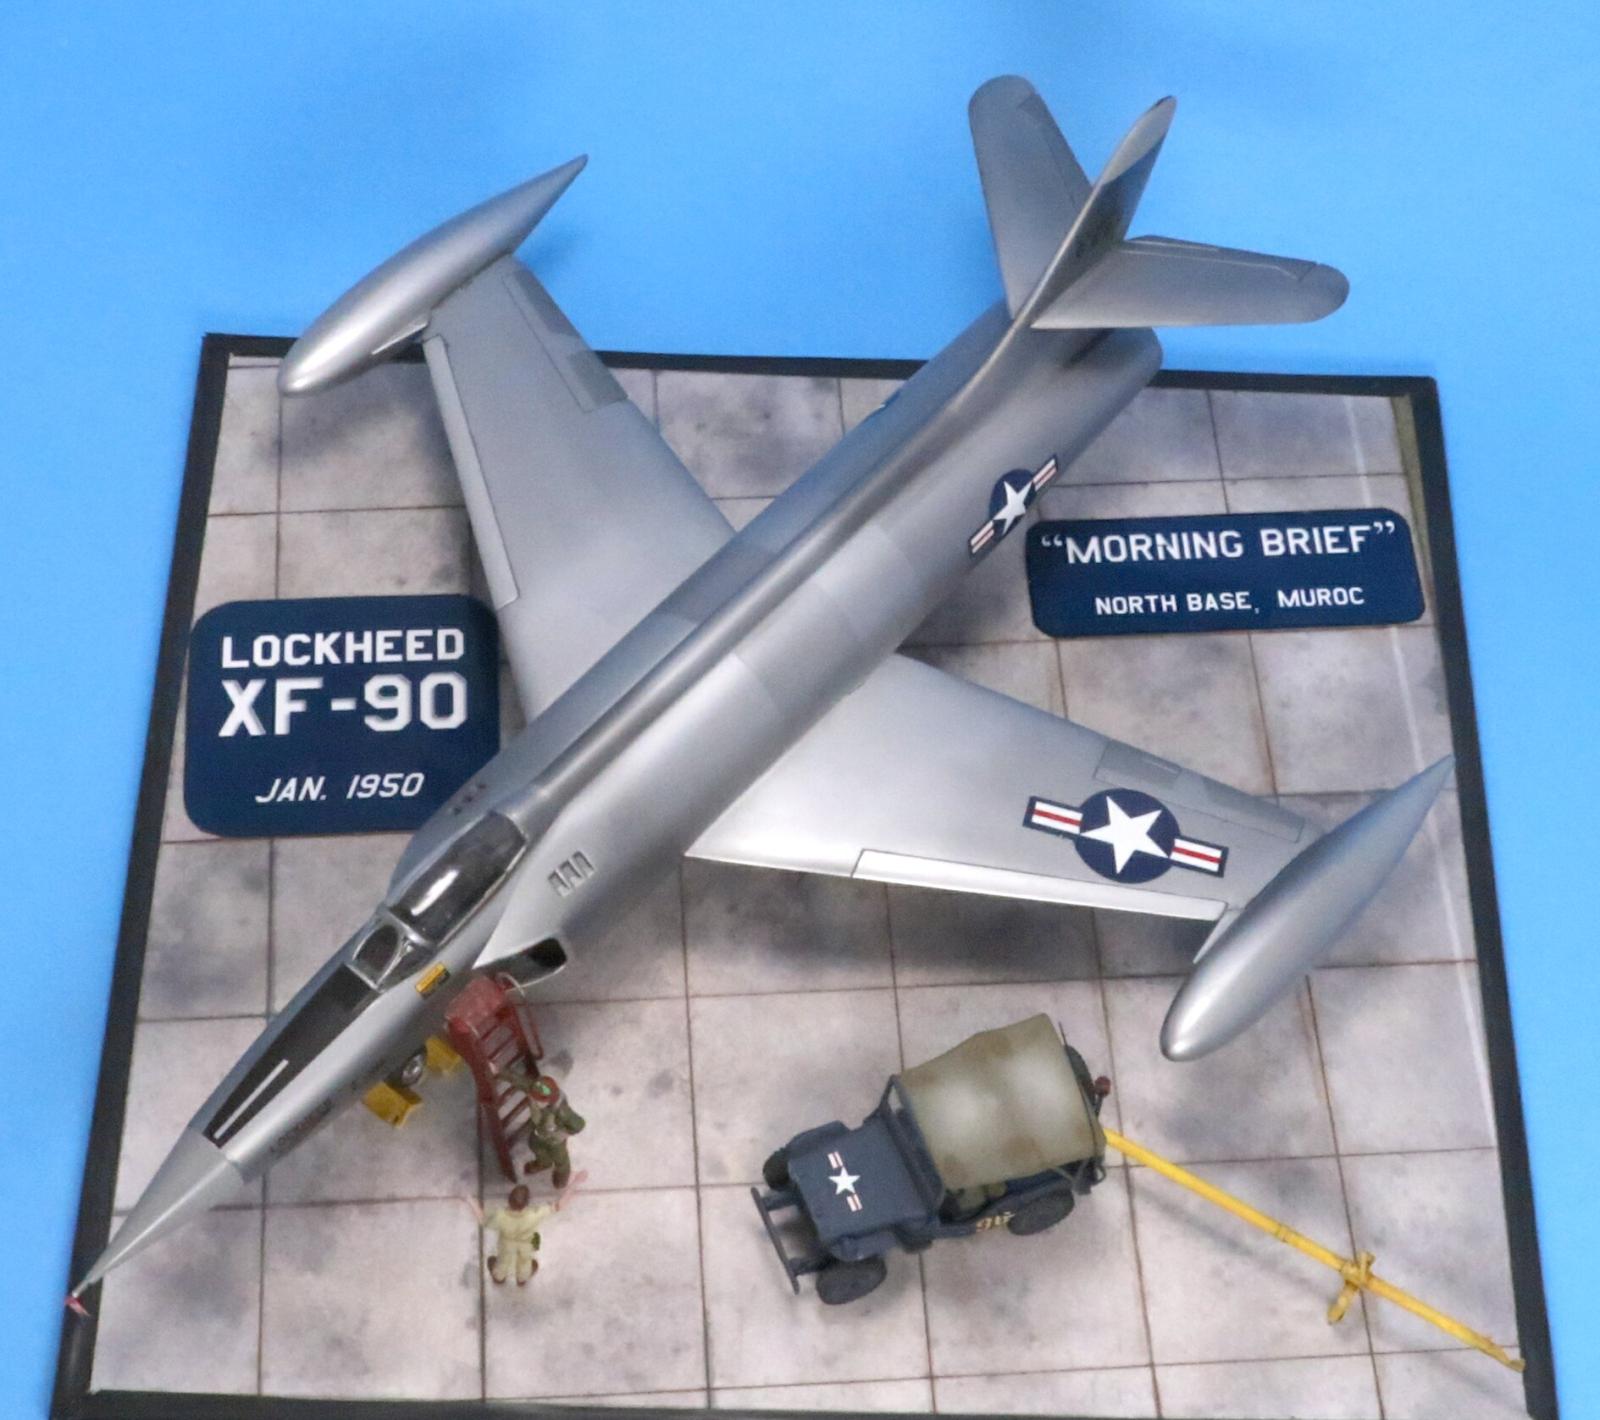
The model was painted with Alclad II aluminum. I had considered scribing panel lines but none of the photos in Simone's book showed any visible lines, even though the plane was bare metal. I used the Tamiya lacquer metallizer paints to add various surface shadings that can be seen in the photos.
The national insignias are from the spares box. The original decals looked good enough that I was able to scan them into my computer. I wanted to get the Lockheed logo that is prominent on both sides of the nose. I brought them into Photoshop and added the correct yellow color to the logo and replaced the word “LOCKHEED” in red.
For the other two markings, the “F-90” on the nose and the tail number, I used the original decals for size reference. I downloaded a free font of post-WWII US Air Force style numbers and letters. With this I created the “F-90” for the nose and the correct tail number (Aurora's was wrong). I added “U.S. Air Force” above it, to match photos. The custom markings were printed with a standard Epson ink jet printer on clear decal paper. This worked fine over the silver surface of the model but the printed colors are pretty thin and probable would not work over a darker color.
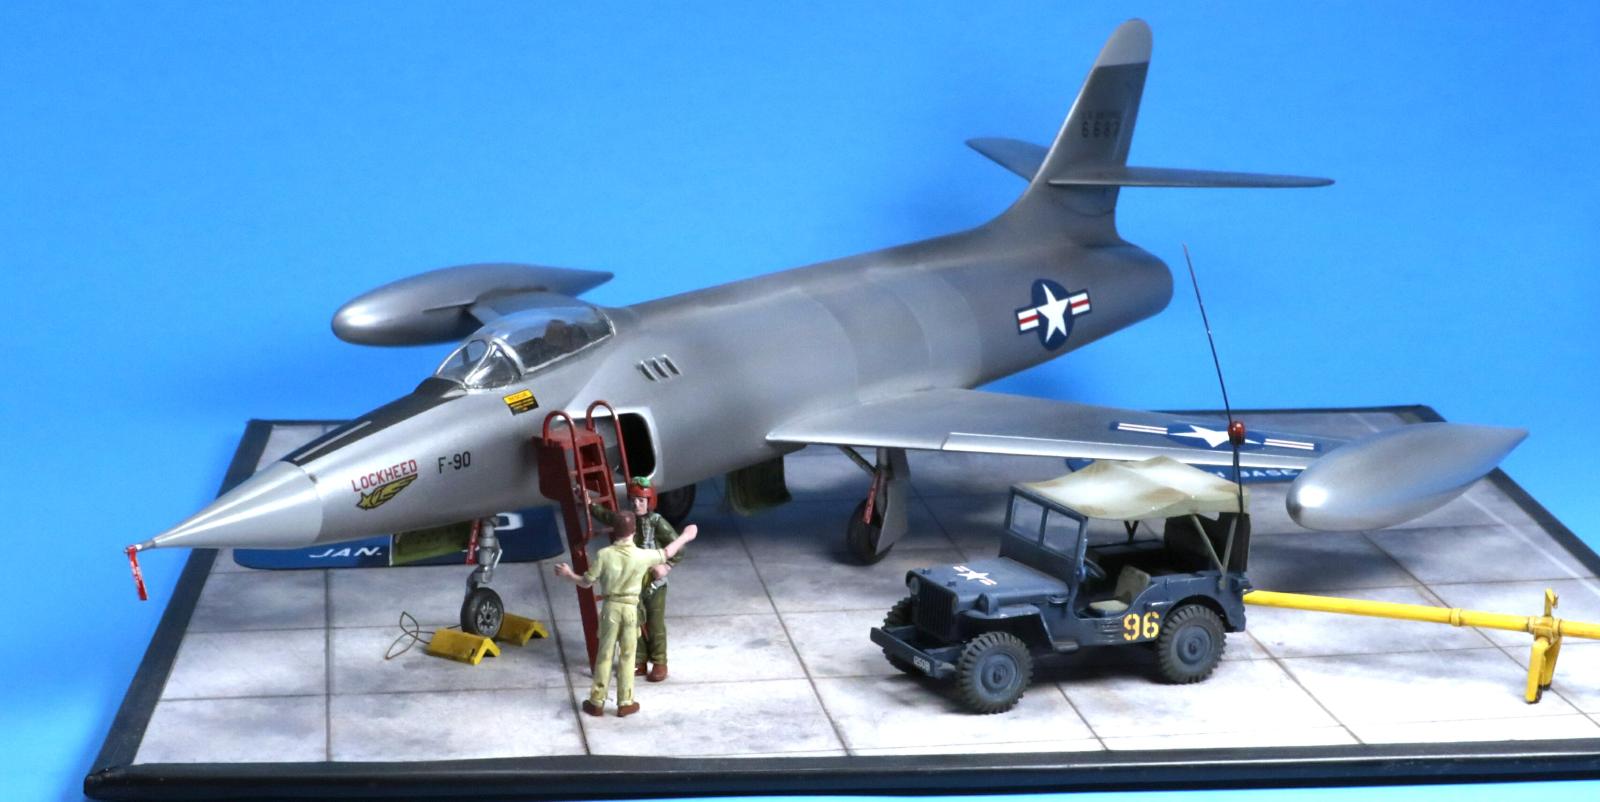
Finally, the base is a free download I found on the internet of a concrete ramp. I printed this on 65 lb card stock and glued it to a piece of Plexiglas. The pilot figure is from the Revell-Monogram F-84E kit and the ground crew figure from the Monogram B-25H. The ladder and tow bar are modified to match pictures and are from the 1980's ESCI ground equipment set. All are painted with Tamiya lacquers.
The tow Jeep is the Tamiya 1976 boxing.
The reality of the time was that things were pretty crude at Muroc. Lockheed quite often used its own 1949 Chevy Suburban station wagon to tow the airplane around. Since finding a model of that Chevy is impossible, I claimed artistic license and substituted the Jeep.
Conclusion:
This is the most interesting and satisfying build that I've done in a long time. It certainly took me down the proverbial “rabbit-hole” but I am very pleased with the end results. It will be the most unique subject on my selves for some time.
References:
1) Air Force Legends Number 222 – Lockheed XF-90 by William J. Simone. Published by Ginter Books, 2020.
2) You Tube videos on the XF-90 and other early 1950's jets
3) My photos from the National Museum of the U.S. Air Force, Dayton, OH.

Lots of effort paid of big time...well done
Thanks, George. It was a really an enjoyable project.
Oh man, I love this! 🤩 Great article and a very cool model; well done, Chuck @charleshorner! 👍 👏
Thanks for you comment, Gary. I distinctly remember building this kit as a kid, back in the early 60's. The design always stayed with me.
Welcome to imodeler, Chuck! Great project. All of your work paid off. I was just looking at some old Aurora kits in my stash last week. Might be time to build some.
Thanks, John. Aurora stuff is really hit or miss. I was lucky that the XF-90 was a well done kit. Some of their WWII kits are really bad.
That would be Tony LeVier receiving the briefing. He told me he thought the airplane would have been wonderful with two J-57s. It was very iconic to we model airplane builders back then. You've done an amazing job with this project and you've got a great result.
Thanks, Tom. This is more or less the article I had originally planned to submit to Model Madness a while back. I inadvertently sent my outline instead of the article.
I met Tony LeVier many years ago. He was one of many speakers we had at the New England Air Museum over the years. It was always so interesting to meet and hear these aviation greats tell their stories. I'm sorry we never got Yeager or Hoover to come east.
Send the article! Scott will be happy to publish this.
Tony really was "The Huckleberry Finn of aviation." I had the chance to fly with him in the 1927 airplane he learned to fly in, rediscovered and restored. His funeral was so big it caused a traffic jam on the freeway.
Now this is some serious modelling, Chuck @charleshorner
Nice article and presented with a wonderful XF90, definitely not an often seen subject.
Welcome aboard.
Excellent job, awesome result and very informative writeup, Chuck! I wonder what this aesthetically pleasing design would do with a pair or engines with sufficient thrust.
Welcome aboard!
It probably would have been the "next great Air Force fighter" as Lockheed advertised.
wow! Vintage kit, rare subject, beautiful work and effect...
The work you did on this little beauty is fantastic. I also remember building this kit when I was about 10 years old and that would have been 1958. And yes, this kit put Jets on the map for me and I still can't get enough of them sixty years later. Thank you for the pictures and for this wonderful article.
Thanks, Thomas. I really enjoyed diving in and creating all the extras to this kit.
Excellent work on making a vintage kit into a quality model.
Now there's one you don't see every day! Great work on such an old kit.
Very cool! I remember smearing tube glue on this kit back ion the '50s.
I guess a lot of kids our age felt the same way... the coolest plane they ever saw!
Great model, diorama and article. The innovative approach you took in the areas that needed help really worked well. I am glad you followed your heart and built this. It would be interesting to see how that T-33 cockpit worked out.
I was quite surprised at how easy it was to fit the T-33 front cockpit in. It's about the right width. I just needed to build some support structure round it to hold it in place. I also needed to add some structure behind the seat.
1 attached image. Click to enlarge.
A truly excellent project. Your article on the aircraft was very informative and the steps and methods you used to build this old and very simple kit were inspiring. Simply a very well done effort.
Appreciate the comment, Dan. Looking back, I never thought of it as a lot of work. Once I committed, I just dove in and enjoyed the challenge.
Well done, Chuck (@charleshorner). A lot of kit bashing and scratchbuilding has resulted in a one-of-a-kind models. I have been dragging this kit around for decades, but never had the will to do all the work needed to create a decent model. A lot of great work went into yours.
Thanks, George. It was really an enjoyable build. I'm eyeing some other old kits in my stash that I might tackle in the same way.
Nice work Chuck,. I saw this one the past Fall at the IPMS shows! Looks even better in person
Steve
Thanks, Steve,
Sorry I missed seeing you at the shows. I managed to hit all three of the New England fall shows: PatCon, BayCon and GranitCon. Apparently the judges didn't agree with you since it got only moderate attention by them. But having comments such as yours is more important to me than an award that will end up in a drawer.
Great job!
Sharp work on an exciting subject. I’ve got the 1/72-scale Anigrand kit calling to me…
Go for it. The Ginter book on the XF-90 is a must. Not sure where else you'd find this much information on the plane. Great pictures, drawings and history text. I am glad I purchased it, even if I hadn't built the model.
Great model, Great article. I appreciate you capturing the history of the aircraft and of the model. I think the Aurora model might have as much historic significance as the real world aircraft. This model really mattered back in the day.
Aircraft modeling is to me a way of better understanding aviation history. A lot of the subjects I pick to do are because I have an interest in that period of time, or I've found an interesting tidbit on that particular plane, pilot or designer.
Looks like a labor of love! Excellent article and build. If you sneak up on a collectable kit and if listen closely you can just about here it saying "build me build me"
'
I can understand the mind-set of collectors, but when I purchase a kit, old or new, I only think about how I might build it, not it's collectable value.