Another try: Rescuing an adult SoD- Revell/Monogram Do.217 E

Started by Pedro L. Rocha · 71 · 3 years ago
  • Profile Photo
    Spiros Pendedekas said 3 years, 2 months ago:

    Pedro @holzhamer, what a quality job you do there!
    That whole interior looks really amazing, a definite temptation to pull my Do-17 out too. I kept on admiring that little instrument (chronometer?) affixed at the handlebars.
    You o have quite a job in gront of you with the flaps, but they look great already.
    Looking forward to it!

  • Profile Photo
    Pedro L. Rocha said 3 years, 2 months ago:

    Thank you guys for the nice feedback, and Spiros ( @fiveten ) I do believe that was either the clock or indeed a chronometer, but I can’t tell for sure.
    So far today I had little time on the bench, but by chance I found out amidst several semi-anonymous sets in the stash the Curting Edge replacement spinners/propeller and cowl ring for this kit.
    I had no memory of having bought it but there you go, I really have this kit for too long in the stash 🙂
    The spinner does loook much more like the ones I see in most pics (I admit there are a few pics where the spinner looks much more like the one made by Monogram, which could mean the plane actually had alternative options somewhere along the production chain, that happendnto the Heinkel 111 and the Ju88, to name a few other bombers). Here’s a comparison, and funny thing they seem to have the same length if one counts the resin part from the same base line

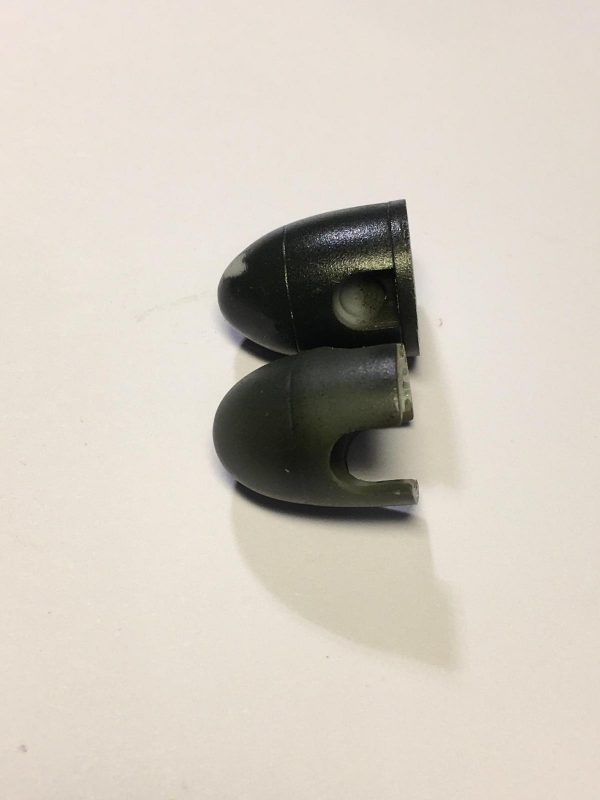
    These resin replacements are meant to be glued to the kit part backplate with the fan blades , which are exactly as I have read in online reviews- chunky parts 🙁
    Here’s how they compare to some made by Eduard for its Fw190s


    Not a hard choice right?

    The problem is the diameter of the resin spinner exceeds that of Eduard backplate/fans part


    So I can either use the kit spinner attached to the Eduard piece and it’s not bad at all, or go mad and cut each fan blade to replace the oversized fan blades provided in the kit part...

    The Cutting Edge propeller blades are much better than those in the box, so I’m using them


    Another item than seems more accurate is the cowl ring provided in resin
    Compared to the plastic part

    Again, thank you for all the feedback, this old SoD is giving a good time all round so far

  • Profile Photo
    Spiros Pendedekas said 3 years, 2 months ago:

    I just love to see all these resin extras, Pedro @holzhamer. This great build is becoming more and more exciting!

  • Profile Photo
    Pedro L. Rocha said 3 years, 2 months ago:

    Details & more details, that’s the story of the cockpit of this kit. My stash keeps pumping after market stuff regularly. So a few days after I found the spinner set I spotted an Eduard PE set for this kit. Many of the parts I will not use for sure (either redundant when comparing to the plastic part quality, or just unnecessary) still the seat belts and a few extra details are a good addition.
    Here’s a view of the cockpit “egg”.


    I need this dry fit so I can start aligning the MGs amo belts and spent cartridges socks. There’s just a few things need to add and paint/weathering to glue the whole part. My first thought of getting one of the sides attached to the fuselage wall doesn’t allow this that easily, so on this step of the build better follow the instructions 😉


    Started riveting


    The large glasshouse and its components were redone and is now much more complete. I noticed that I had removed the supports for the MG turret, no idea why or what I had in mundo doing back then, but now I’ll need to glue 2 stiff plastic bits to get that in place. The turret however will only be added after the model is painted.

    The undercarriage is completed but not attached to the gear bay. Another thoughtful build detail that Monogram had, allowing the whole structure to be glued last after painting the whole model.
    More to come in a few days, thanks for watching!

  • Profile Photo
    Erik Gjørup said 3 years, 2 months ago:

    Quite an egg you got there Pedro @holzhamer. Great stuff!

  • Profile Photo
    Tom Cleaver said 3 years, 2 months ago:

    @holzhamer - Wow! You're really doing amazing work with this old chestnut.

  • Profile Photo
    Spiros Pendedekas said 3 years, 2 months ago:

    Yep, the quality (and quantity) of your job is spectacular, my friend @holzhamer.
    This is one of the best cockpits I have ever seen!

  • Profile Photo
    Pedro L. Rocha said 3 years, 2 months ago:

    @airbum - Thank you Erik, let’s see how this rolls

    @tcinla - Thank you Tom, this one is old alright but it’s also gold. Wonder when will Revell re-issue this one again? It’s been more than a decade before the last box came around. Perhaps ICM will add the E variant to their ever growing Dornier line

    @fiveten - Thank you for the nice compliment my friend! And this cockpit isn’t even completed yet 😉 I’m really itching to get to the painting part

  • Profile Photo
    Pedro L. Rocha said 3 years, 2 months ago:

    Some small details and toying with the camouflage colors has been my main occupation around the kit.
    Painted the quickboost exhaust stacks, which are much more refined than those supplied in plastic

    all it needs is some weathering and seal them in matt varnish. Unfortunately they will have to be glued before the exterior painting occurs, shame.
    The kits wheels are also very nice imo, and here you can see them already set for some powders
    Unlike the exhaust stacks the whole undercarriage will be added to the model almost at the very end of the entire build, including paintwork 🙂
    As usual, I like to replace/add small details in scale effect to improve the realism when one looks at the finished model later on. On this one I cut the plastic that pretended to be a leaking tube and used stretched hollow plastic instead another detail I will also replace are the wing tip warning lights, fairly easy task on the 217.

    Finally, I started playing with the camouflage colors, and decided to use RLM 72/73 for the upper factory splinter scheme. This will later be covered by a field applied mass of dots and squiggles in RLM76. The underside of the bomber is black, but I’m going for some weathered effect that will show the factory painted 65 light blue, as you can see on the lower frames of the nose window


    Thanks for watching!

  • Profile Photo
    Erik Gjørup said 3 years, 2 months ago:

    Some fine details! It would seem like you got some work ahead of you with the airbrush too. I like the small detail with the skidmark on the tyres.

  • Profile Photo
    Eric Berg said 3 years, 2 months ago:

    That's some mighty fine work you've done here Pedro. As Spiros said, this is looking really spectacular!

  • Profile Photo
    Carl Smoot said 3 years, 2 months ago:

    Yes, I quite agree, spectacular. Very nice paintwork in the cockpit. Definitely going to be a looker when completed.

  • Profile Photo
    Spiros Pendedekas said 3 years, 2 months ago:

    Love all those details and improvisations, my friend @holzhamer!
    Pity that the exhaust stacks will have to be added at early stages...
    Looking forward to your next steps!

  • Profile Photo
    Tom Cleaver said 3 years, 2 months ago:

    @holzhamer - you are really going "above and beyond" with this and I really like where you're headed.

  • Profile Photo
    Pedro L. Rocha said 3 years, 2 months ago:

    @tcinla Thanks Tom! I’ve been enthusiastic about this build, really is a mojo booster and it’s been pushing my head for modeling solutions I rarely used until now.

    Finished the undercarriage (including the tail wheel though it’s not in the photo)

    The cockpit is also going well, need to get the throttle and other manifolds (and that’s a lot of manifolds I say) plus the ammo belts and those spent ammo sleeves to proceed to final conclusion of this area