Memorial Day tribute to a fallen family member. Monogram 1/48 B-25 J ”Stuff”

Started by Louis Gardner · 98 · 4 years ago
  • Profile Photo
    Louis Gardner said 4 years, 9 months ago:

    Thanks gents ! I sincerely appreciate the compliments... 🙂

  • Profile Photo
    Louis Gardner said 4 years, 9 months ago:

    I have been experimenting with various nose weight configurations to keep this one from being a tail sitter... I added some steel weights in the forward part of the nacelles... and this wasn't enough.

    So I packed the void areas using modelling clay. Still tail heavy. Not good.

    So I packed things up at left it alone overnight.

    This morning I started fresh and had an idea that I wanted to try out. These older Monogram kits have a fairly large gap present where the wings join against the nacelles...
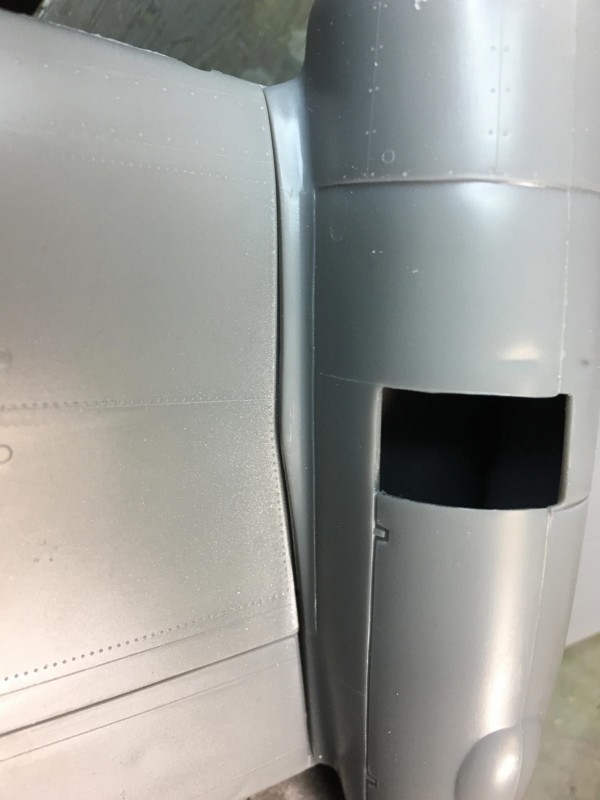

    Plus I wanted to build a holding area for additional weights. So I removed the modelling clay and steel stick on weights.

    The next step was to break out the template gauge.


    I ended up with this pattern

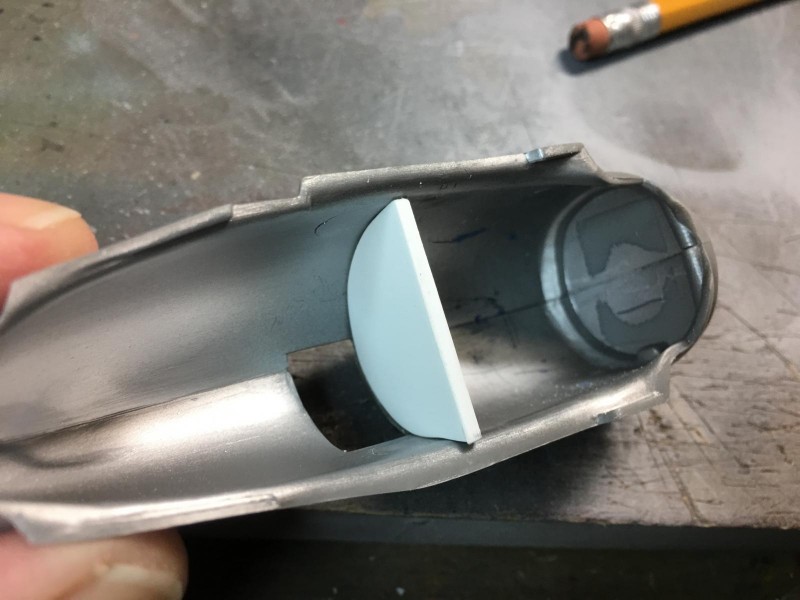
    Next I traced it onto paper and made a mock up bulkhead to fit the inside of the nacelle. This paper pattern was transferred onto some thick plastic sheet. I ended up with something that looked like this when it was all said and done. Notice the 45 degree bevel at the bottom:

    The bevel was done to clear the locating pins and allows the bulkhead to sit farther towards the rear of the nacelle. This will allow for more lead weight in the forward compartment.

    I made sure that the new bulkhead was a little wider than it needed to be. This helped to push out the side walls of the nacelles.

    In turn it removed some of the gap... and now the nacelles fit a little better.


    Now I have a decent sized area to hide some shotgun lead pellets inside the nacelles.

    This is what I ended up with...

    The next step will be to add the lead pellets, and then do the center of gravity test again with the tail parts mocked up and the main landing gear legs pressed into position.

    Hopefully this time It won't be tail heavy. With the glass nose, it's not easy to hide weights in there...

    In case this works, I kept the paper pattern for the other Monogram B-25's in the stash...

    I'll spray the new bulkhead flat black or aluminum to blend things in and make it look as if this is part of the kit if you happen to peek inside the landing gear well.

    as always,
    Comments are encouraged.

  • Profile Photo
    Allan J Withers said 4 years, 9 months ago:

    Looking good Louis, lead is the way to go, my 1/72 B25 has this molded piece in the nose, pic 1 and more under the cockpit floor, I like to mold lead to fit the nose of most of my models using casting plaster, make sure it has dried before pouring the molten lead in, you may find it worth while to try this with your nacelles !

    5 attached images. Click to enlarge.

  • Profile Photo
    Louis Gardner said 4 years, 9 months ago:

    Allan this is perfect ! What a smashing idea... I will definitely do this on the next build.

    I would have done it this time but by the time I read what you posted, I had already glued the lead Bird shot in place using regular Elmer’s white glue.

    Plus I don’t have any plaster on hand, but I will definitely be picking some up now. Wonderful thought. This will work with other future builds. I’ll make some molds and start having some practical nose weights similar to those that were being made some years ago by Terry Dean.

    Thanks !

    Marvelous idea ...

  • Profile Photo
    Louis Gardner said 4 years, 9 months ago:

    Here are some pictures that show the bird shot lead weight glued into the nacelles.


    Once the glue had dried overnight I permanently glued the nacelles to the wing.

    Prior to gluing everything together, I did a mock up test to see if this would work as is.

    I’m very happy to report that “Stuff” now sits perfectly with all three struts on the ground.

    As always, comments are encouraged.
    Thanks for stopping by.

  • Profile Photo
    Louis Gardner said 4 years, 8 months ago:

    Last night I took care of the seams and various sink marks on the fuselage. This area has been wet sanded with 400 grit paper.

    This is the upper fuselage section. The two small "bumps" on top of the fuselage were glued on as well. From what I have read, on the real plane, these were bullet deflectors, designed to keep the top turret gunner from accidentally shooting the tail gunner, or various sections of the tail. That would make a bad day even worse.

    The upper turret supposedly had a fire interrupter system that was supposed to keep this from happening. I think these two deflectors were added as an additional safety measure.


    The underside had some blemishes too. This underside area will now be covered with Bare Metal Foil.


    Once the sanding work was done, I attached the clear parts.

    The MG's were installed behind the clear parts. Here's the nose...

    and the waist gunners position.

    The tail gunner's all enclosed now too.

    The wings and engine nacelles will get the same treatment with filler, wet sanding and Bare Metal Foil.

    as always,
    comments are encouraged.

  • Profile Photo
    Michel Verschuere said 4 years, 8 months ago:

    Great build Louis, a real worthy tribute. Keep going my friend!

  • Profile Photo
    Jeff Bailey said 4 years, 8 months ago:

    Brother Louis, you have already fixed the problem, so I won't go into too much detail here. For decades (my Dad taught me this circa 1960-1961, when I began modeling) I have always used modeling clay and shotgun shot (#8 size or smaller) to add weight. Some years later I modified this technique because I was out of clay, so I filled the hole I needed the weight in and then poured liquid glue over the shot. BAD IDEA! That much glue melted the plastic, ruining my project. Then I realized that Elmer's glue (white liquid glue that actually has milk products as part of the ingredients) or Tacky would work without melting the project. If not much weight is needed, spread some clay, then embed lead shot, or ... if a LOT of weight is needed - like in your B-25 - fill the area with shot then pour white glue over the whole mess and wait for it all to dry. This will take a while to dry, but it should be dry in 48 hours or so. Of course, custom fitting partitions to hold the glue-soaked shot may be needed, but as you showed, Louis, that isn't too hard.

    Anyhoo, great job getting your potential "tail sitter" to sit up straight and be right!

  • Profile Photo
    Erik Gjørup said 4 years, 8 months ago:

    @lgardner, comin' along nicely! - looking forward to the metail foil. . .

    • the lead-weigts by @kalamazoo are GR8 stuff. Thanx for sharing.
  • Profile Photo
    Stephen W Towle said 4 years, 8 months ago:

    Louis,

    Or should I say the CEO of Modeling Industrial,light and magic. Awe struck by your productivity too. I've have never met a Monogram B-25 I didn't like...its the perfect canvas for painting nose art. Big enough to show some of the art work that went on and of course made famous by the movie Catch-22 and more importantly the ride of our nations heroes. Like you I had concerns for weight and balance when I built my kit and pretty much did the same thing only I put enough shot in the kit to take down a deer. Never had a problem with the kit being a taildragger. Once I completed the kit and it sat for awhile the main gear started to splay out from all of that lead. I replaced the plastic main gears with one of those white metal sets and then took piano wire to represent the brake lines to help stiffen the gear further. I also, cut some brass tubing to mount the white metal gear. Made it long enough to match the gear stub and glued with epoxy. Some over kill ...your mileage may vary. Keep up the good work. The decals are what really make the kit stand out and make it interesting.

  • Profile Photo
    Louis Gardner said 4 years, 8 months ago:

    Gents thank you very much for the comments and compliments.

    Stephen, I have another 1/48 scale B-25 build from many years ago. That one is a solid nose tri colored US Navy PBJ, so I used a lot of modelling clay in the nose of it. I'm surprised the landing gear has held up... any day now I'm expecting a failure. When it happens, I'll take your advice and make some mods.

    I still want to build up another one of these Army B-25-J's, but in the markings from the 100th Bomb Squadron from the Philippines in early 1945. This one will also be a tribute build to another family member of ours that never made it home... He was a B-25 pilot in the "Crusaders".

    For this one I will be making up a set of lead weights just as described by our friend Allan.

  • Profile Photo
    Louis Gardner said 4 years, 8 months ago:

    Last night and earlier today I applied the Bare Metal Foil on the fuselage.


    I used three different shades of foil.

    This B-25 is covered using "Ultra Bright Chrome", "Chrome" and "Matte Aluminum".

    Each panel received a slightly different shade to make the aluminum panels stand out just a little more.
    Here are a few close up pictures that show this effect a little better than the overall pictures did.


    The upper portion of the fuselage will be sprayed in OD Green. That's why I didn't cover this area with foil. These areas still remain in the plastic color of gray.


    This last photo will give you a general impression of how the aluminum looks in various colors of foil.

    It's hard to get a decent photo of the airframe at this point. Once the plane is completed I will take some better pictures with a different light source.
    As usual,
    Comments are encouraged. Thanks for stopping by.

  • Profile Photo
    Allan J Withers said 4 years, 8 months ago:

    Looks good Louis, something I should try one day !

  • Profile Photo
    Tom Bebout said 4 years, 8 months ago:

    Ah, the bare metal specialist at his best. Looking good Louis, will put my model representing Stuff to shame.

  • Profile Photo
    bob mack said 4 years, 8 months ago:

    marvelous work "Old Top"...had no idea this was going on until i saw the headline