A-4B Skyhawk – Fuerza Aerea Argentina, Falklands War – 1/48 scale

Started by Colin Gomez · 94 · 1 year ago
  • Profile Photo
    Erik Gjørup said 3 years ago:

    The IP and consoles look a lot better than PE! Well done!

  • Profile Photo
    Colin Gomez said 3 years ago:

    Thanks, Spiros. I suddenly see now that we can reply to individuals in this forum - that's a welcome improvement. The only problem is that it doesn't go where it is supposed to. Oh well. I am really glad you like the cockpit. Modeling is like impressionist painting (only not so culturally valued!), we often aim for the result that best captures the light and looks true to the eye. I haven't done this sort of painting for a while but I am glad I did. It sure is more challenging to work in 1/48 than 1/32.

  • Profile Photo
    Colin Gomez said 3 years ago:

    Thanks, Tom. The decals I have are for C-236 but I can just flip the last number. I have Pablo Calcaterra's Osprey book on the Sea Harrier vs the Mirage/Dagger - a very good read. I have also seen his fine modeling work on Modeling Madness of the Hasegawa and Hobbycraft A-4s. Good to know the correct load out. It looks like C-204 had the yellow ID panels, which I like. Do you know if C-239 had them as well?

  • Profile Photo
    Colin Gomez said 3 years ago:

    Thanks, Erik. I am really happy that you find the painterly work looks better than etch. It certainly has different qualities and, luckily, the right ones to get the older beaten-up look I am aiming for in the A-4B cockpit. I hope you like the final seat and pit, below.

  • Profile Photo
    Eric Berg said 3 years ago:

    That's a great idea using the flat clear over the decal consoles. I wonder if other flat acrylics will work just as well because who knows how much longer MM clear flat will still be available. That cockpit looks "absolutely marvelous", as Fernando on SNL used to say.

  • Profile Photo
    Colin Gomez said 3 years ago:

    Here is just a brief update to show the finished seat.

    I put a lot of care into this and wanted to at least document it before fitting it inside the fuselage and risking damage. It was most fun to do the face curtain firing handle. I used stretched sprue, which I pulled tight around a round toothpick to get the right curvature and size of handle. I ran this under the hottest tap water I could while stretching it; the heat softened the plastic into a permanent "U" shape. Once painted and glued in, it was ready for the zebra stripe warning decal. The ESCAPAC seat has this odd plate over the front of the handle, instead of striping all along the handle itself. The decal replicates this nicely. The only thing missing from the pit now is an oxygen hose which I will put on the console to the port side of the seat. My Squadron A-4 Skyhawk Walkaround shows how this looks. Just have to paint it first. More updates soon. Happy modeling.

  • Profile Photo
    John Healy said 3 years ago:

    Looks great, Colin.

  • Profile Photo
    Colin Gomez said 3 years ago:

    Thanks, Eric and John.

    Eric, I think maybe the Gunze Flat has similar qualities, but I would want to apply it with adequate retarder to get to flow into crevices. Would have to test it first. Did Model Master abandon acrylics? That would be a shame if they did.

  • Profile Photo
    Erik Gjørup said 3 years ago:

    Colin, that is awesome. Yes, I like it a lot! I think that Eric refers to the fact that MM has indeed stopped makint the paint, and whenever you trip over a bottle you should get it. Only availabl as long as stock last! The importer in Denmark still has a few different colors available, but not a lot.

  • Profile Photo
    Spiros Pendedekas said 3 years ago:

    This is an amazing cockpit, my friend @coling!
    Yes, it is amazing what can be done with scratchbuilding and good references (and your excellent skills, of course).

  • Profile Photo
    Tom Cleaver said 3 years ago:

    @coling - According to Pablo, all the FAA A-4s did have the yellow panels.

  • Profile Photo
    Eric Berg said 3 years ago:

    ModelMaster was made by Testors. Rustoleum purchased Testors a several years ago and dumped the MM line and replaced some of the colors with their own Rustoleum labeled line of model paints and rattle cans packaged that look suspiciously just like MM. Last time I saw these Rustoleum model paints was pre-Covid so I can't say what's up currently. There seems to be plenty of MM clear acrylics still around online.

  • Profile Photo
    Colin Gomez said 2 years, 11 months ago:

    Thanks, guys for your supportive comments. Thanks also to Eric and Erik for the info on MMAcryl paints. Guess I should stock up while I still can. Those expensive little bottles have got to be profitable for Rustoleum, though. They are priced like gold, compared to automotive and house paints.

    Please convey my appreciation to Pablo, Tom and thanks for inquiring for me. I hope he might want to jump into the GB some day. Lots of subjects to cover, yet.

    Here is a brief update on the Skyhawk. I added the last detail to the cockpit: an oxygen hose made from guitar string.
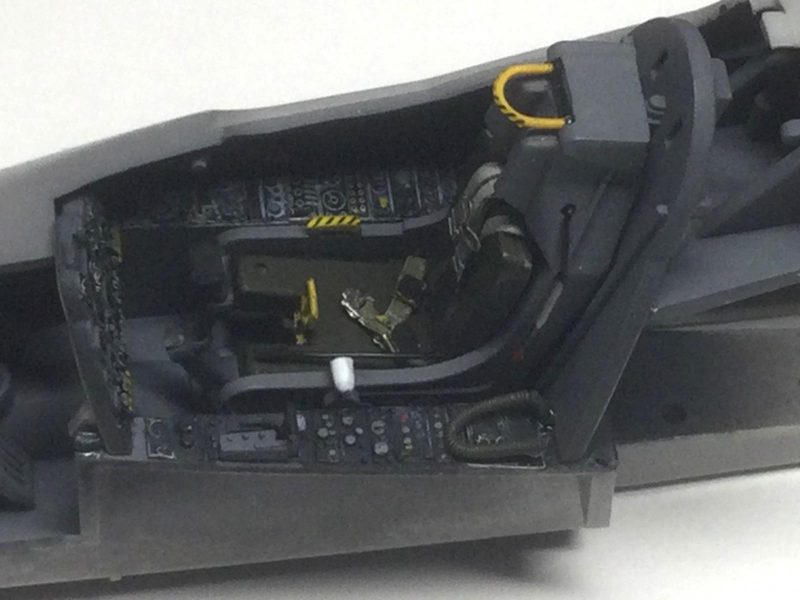
    This matches real cockpit photos I've seen of how it fits in the A-4 beside the seat. I glued in a hefty fishing weight plus a few more fragments not pictured.
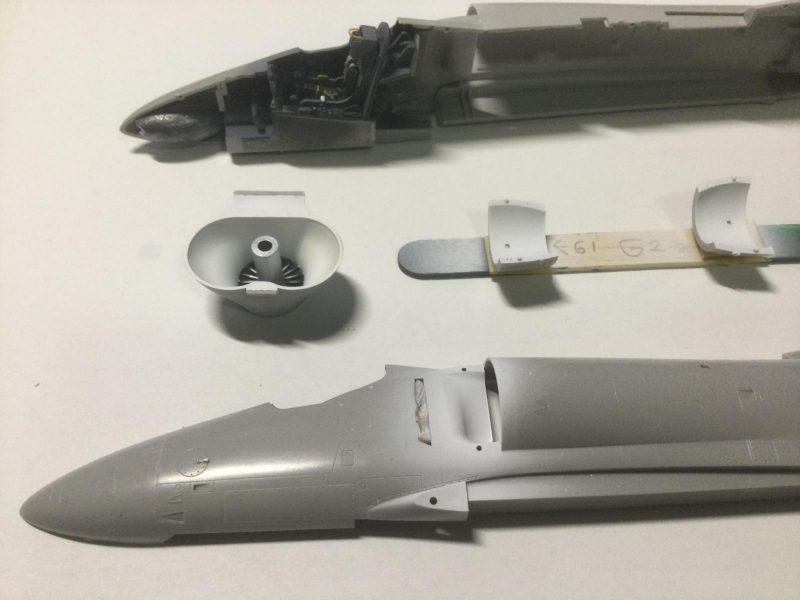
 Hopefully that will handle the landing gear stance - it's pretty nose heavy now. In fact, it was so nose heavy that I dropped it while painting and had to repair the face curtain firing handle on the seat, which snapped off. With the intakes and fan painted, I glued the fuselage halves together and am now ready to sand the seams. I dry fitted the lower wing for now for photography. I will be ready for the first stages of painting soon, which will begin with the red slat and flap bay detail. I am feeling good about this build. Hope you like what you see, even though it may not be too exciting yet, it is obviously a crucial stage for me.

  • Profile Photo
    Spiros Pendedekas said 2 years, 11 months ago:

    What a great progress, my friend @coling! It is always a fantastic feeling to put the basic model elements together. Love how the cockpit turned out!

  • Profile Photo
    Colin Gomez said 2 years, 11 months ago:

    Thanks, Spiros. A bit lonely in this GB but here goes nothing.

    I attached the intakes and did most necessary filling and sanding for the fuselage and wings.

    this was another case where I attached the top wing halves to the fuselage before adding the bottom wing to the hold assembly (see below). It makes for a very good fit. BTW, I plan to recreate or reshape the balsa intake covers from my SuE paint process to do the same with them for the Skyhawk. That will come later. In the meantime, I have solved one other nagging "problem" of the Hasegawa A-4 - the odd un-aerodynamic "step" at the back of the slat bay. I was going to leave this but decided to create styrene sheet inserts to correct it after all. I had to add a small strip inside to make sure it fit flush at the back. All detail seen on the Hasegawa flap pay was rescribed in the white styrene insert. Accuracy issue fixed! I then glued on the bottom wing half.
    I have spent a lot of time research the bombs and mounting arrangements for the Argentinian A-4B. I won't go into detail about this just yet but suffice it to say it's complicated! Anyway, I recently received the required TER (Triple Ejector Rack) for the 500 pounders from eBay. Now I just have to re sculpt some bombs to match research images and data before moving on to painting.