Two 1/32 scale Revell of Germany P-51-D5 Mustang builds. One as ”Cripes a Mighty 3rd” and ”LOU IV”

Started by Louis Gardner · 366 · 1 month ago
  • Profile Photo
    George R Blair Jr said 3 years, 9 months ago:

    Great idea, Louis, to paint more than one model at a time. I have tried doing that but my build space is limited enough that I usually do only one project at a time to keep the clutter and confusion down to a minimum.

  • Profile Photo
    Louis Gardner said 2 years, 4 months ago:

    Gentlemen,
    It has been WAY too long for me to not have done anything with these two builds. It's been a little over a year and 5 months since I have made any progress.

    In particular, I was thinking about these two Mustang models on Christmas day, which also happens to be the very same day that Major George Preddy was shot down and killed back in 1944.

    I hope to have a lot of bench time coming up sometime in mid to late January, if the good Lord is willing. I will revive this build and be working on the 1/48 Monogram B-24 "Tubarao" at that time. If things work out I might get more previously started projects completed, so please stay tuned.

    I also want to build a 1/48 scale Monogram B-29 for our Korean War group. I have everything in place to complete these models, the only thing I am lacking right now is time...

  • Profile Photo
    John vd Biggelaar said 2 years, 4 months ago:

    Really looking forward to the continuation of these kits, Louis @lgardner

  • Profile Photo
    Spiros Pendedekas said 2 years, 4 months ago:

    Those are really great projects, my friend @lgardner! As always, it will be a pure pleasure to follow them along, since you have a gifted way not only to build in excellence, but to write down all build details in a very understandable way. Add to the above the great research and we are talking about superb build threads!
    Really looking forward to them!

  • Profile Photo
    capt. R said 2 years, 4 months ago:

    @lgardner
    Great project! I like your build! I hope you finish it! 🙂

  • Profile Photo
    Erik Gjørup said 2 years, 4 months ago:

    blip blip blip - tuned in and ready to follow as they re-start!

  • Profile Photo
    Pedro L. Rocha said 2 years, 4 months ago:

    Same here Louis! I gotta feeling 2022 will be a Pony year for me too

  • Profile Photo
    Tom Cleaver said 2 years, 4 months ago:

    Just be glad you didn't commit the stupidity of deciding to do a later-version P-51D and spent the $25 to buy a resin set that has the different tail, horizontal stabs and elevators - let's just say that opening the box the other day was a trip in the Wayback Machine to a good 30+ years ago of "garage" resin parts, none of which are usable once cleaned up (and they all need MAJOR clean-up!). And the vacuformed canopy wasn't better. Unfortunately you really do need a replacement canopy since EVERY CANOPY in ALL THE KITS was pulled out of the mold too soon and they are "coke bottle" in visibility - and the "replacements" Revell was sending out when the kit was first released are no better. There's a clear-resin canopy done by Aeroscale (I think that's the name) over in England that is good. The name of this company that is going to see a return of all this is the German name for single seat day fighters used as free ranging night fighters. You have been warned. I don't know how this guy does business.

  • Profile Photo
    Louis Gardner said 2 years, 3 months ago:

    Hello again everyone. Welcome back to the party... Today I made some progress, but since it's getting late, this will be an abbreviated posting. I will respond to you all hopefully tomorrow.

    When I first started working on these two Revell Mustangs, I wanted to make sure the separate tail section fit well. So I glued it in place first. It has had well over a year to dry now, so it should be OK 🙂

    There is a small "step" where the tail section joins the fuselage.
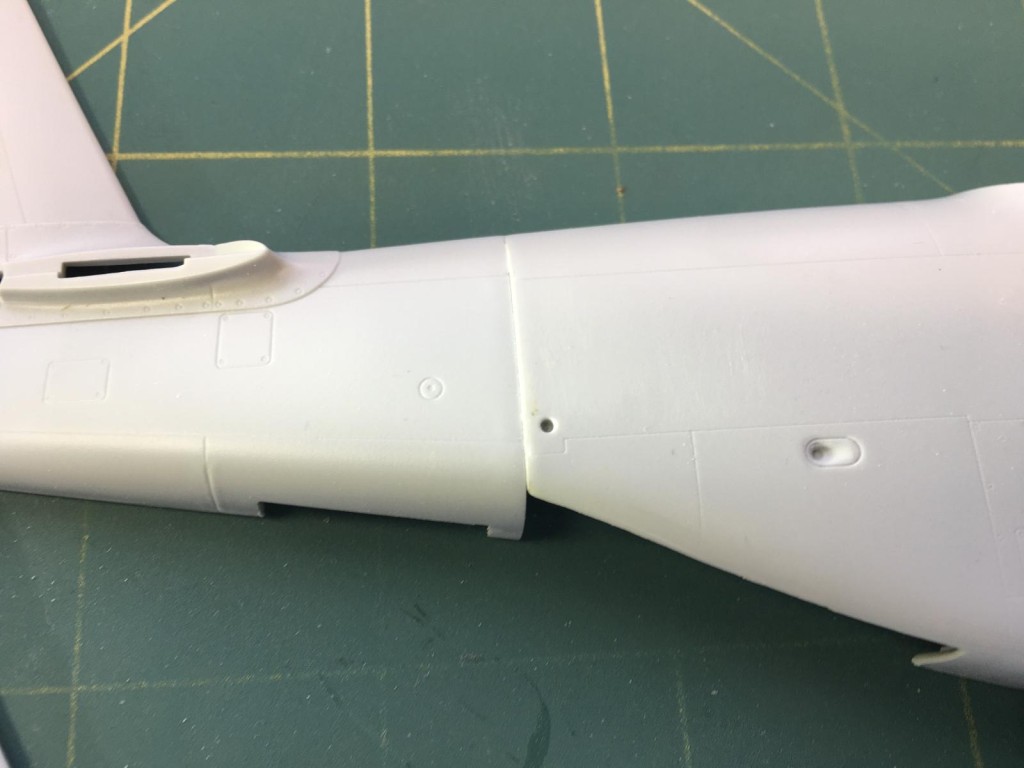

    Here is what it looks like after a few minutes with some quality time and a sanding stick. The good fit is evident, and it looks very nice once the step is sanded down smooth. In this next picture you can see the upper fuselage half has not been sanded level, while the lower section has.

    This is a good close up photo showing the joint. It is a very good fit other than having the step. I restored some of the panel lines afterwards, and now you can't tell this was two different parts.


    On the real Mustang, there is a hole that passes through the fuselage. This is used for hoisting the airframe, or securing it down. So out came the pin vise, and a #62 drill bit... Voila ! we have a set of nicely drilled holes.

    This is how the two right hand fuselage halves look like now the holes have been drilled. One of these still has to be sanded down smooth to eliminate the step.

    In case you are wondering which version this is, here's the box art.

    Now I have a question for you, and I hope that someone knows the answer. They used 3 different types of covers on the lower nose section of the Mustang. Here are the three examples. One style is a flat blank plate. Next is one with a series of small holes. The last type was a mixture of holes and ridges.

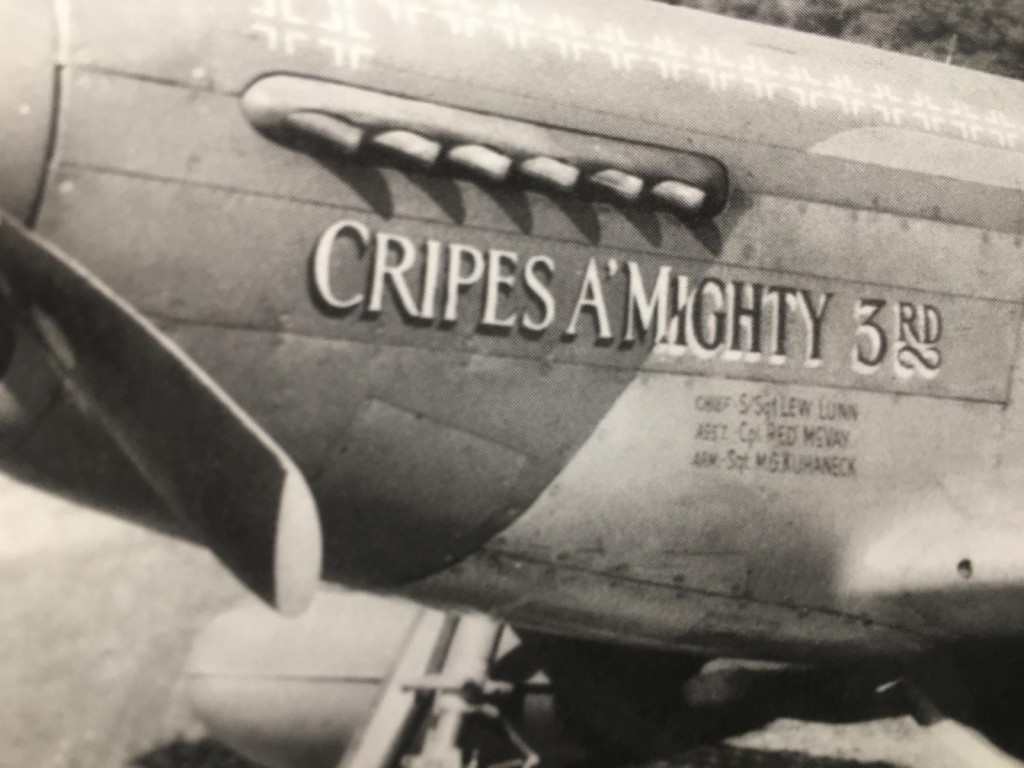
    I know for certain the "Cripes A Mighty III" had the blank / smooth style. It can clearly be seen in the cover picture.

    I have glued the smooth style plate in place on the fuselage sections that are going to eventually be Cripes A Mighty.

    This is the opening where the cover fits. I have been doing a bunch of scrounging around on the Internet, trying to determine exactly which style of cover was used on "LOU IV".

    I am about 75 percent sure this aircraft could have had the style with the small holes in it. What makes it so hard to determine, is the lighting when these pictures were taken, as well as the cover appears to be dark possibly even a Black color.

    If anyone knows for sure, please don't hesitate to reply about it.

    As always, comments are encouraged.

  • Profile Photo
    John vd Biggelaar said 2 years, 3 months ago:

    That tail section looks perfect, Louis @lgardner
    Regarding that plate, I'm not sure either. I would say tiny holes as well but have no proof for that.
    I did find the following image, but it does not prove if it is correct from the original picture.

    1 attached image. Click to enlarge.

  • Profile Photo
    Erik Gjørup said 2 years, 3 months ago:

    Nice return of this build. And a very welcome return it is. I know nothing at all about the plate, but I would go for olive and holes. But lets hope someone who really knows will show some documentation.

  • Profile Photo
    Louis Gardner said 2 years, 3 months ago:

    John, @johnb
    Erik, @airbum

    Gentlemen,
    Thank you VERY much for the assistance. That's a nice looking artists rendering. I have been studying the nose panel in question, and It very well "could" have been a solid plate, just like the ones used on Cripe's A Mighty III. These aircraft were built with less than 100 airframes in between them. I took this photo,


    and zoomed in on it. What I ended up with looks like this.

    By enlarging it to this level, most of the sharpness in the picture has been lost. In the end, I'll likely choose between the solid flat and the one that has a series of small holes in it. That was also a good suggestion about the color of this cover possibly being painted in OD Green. I am leaning towards the plate with the small holes in it, as recommended.

    Thanks again gentlemen.

  • Profile Photo
    Louis Gardner said 2 years, 3 months ago:

    Today I actually got a lot of work done on these two Ponies.

    First up, I sanded the bulge along the seam where the tail section didn't fit as nicely as I would like. The panels lines were restored after the polishing was done.


    All 4 fuselage halves were taken care of.

    While working on the fuselage halves, I drilled out a tiny hole on the Starboard side of the engine. In many Mustang pictures, you will notice that oil has a tendency to run out from this hole.

    Next I concentrated on building up the radiator and associated tunnel. The fit has been very nice with these parts. I will only have to add a tiny amount of Liquefied Styrene in one place.

    Following this, I installed the other half of the inner tail wheel well "box". This part fit together so nicely, that I could have gotten away without using any glue. I did however glue the parts together. This is what the tail wheel bay, the radiator and air flow tunnel looks like now.


    Here I have flipped the parts around so that you can see both the top and bottom side at the same time.

    Finally I glued together the wing ribs, which will be a part of the main landing gear wheel well opening.

    Tomorrow I will be spraying on some Yellow Zinc Chromate on the inside of the upper wing half, the outer portions of the tail wheel bay. Then I will be painting the exhaust shrouds, and possibly the entire nose sections in blue for one P-51, and Yellow for the other plane. This will allow me to install the new aftermarket exhaust and I will be one step closer with this one.

    This is a picture of me sitting in the cockpit of a full sized 1 to 1 scale Mustang. I consider myself to be very fortunate to have had some of the opportunities I have experienced during my life.

    I'm calling it a day.

    As always, comments are encouraged.

  • Profile Photo
    Tom Cleaver said 2 years, 3 months ago:

    @lgardner - most people who study Lou IV are of the opinion it has the plate, the reason being that 1944 was relatively cold all year and many of the P-51s got the holes replaced with the plate to keep the engine warm inside the cowling.

    You're doing so well on these that, if you're not careful, you're going to shame me into pulling out my kit and resuming it after I can't remember how long, but it was back when it was first released. 🙂

  • Profile Photo
    John vd Biggelaar said 2 years, 3 months ago:

    Amazing progress, Louis @lgardner.
    Judging from the smile on your face it has been a great experience to take seat in that Pony.
    Nice to see the Yellow Zinc Chromate on the right side of that picture.