Eduard F6F-3 Hellcat, 1/48. Grumman's Ace Maker.

Started by Harvey R. · 70 · 1 year ago
  • Profile Photo
    Harvey R. said 1 year, 11 months ago:


    Two white boxes appeared, what could it be?

    Two F6F-3 Hellcat overtrees from Eduard. I've been wanting to get a Hellcat in the shelf for a while now since it's obviously such an iconic Pacific war aircraft, but Eduard's offering has been a little hard to get a hold of. Thankfully, last month they seem to have started reselling the models with their F6F-5 coming last month, their F6F-3 this month and the overtree sets being available.

    Why overtree? Well I want a nice tri-colour Mid-war scheme Hellcat so that limits us to the F6F-3, and the only one available was the profipack but for that price I could get two overtrees and a decal set. I also wanted to do one Hellcat in flight, and another one on the ground.

    Looking at the sprues I'm reminded that this is a big old piece of kit. It is a fat aircraft and there is no doubt about that, and having never seen the Hellcat but only its older and younger brother in the form of the Wildcat and Bearcat I wasn't expect it to be quite so large. This is a large reason why I like to stick with my chosen scale of 1/48 so I can build a better understanding of size especially on these aircraft I haven't seen.

    For the schemes, we will be doing one famous ace in the form of Alexander Vraciu's aircraft. Vraciu was at one point the highest scoring Navy ace, and ended the war coming in forth. In perhaps his most famous incident was shooting down 6 D4Y 'Judy' dive bombers within just a few minutes on June 19, 1944 also known as 'The Great Marianas Turkey Shoot'. Apparently he only used 360 rounds of ammunition to accomplish this feat, which if true is a testament to his astonishing skill and the astonishing stupidity of having unarmoured dive bombers...


    The second one, well I'll come to that later. It will be a very generic Hellcat but I do wish to do a diorama for it hence why I'll leave it as a 'possible' as my track record with actually going ahead and finishing a diorama idea I've had in my head is rather poor.

    Anyways, time to prime some plastic and get the cockpit put together!

  • Profile Photo
    Spiros Pendedekas said 1 year, 11 months ago:

    Great entries and great scheme choices, my friend @scalerambush!
    Looking forward to them!

  • Profile Photo
    John vd Biggelaar said 1 year, 11 months ago:

    An amazing entry, Harvey @scalerambush
    Since I'm also still looking for a Hellcat on the shelve, I will be absolutely following your progress with great interest.
    With Vraciu's background, the build will have a nice history part as well.

  • Profile Photo
    Brian Scott said 1 year, 11 months ago:

    @scalerambush I am really looking forward to this > Love the Grumman Hellcat and cant wait for the next progress update πŸ™‚

  • Profile Photo
    Harvey R. said 1 year, 11 months ago:

    Thank you all!

    Got a few builds going on at once at the moment, so a bit of time was spent on an A6M2 when the paints arrived for it. I did do some basic work on the Hellcats however.

    First Steps, the Cockpit


    Unsurpsingly we start with the cockpit on this kit. For context, the Eduard F6F first came out in 2008 which isn't old but I would say Eduard have progressed in quality greatly over the years, there is definitely a noticeable difference in quality from their 'older' kits I've built (Fokker Dr.1, D.VII, Hellcat) compared to their kits in the recent few years.

    With this the first thing to point out is a very sparse cockpit detailing, a lot of it is actually just plain and is clearly designed around the use of either photoetch or decals. This is disappointing as I wasn't quite expecting this as every other Eduard kit I've built I've felt has had superb moulded details in this area, and as these are both the 'Overtree' sellings I don't actually have any decals for the cockpits.

    As such I did my best, the black panels were quickly masked and sprayed on one by one by going off of what I could see in photographs, but even so it is lacking some buttons and switches.

    Of course, without decals I had to resort to just painting the instrument panel. It's not the finest work in the world (a worker shouldn't blame their tools and all, but I do need to get round to buying some less frayed brushes!) but it will do.

    With that the fuselage could be assembled, of note is that the tailwheel needs to be glued in place before the fuselage is sealed but luckily this is really only going to be painted the underside colour so not a lot of masking would be required if wheels down. Building it wheels up was simple, the holes were the wheel goes in was cut out and part of the wheel chopped off, its a quick 2 minute job. You also need to add the windows behind the pilot that are a characteristic of the earlier F6F-3 before gluing, I added these with Krystal Klear and then masked them off. With that done the two halves were added, of note in this is the lack of guideholes to align the fuselage which could cause an issue.
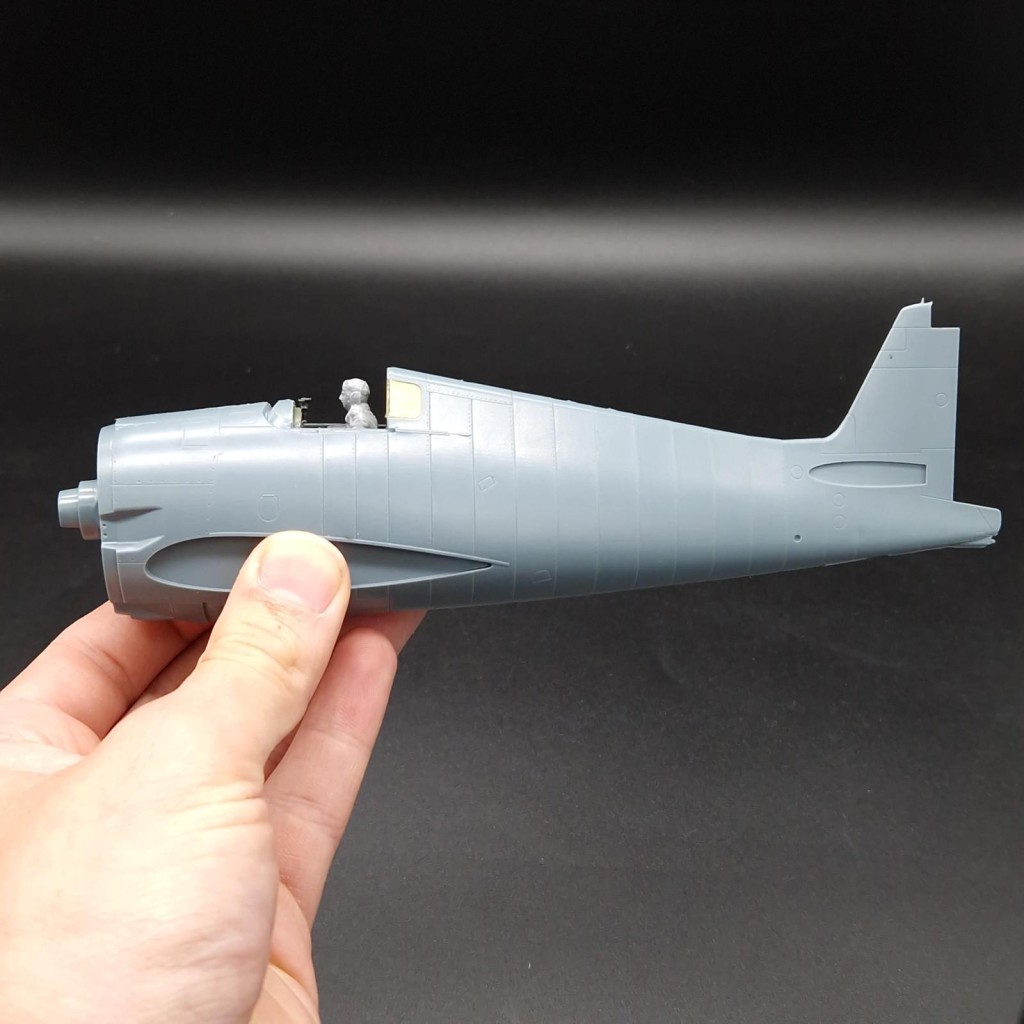
    The Wings and Cowling

    I also started to assemble the wings so I could work out what the best way to tackle the wheels up modification would be, it doesn't seem particularly difficult but one panel will need to be scratchbuilt and I'll show that off when I get to it. The two of the three panels in the kit that the undercarriage has fit well enough, and since the wheels come in halves just adding the one visible half allows it to fit into the bay decently well. I found that removing the detailing here makes life easier and should have been done before assembling the wing.


    For some reason though I had issues with one of the wings sort of collapsing in on itself, lots of glue plus using the handle side of the tweezers to prop it up solved it. This will need a fair bit of sanding later

    It is interesting how the wing glues on, I wonder how strong this will actually be.

    I also assembled the cowling, which actually fits not too bad and won't fall off by itself. This should allow it to be painted on the model, removed and then the engine popped on for final construction.

    With that we are actually not all that far off of painting, all we'd have to do is build the horizontal stabilisers and the rudder, but of course the task of sanding and removing seamlines is going to be the time sink.

  • Profile Photo
    John vd Biggelaar said 1 year, 11 months ago:

    Great progress, Harvey @scalerambush
    The cockpits still look very detailed.

  • Profile Photo
    Spiros Pendedekas said 1 year, 11 months ago:

    Looking great as always, my friend @scalerambush!

  • Profile Photo
    Andrew H said 1 year, 11 months ago:

    Wow Harvey, a lot of good work in short order. Those cockpit side panels and IP look great from here!

  • Profile Photo
    Brian Scott said 1 year, 11 months ago:

    Those Grumman Zero Killers looking really great !

  • Profile Photo
    Rick Wilkes said 1 year, 11 months ago:

    Hi Harvey.
    Your Cat’s are looking great. One question, from your pictures it appears that you assembled the tail wheel in the retracted position on both kits. Not being a wise guy, just asking.

  • Profile Photo
    Harvey R. said 1 year, 11 months ago:

    Good eye Rick, you're not wrong!

    The common quip is 'any landing you can walk away from is a good one', well the plan is the pilot can walk away but the plane might not be in the best shape.

    I'm currently work is divided between the in flight Hellcat and an A6M2, when I have a bit more substantial work to show on the diorama Hellcat I'll upload some photos but right now I'm trying to work out a few finer details with this whole scratchbuilding business!

    Assembling the Hellcat

    Just a quick update, it should be said that this kit is very simple in construction, and with the cockpit assembled and fuselage glued up not a whole lot of filler was required but I did give it a quick bit of work down the fuselage seam and rescribed those unique panels.


    I was debating leaving the wings off the model and painting it seperate, but in the end it seemed more hastle so I just glued them on. The wing leading edge was also puttied to remove any seam. The horizontal stabilisers were also added.

    The immediate steps are the pilot and canopy, then prime it and whilst that dries I can work on the engines and propellers. Though of course the other A6M2 I'm doing is in the decal stage which takes some time!

    One thing I do appreciate about the Hellcat upon doing it is that it is bigger than I thought, I always assumed the Hellcat was chunkier but smaller than the Corsair having never seen one and placed it in my mind as between the Bearcat and Corsair in size, but man she is a chunky plane with a good wingspan.

  • Profile Photo
    Spiros Pendedekas said 1 year, 11 months ago:

    Coming together nicely, my friend @scalerambush!

  • Profile Photo
    John vd Biggelaar said 1 year, 11 months ago:

    Great progress, Harvey @scalerambush

  • Profile Photo
    Brian Scott said 1 year, 11 months ago:

    @scaleambush that Hellcat really looking great !

  • Profile Photo
    Harvey R. said 1 year, 11 months ago:

    Evening folks! Work has largely been spent on the A6M2 since the last post but I have got a few bits done on the Hellcat since then.

    Fitting the Canopy

    To fit the canopy two things are needed, firstly to paint the internals that were otherwise left plastic previously.


    And of course, the pilot.

    I'm not too happy with this one, I'm not sure what it is. Perhaps it's the mediocre Tamiya mould? Perhaps it's the paint I used? Either way I'm not adding this to my proud painting list but it will be fine inside the canopy. I did briefly look at getting a resin pilot but I've already painted 2 of PJmodels sunglass wearing pilot and I'm not feeling having a third American wearing aviators in my models.

    Either way, with him done I can apply the canopy. Back to the old school manually masking ways with this one. Normally I add eduard canopy masks as a must have for any build but with this I just put tamiya 6mm tape onto the glass, pushed it down with a cocktail stick and cut it out with a sharp scalpel.

    With that done it can be glued on with Krystal Klear. I've found Krystal Klear glues a bit more resilient than the normal PVA, unfortunately I've run pretty low on the stuff recently so I'm digging at the bottom of the pot for it. I found this doesn't fit particularly well, which honestly isn't too surprising as even recent eduard kits have bad fitting pieces if you do a closed canopy.

    And on top of this the out of box engines are done. You can tell this eduard kit is old because it comes with a pin that isn't glued in and is of useable length, its a shame the new kits don't have that. I'll add some copper wire too it before I glue it on.

    With this all done the next step is to paint the cockpit internal, some folks like to paint the internal by masking it off but I think that's largely irrelevant unless you're being hyper-detailed so simply painting the clear plastic black before the subsequent coats will do fine. After that I can prime it and get painting.