Hawker Hurricane Mk.1, RAF, GiNA,1/48th, Airfix

Started by Chuck A. Villanueva · 73 · 3 years ago
  • Profile Photo
    Chuck A. Villanueva said 3 years, 11 months ago:

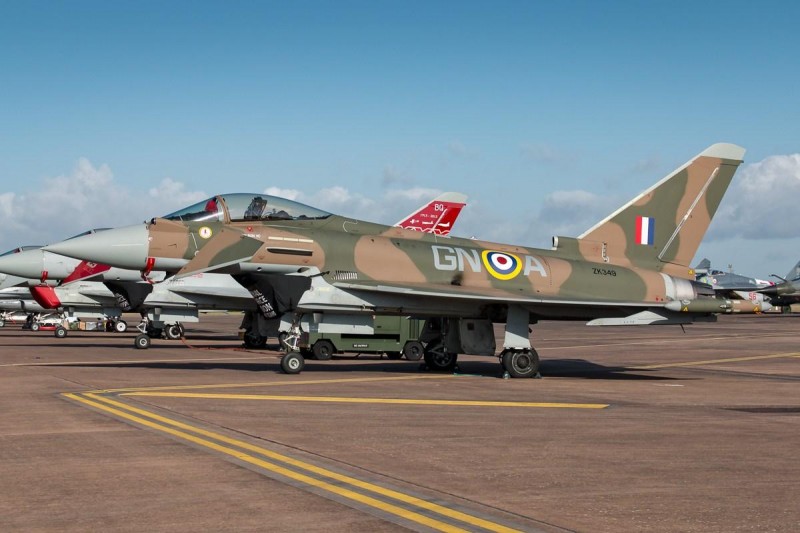
    So a year ago (seems longer than that) I participated in Paul Barbers 100 year RAF anniversary Group Build, and one of my contributions was the Eurofighter Typhoon. Wearing the markings of a WWII Hurricane Battle of Britain commemorative scheme. When the Typhoon wore this scheme during the Anniversary celebration by the UK in 2015. You see the Typhoon fly with Spitfires and other RAF war bird aircraft. No Hurricanes, so I assumed wrong that the scheme was of a Spit.

    As I was inspired to build a companion for the Tiffie turns out the scheme is from a Hurricane during the BoB. So I looked for awhile to see if I can find any markings for that particular Hurricane. You can't believe the number of schemes and markings that are available for the Hurricane all variants. But not this one, then a relatively unknown to me yet well know to researchers of Avieology. They had GiNA in their amazing Hurricane set. Trust me it was hard to find. So finally after a great motivating build that Dale Travis posted earlier this week of his fantastic Finnish Hurricane. Time to finally build my very first new mold Airfix kit, and it is the Hurricane. So lets take a peek inside, I love the smell of new plastic in the morning when you pop the lid and then take a sip of joe. (Coffee)

    The kit is actually the Tropical Hurricane which has all the parts to build the basic land based variant without the naval gear. Couldn't find the regular Hurricane boxing anywhere.

    The Avieology decal set, the Vital Storm pt2 series that contains the markings for GN A. The original set of markings does not have the badge on the LH side of the nose. A supplement was later released that has this marking. Avieology does admit they have yet to find photos or images of this Hurricane with these markings but it did exist according to RAF records, and the markings are based off of photos of other aircraft with the squadron markings in this period of time.

    The instruction sheet is the new style and very comprehensive yet really easy to follow, still lots of parts involved, take your time. Each step is simple and involves only a few parts in each one. So normally a kit will have all the cockpit components that are involved usually done in the first two steps.

    Airfix approach is for instance the seat has 3 parts to assemble and that is all for step one. And that how it goes the rest of the way.

    The decal sheet has markings for 2 aircraft one in the MTO trop scheme and another in an interesting overall silver scheme

    The kit is molded in a soft Lt grey plastic, a satin sheen overall. The details are amazing. The new style of mold from Airfix is much different than the Airfix of old. So this being my very first attempt on one of these new wunderkind kit is something to look forward to. The first sprue the lower wing, the wing spars, internal braces, gear doors, forward bulkhead and the main wheels.

    The next sprue contains most of the cockpit braces, both type of prop spinners. The gun bay detail parts as well as the guns if you wish to display the gun bays open. You will know delicate the braces and other smaller interior parts look and in scale that is not resin. Yet being careful they are not difficult to remove from the sprue. Just be careful with the nipper or knife when you remove the parts. For a single engine WWII fighter, the parts count is high. Lots of parts but not over engineered. Just a well laid out plan by Airfix in getting this together.

    The exhaust manifolds look good just may need to drill out the exhaust ports. 4 spoke wheels are in the kit, though my scheme may use the 5 spoke wheels, will check for that. The landing gear main struts are well done. The optional open gun bay doors are provided which is a nice touch as there are a set molded on the wings. The IP is well defined and uses the decals provided for the gauges and dials.

    The wing sprue is next for the upper wing panels. The horizontal tail and seat armored bulkhead. The upper wing panel has the ailerons as separate parts. The armored bulkhead and the center wheel bay roof again fine details.

    The final sprue contains the fuselage halves, the side cockpit braces and the 2 type of props.

    The fuselage has details on the inner cockpit side walls. PE will help define this area a little better.

    2 propeller type are also provided.

    And the 2 side braces which is the key to this kit. Get this first part of build correct, it is the foundation in how it all goes together at the very start. It is quite flimsy so be careful in handling it.

    Finally the clear parts look good and yay you can display the cockpit open, unlike the Hase Hurricane which has this as one piece.

    And it has only been that Hase Hurricane Mk.IIIC that I built when it first came out in the late 90's. The fan fare that kit received when it came on the scene. Now looks like this Airfix is going to surpass it. Though it is a good kit. Next up lets do some prepainting...more to follow.

    1 additional image. Click to enlarge.

  • Profile Photo
    Pedro L. Rocha said 3 years, 11 months ago:

    Nice choice Chuck, I’ll be following your build thread if you don’t mind. My experience with these newer Airfix kits is that they build very good and look accurate. However detail is somewhat soft in places, and sometimes also short. Considering the € spent I’d say they provide a good modelling time reward. The Hurricane Kit is on my wish list for some time so your experience with it is welcome

  • Profile Photo
    Spiros Pendedekas said 3 years, 11 months ago:

    Nice choice, nice inspiration and excellent presentation, Chuck. I can for see this will be a superb build. Please sign me up, Sir!

  • Profile Photo
    Erik Gjørup said 3 years, 11 months ago:

    I'm in!

  • Profile Photo
    Chuck A. Villanueva said 3 years, 11 months ago:

    Thanks Pedro, now I'm surprised you don't have one being one that is prominent in his WWII builds which are quite excellent. Then again I have yet to savor any Eduards kits, don't even have one in the stash to fondle. So I shouldn't be surprised as we can't get them all.
    Thanks Spiros and Erik, you get front row seats.!

  • Profile Photo
    George R Blair Jr said 3 years, 11 months ago:

    This should build into a great model. The new mold Airfix kits are awesome. We seem to get the Airfix kits here in central Texas, but they don't stay on the shelves long in the one or two hobby shops we still have around here.

  • Profile Photo
    Chuck A. Villanueva said 3 years, 11 months ago:

    Thanks George, after reading so many build reviews on these newer generation Airfix kits. Finally found a great opportunity to build one starting out with this Hurricane. The parts look good in the box, the details and parts count are quite intriguing. Time to get started.
    1st some pre painting of the interior components. Using Mission Models RAF Int Grey Green.


    Next using Vallejo Aluminum, portion of the fuselage interior is painted, framework, wheel wells, wheels, radiators and cooling scoop internal components.

    Next to prepare some of the interior PE bits to use for the interior.

    1st step is to build the seat.

    I will use Eduards PE for this vice the kit seat. The Airfix seat is ok, just comparing it against the PE seat is how bulky it looks in scale thickness. Just a matter of choice.


    More work on the interior, lots of fiddly pieces. More to follow.

  • Profile Photo
    Spiros Pendedekas said 3 years, 11 months ago:

    Looking great, Chuck! This Eduard PE seat (and the whole PE set) looks marvellous!

  • Profile Photo
    Erik Gjørup said 3 years, 11 months ago:

    @uscusn, Chuck, that looks like a really fine choice to use the PE seat. What an improvement.

  • Profile Photo
    Chuck A. Villanueva said 3 years, 11 months ago:

    Thanks Spiros and Erik, was going to stick to the kit seat as it accurate in shape but what a difference in scale thickness. So opted for the PE seat.

  • Profile Photo
    George R Blair Jr said 3 years, 11 months ago:

    Seat looks great, Chuck @uscusn. For a long time I would normally ignore the photoetch seats in the Eduard sets because I just didn't want to deal with them, but they really do make a big difference.

  • Profile Photo
    Chuck A. Villanueva said 3 years, 11 months ago:

    Good morning George, I was of the same mind set as well. But for the heck of it I took this off the fret and folded into shape. And after a comparison it was the way to go. Normally I will use the kit seats as most are accurate in shape and just use the belts to enhance the kit seats and a bit of weathering.

  • Profile Photo
    Chuck A. Villanueva said 3 years, 10 months ago:

    Now to build the cockpit frame work starting with the rear bulkhead which will also support the seat.

    The next step is critical, front and rear wingspars and the LH side of the framework are assembled. The parts are flimsy and delicate, yet resilient. These will be handled quite a bit during the whole cockpit assembly. Patience and just take each step and let the cement set. Will explain the process a bit more in detail when we encounter what to watch out for.

    The LH side framework will be enhanced with some PE bits to enhance the good details already provided in the kit.

    Once the PE bits are set, carefully place the frame on forward spar, very well defined notch to place the front locating pin into the notch, the rear spar will be attached to a similar notch to insure alignment. The fit is tight but it also helps to keep alignment true as you continue on to the next step.

    Next up the foot troughs and top of the wheel bay.

    The foot trough is attached to the floor. And put aside to set.

    Next is to install the floor the spar and side frame rail. Place the leading edge over the front spar, and the LH side of the floor attaches under the LH frame rail. The rudder control rods rest on the rear spar.

    Next is the front and rear braces.

    First starting with the rear brace which will be sandwiched between the cockpit framework. Again stay patient and don't worry when it looks off kilter a bit, thats ok. The parts are flexible. Once it is all together it will be aligned properly. The rear brace will have 4 points of contact. 2 front pads attach the rear wing spar. One pin locates on the LH lower part of the frame in a hole for the pin. It looks crooked but thats ok, it will straighten out on its own.

    Next up is the forward brace. Eduards PE gauges, levers are attached and set aside.

    The forward brace has 3 points of contact. One dead center on the rear wing spar and 1 each point on the side frame work. Allow time for the cement to set. Other wise things can break loose and cause unnecessary frustration. Don't worry about how off it looks at first. All the parts to this point fit perfectly in the slots and pin holes. They are delicate and a bit flexible. And it does take quite a bit of handling in this process. Be patient.

    Next the control stick and grip.

    The control I will attach for now but will install the grip later, as finally it is not the greatest attachment point and with a bit more left to do on this step, I will leave it off for now.

    Next up is the rudder pedals and they are attached to the floor. No drama here.

    Next finally to attach the RH frame work to the cockpit assembly.

    Carefully place the rail on the spars, I left it loose as I attached the front and rear braces into place. Perfect and then cement each point as well as the frame to the wing spars and floor.

    Last the rear bulkhead, will attach the seat later.

    More to follow.

  • Profile Photo
    James B Robinson said 3 years, 10 months ago:

    Wow Chuck @uscusn, I had no idea this kit had this much involvement. I'm sure there will be a big sigh of relief and pride once it is completed. As usual, you very detailed build chronicle is greatly appreciated. Keep it up!

  • Profile Photo
    Chuck A. Villanueva said 3 years, 10 months ago:

    Thanks James, after reading several build reviews to get a feel in what to expect on a new mold Airfix Hurricane (new 7 years old already) which is my very first attempt to finally start to build any new mold Airfix kit, and it is so far it has been a pleasant build. Lot's of parts for a WWII fighter. I built the Hase Hurricane Mk IIC when it first came out in the late 90's. Good kit but not even close in the number of parts that is given.